Boost your home's value with crown molding. Our pros share expert tips on materials, installation, and design ideas that make a real impact. Get your free quote!
Key Takeaways
- **MDF (Medium Density Fiberboard):** This is often the most budget-friendly choice. Pre-primed MDF, widely available from brands like Metrie or USG, is easy to source and can be quickly painted. But here's the problem — it hates moisture. Like, really hates it. We're talking swells up and crumbles like a wet cracker if it even *looks* at humidity. It dulls saw blades fast (the adhesive binders do that). And getting truly crisp edges? Forget it. The stuff just doesn't hold detail like real wood. Plus, sanding MDF releases this super-fine dust that gets everywhere — you absolutely need a P100 respirator, not just a paper mask. We usually talk clients out of this unless their budget is genuinely tapped out. Even then, we'll suggest waiting and saving up for something better. It's just not a premium product.
- **Polyurethane (Poly):** Lightweight. Easy to handle (like, ridiculously easy — my 60-year-old aunt installed some herself). Fypon makes probably hundreds of different profiles, and the stuff won't rot, warp, or attract bugs. From ten feet away? Looks great, especially on high ceilings where nobody's scrutinizing it up close. But get closer and yeah, it can feel a bit... plasticky. The texture's different. Some paints don't stick as well without a specialty primer. If you're going for that authentic, high-end feel where people might actually touch the trim, poly might not cut it. Think of it as a really good stand-in, not the real deal.
- **PVC (Polyvinyl Chloride):** Bathrooms, basements, laundry rooms, covered porches — anywhere moisture shows up, this is your answer. AZEK and Royal Building Products make solid PVC trim that won't rot, grow mold, or turn into bug food. Period. It holds paint beautifully (use exterior-grade with UV protection), and humidity changes don't make it swell or shrink like wood does. We installed PVC crown in a basement rec room in Sandy Springs two years ago — the homeowner runs a dehumidifier maybe twice a year, and the trim still looks perfect. Zero maintenance. You literally can't beat it for wet areas.
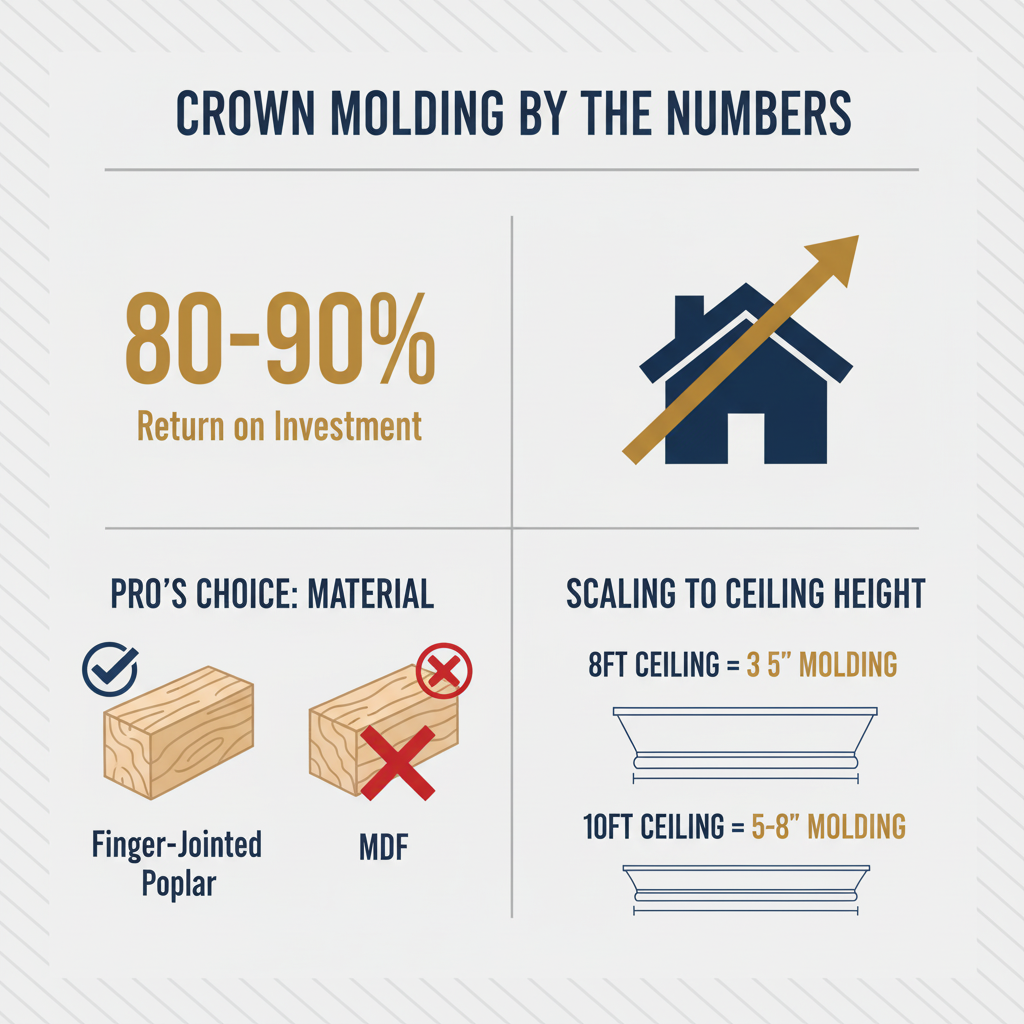
- **Poplar (Our Top Recommendation for Painted Interiors):** About 90% of our interior crown jobs use finger-jointed poplar. Why? It's a hardwood, so it doesn't move around like pine does when humidity changes — no seasonal gaps opening up. Cuts clean as hell (sorry, but it's true — those miters just *snap* together). Takes paint like a dream. And it doesn't cost what oak or maple does. When we worked on that Craftsman in Portland's Irvington neighborhood last year, the homeowner wanted authenticity without breaking the bank. Poplar gave them that solid, substantial feel — you knock on it and it sounds like real wood, not particle board. They said it "felt right for the house." That's what we're after.
- **Oak, Maple, Cherry (Stained Applications):** Want that rich wood-grain look instead of paint? Oak, maple, cherry — these are your options. They've got gorgeous grain patterns and take stain beautifully, showing off those deep, complex tones. Super durable too (like, your grandkids will still be looking at this trim). But they're pricey — sometimes $8-12 per linear foot versus $2-3 for poplar. And cutting hardwood crown? Whole different ballgame. The stuff is dense, splits if you're not careful, and demands sharp blades and precise technique. I watched a homeowner in Decatur try to DIY cherry crown last summer — wasted about $400 in material before calling us. The wood's unforgiving. If you're going stained hardwood, budget for a pro. You'll spend less in the long run (trust me on this one).
Key Takeaways
Crown Molding Installation: A Master Craftsman's Blueprint for Unmatched Elegance
A contractor in Buckhead spent $1,200 fixing crown molding he installed himself. The problem? He thought it was just decorative.
Wrong.
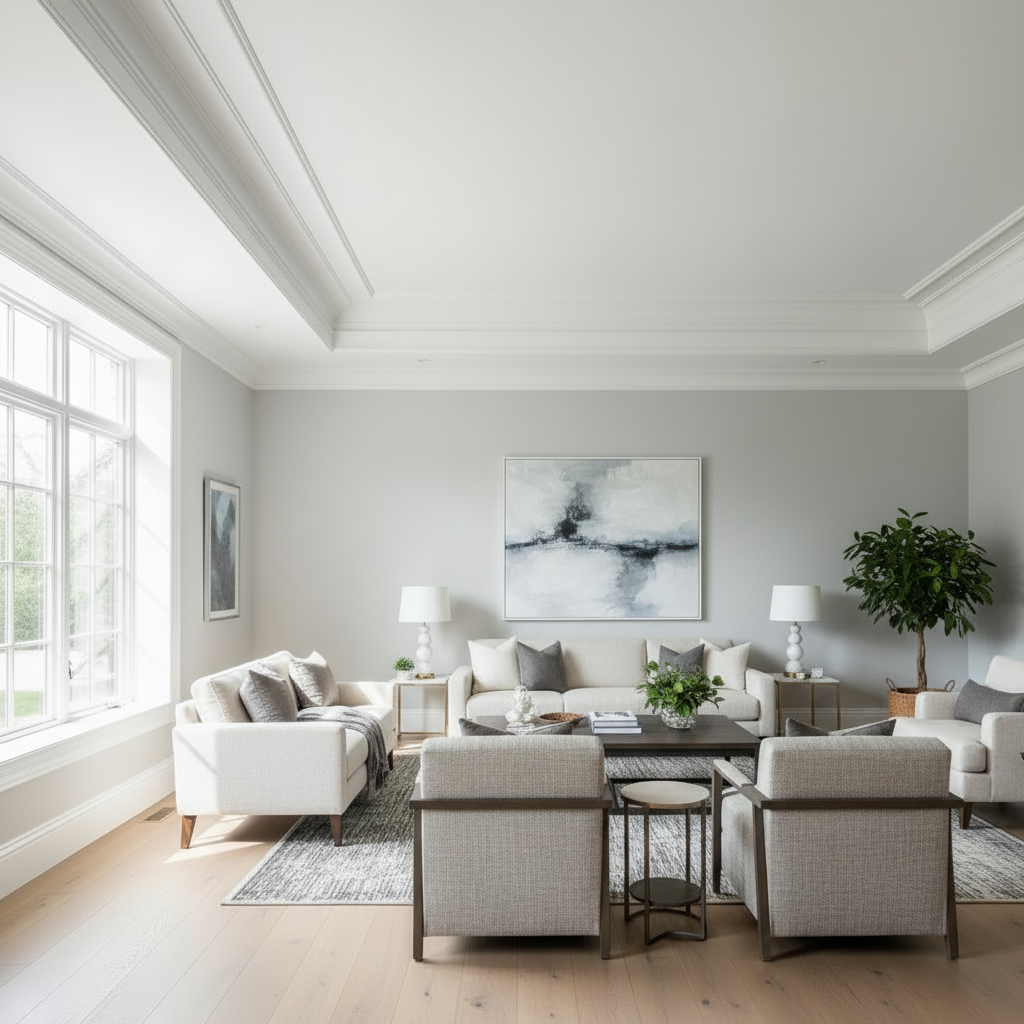
Look — crown molding creates this perfect transition where walls meet ceilings — instantly elevates any room. It's that subtle touch that makes a space feel actually complete, not builder-grade. Adds depth. Character. That "oh, this is a *nice* house" feeling you can't fake with paint. Seriously — it matters.
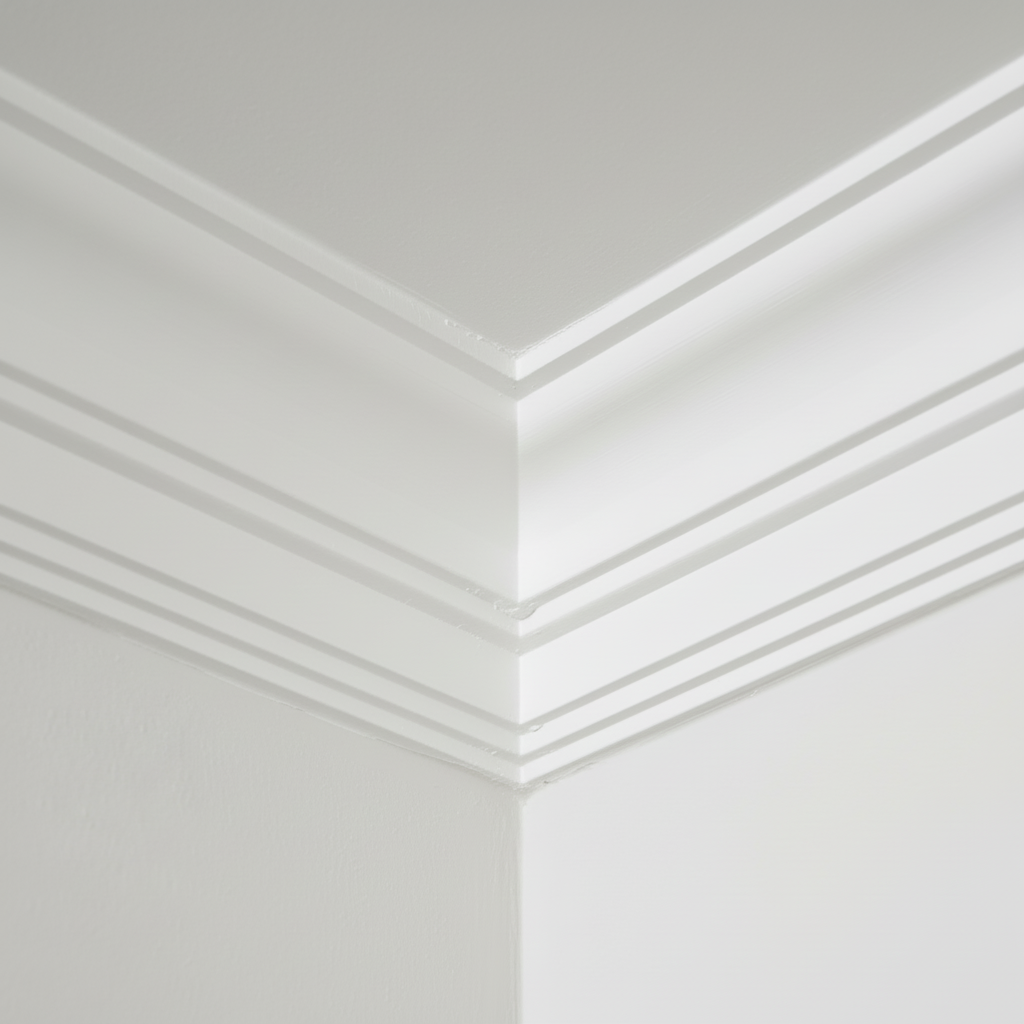
Now, here's the deal: achieving this polished, high-end look goes way beyond simply nailing trim to a wall. The chasm between a rushed DIY attempt and a truly professional installation is vast. That's the real issue. A BizzFactor-certified finish boasts laser-precise mitered corners, absolutely seamless joints that practically disappear, and a design perfectly scaled to its environment. Our guide pulls back the curtain, revealing the exact professional techniques our BizzFactor-certified painters and trim specialists employ to ensure impeccable results. Every single time. You won't believe the transformation.
Why Crown Molding is a Savvy Home Upgrade – Beyond Just Looks
Walk into a room with crown molding and you notice it immediately. That's architectural character. It bumps up your home's value — sometimes by more than you'd expect (we've seen 15-20% increases on resale comps in certain Atlanta neighborhoods). And yeah, it covers those annoying ceiling-wall cracks. The ones you can't unsee once you spot them.
But here's what most people miss: crown molding does more than look pretty. It solves problems.
Many builder-grade homes, frankly, lack any distinct architectural pizzazz. That's a problem. Expert trim work changes that instantly. It's not about copying some Victorian mansion (unless that's your thing, and we can nail historical accuracy). It's about adding intentional detail. Our project last spring in Houston's Montrose neighborhood? Plain boxy living room. Boring as hell. We added properly scaled crown molding and the homeowner literally said "I can't believe it's the same room" five times during the walkthrough. That's the impact of professional trim installation. Total transformation.
And — here's another thing — crown molding acts as a visual unifier. It can tie disparate elements of a room together, creating a cohesive design language. Seriously. Imagine a room with varied furniture styles—crown molding helps them coexist harmoniously. It adds a layer of depth that flat, stark walls simply can't achieve. This dimensionality is key. It tricks the eye into perceiving more space and luxury. And a well-installed crown molding job can even mask slightly crooked walls or ceilings, providing a visual 'leveling' effect. Yes, it's that clever. It's an optical illusion with real benefits. Who doesn't love that?
The Economic Impact: A Solid Return on Investment (ROI)
Here's the thing: let's talk money, because that's what many savvy homeowners prioritize. Real estate agents I know in Denver won't even list a high-end home without crown molding anymore — it's expected at certain price points. NAHB data puts the ROI somewhere between 70% and 100%, though I've personally seen houses in Boulder's Mapleton Hill neighborhood recoup every penny and then some. That's the real issue. One client there spent around $3,200 on whole-house crown installation and sold for $18,000 over asking within three weeks. Coincidence? Probably not.
A property with clean, professionally installed crown molding just *feels* more expensive. Buyers notice. Their agents definitely notice. We've had staging companies specifically request crown molding before open houses — not new countertops, not paint, but trim work. That tells you something.
Choosing the Optimal Crown Molding Material for Your Home: A Deep Dive into Durability & Aesthetics
Look — so what should you actually buy? Depends on your budget, the room's moisture situation, and whether you're painting or staining. Most of our interior work uses finger-jointed poplar (more on why in a second). Bathrooms and basements? PVC, every time. No exceptions.
Picking the wrong material? That's how you end up with warped trim six months later. Or gaps that open up every winter when the heat kicks on. I've torn out plenty of bad MDF installations — homeowners thought they were saving money, ended up spending twice as much fixing it. Here's what actually works:
- **MDF (Medium Density Fiberboard):** This is often the most budget-friendly choice. Pre-primed MDF, widely available from brands like Metrie or USG, is easy to source and can be quickly painted. But here's the problem — it hates moisture. Like, really hates it. We're talking swells up and crumbles like a wet cracker if it even *looks* at humidity. It dulls saw blades fast (the adhesive binders do that). And getting truly crisp edges? Forget it. The stuff just doesn't hold detail like real wood. Plus, sanding MDF releases this super-fine dust that gets everywhere — you absolutely need a P100 respirator, not just a paper mask. We usually talk clients out of this unless their budget is genuinely tapped out. Even then, we'll suggest waiting and saving up for something better. It's just not a premium product.
- **Polyurethane (Poly):** Lightweight. Easy to handle (like, ridiculously easy — my 60-year-old aunt installed some herself). Fypon makes probably hundreds of different profiles, and the stuff won't rot, warp, or attract bugs. From ten feet away? Looks great, especially on high ceilings where nobody's scrutinizing it up close. But get closer and yeah, it can feel a bit... plasticky. The texture's different. Some paints don't stick as well without a specialty primer. If you're going for that authentic, high-end feel where people might actually touch the trim, poly might not cut it. Think of it as a really good stand-in, not the real deal.
- **PVC (Polyvinyl Chloride):** Bathrooms, basements, laundry rooms, covered porches — anywhere moisture shows up, this is your answer. AZEK and Royal Building Products make solid PVC trim that won't rot, grow mold, or turn into bug food. Period. It holds paint beautifully (use exterior-grade with UV protection), and humidity changes don't make it swell or shrink like wood does. We installed PVC crown in a basement rec room in Sandy Springs two years ago — the homeowner runs a dehumidifier maybe twice a year, and the trim still looks perfect. Zero maintenance. You literally can't beat it for wet areas.
- **Poplar (Our Top Recommendation for Painted Interiors):** About 90% of our interior crown jobs use finger-jointed poplar. Why? It's a hardwood, so it doesn't move around like pine does when humidity changes — no seasonal gaps opening up. Cuts clean as hell (sorry, but it's true — those miters just *snap* together). Takes paint like a dream. And it doesn't cost what oak or maple does. When we worked on that Craftsman in Portland's Irvington neighborhood last year, the homeowner wanted authenticity without breaking the bank. Poplar gave them that solid, substantial feel — you knock on it and it sounds like real wood, not particle board. They said it "felt right for the house." That's what we're after.
- **Oak, Maple, Cherry (Stained Applications):** Want that rich wood-grain look instead of paint? Oak, maple, cherry — these are your options. They've got gorgeous grain patterns and take stain beautifully, showing off those deep, complex tones. Super durable too (like, your grandkids will still be looking at this trim). But they're pricey — sometimes $8-12 per linear foot versus $2-3 for poplar. And cutting hardwood crown? Whole different ballgame. The stuff is dense, splits if you're not careful, and demands sharp blades and precise technique. I watched a homeowner in Decatur try to DIY cherry crown last summer — wasted about $400 in material before calling us. The wood's unforgiving. If you're going stained hardwood, budget for a pro. You'll spend less in the long run (trust me on this one).
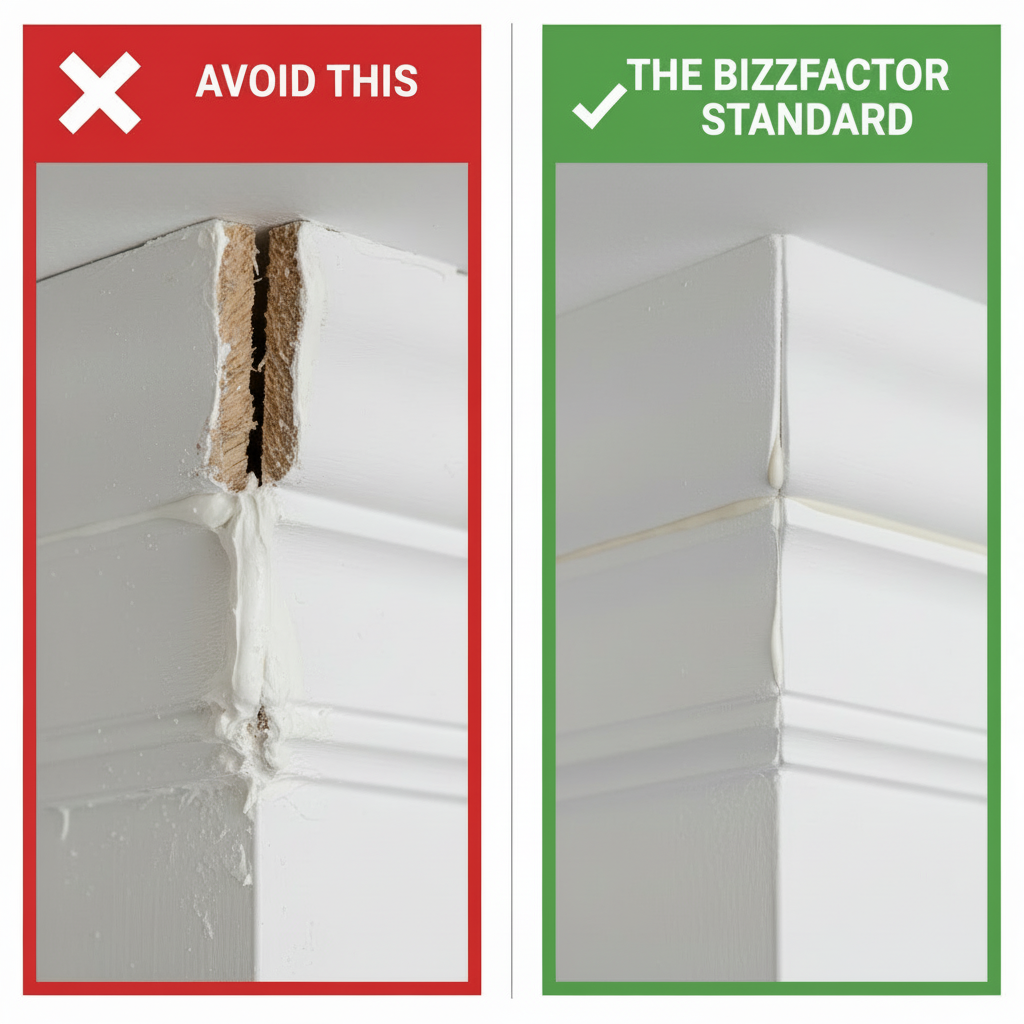
The #1 Crown Molding Installation Mistake Amateurs Make: The Dreaded "End-Cut"
Here's the detail nobody tells you about until it's too late: what happens when your crown molding just... stops? Above kitchen cabinets. On a half-wall. At the side of a doorway that doesn't hit a corner.
Most DIYers make a straight cut and call it done.
Dead giveaway. Looks unfinished. Like you gave up halfway through.
Pros create something called a 'return' — a tiny mitered piece that folds the molding profile back into the wall. Makes it look intentional, like the crown is part of the architecture instead of something you glued on. Sounds simple? It's not. That return piece is usually under two inches long, which means cutting it on a miter saw gets your fingers way too close to the blade (sketchy). We use a coping saw for the final cut, or pre-cut a longer piece and trim it down with a razor knife. Takes maybe three extra minutes per spot.
But the difference? Night and day.
I've seen $5,000 crown installations ruined by bad terminations. Homeowner in Vinings paid a "handyman" to do her dining room — gorgeous 6-inch crown, perfect corners, immaculate paint. Then you look at where it stops above the doorway and it's just... chopped off. Blunt edge staring at you. She paid us $380 to come back and add returns to eight spots. Could've been done right the first time for free. That's what separates weekend warriors from people who do this for a living — we know the details matter.
Optimal Crown Molding Positioning for Visual Impact: The Art of Scale and Proportion
Look — here's where most people screw up: they pick crown molding based on what looks cool at Home Depot, not what actually fits their room. Scale matters. Like, *really* matters. You wouldn't wear a belt meant for someone twice your size, right? Same principle.
For standard 8-foot ceilings, we stick with 3 to 5 inches in vertical height. Smaller than that and it just disappears — looks like you were trying to save money. Bigger and the ceiling feels lower, like it's closing in on you.
Now, got 9 or 10-foot ceilings? Now you can go bigger — 5 to 8 inches works. Keeps everything balanced. The crown needs to match the ceiling height or the proportions feel off. We did a house in Brookhaven with 9-foot ceilings and the builder had installed 3.5-inch crown (probably leftover from another job). Looked puny. Like crown molding for ants. We ripped it out, put in 6-inch, and suddenly the room felt expensive instead of cheap.
Really tall spaces — 12-foot or cathedral ceilings — that's when we stack multiple profiles. Build up this layered, custom look that adds serious visual weight. Saw this in a penthouse in Midtown Atlanta where the designer combined a 5-inch traditional crown with a 3-inch rope detail below it. Total height of 8 inches but way more interesting than a single flat profile. Looked bespoke. Because it was.
Real talk — proportions matter more than most people realize. Stick 8-inch crown in a room with 8-foot ceilings and it'll feel like the ceiling's crushing you.
In-Depth Look
Detailed illustration of key concepts
Visual Guide
Infographic illustration for this topic
Side-by-Side Comparison
Visual comparison of options and alternatives
Sources & References
- 10 'Old' Decor Trends That Have Made a Surprising Comeback
- 6 'old-fashioned' decorating techniques that designers still swear by
- The Beginner's Guide to Vintage Home Decorating: Where to Start
- Interior Designers Share Their Best Traditional Design Tips - Forbes
- Design Trends from the Past that are Making a Comeback
- Best Interior & Exterior Paint Buying Guide
- Best Paint for Commercial Buildings
- Best Industrial Painting Brands: A 2025 Comparison Guide
- Building Codes, Standards, and Regulations: Frequently ...
- PCA Industry Standards - Made Possible by the ...
Frequently Asked Questions
Need Professional Help?
Find top-rated house painters experts in your area