Tired of peeling paint? Our pros reveal the real causes—from moisture to bad prep—and how to fix peeling walls for good. Get expert tips and avoid costly mistakes.
Key Takeaways
- **Latex over Alkyd/Oil:** Without proper sanding (to dull the gloss to at least a 180-grit profile) and a dedicated bonding primer, the latex will 'alligator' or peel in sheets. This is classic for older homes with original oil trim. We see it in older Philadelphia homes all the time.
- **Exterior Primer Mismatch:** Using an interior-grade primer outdoors will lead to chalking and peeling due to UV degradation and moisture susceptibility. Exterior primers demand robust resin systems.
- **Gloss Level:** Applying a flat paint over an un-sanded high-gloss finish, even of the same type, can lead to adhesion problems. The tooth isn't there. The mechanical bond is nil.
Key Takeaways
Why Is My House Paint Peeling? Professional Fixes & Underlying Causes – A BizzFactor Guide
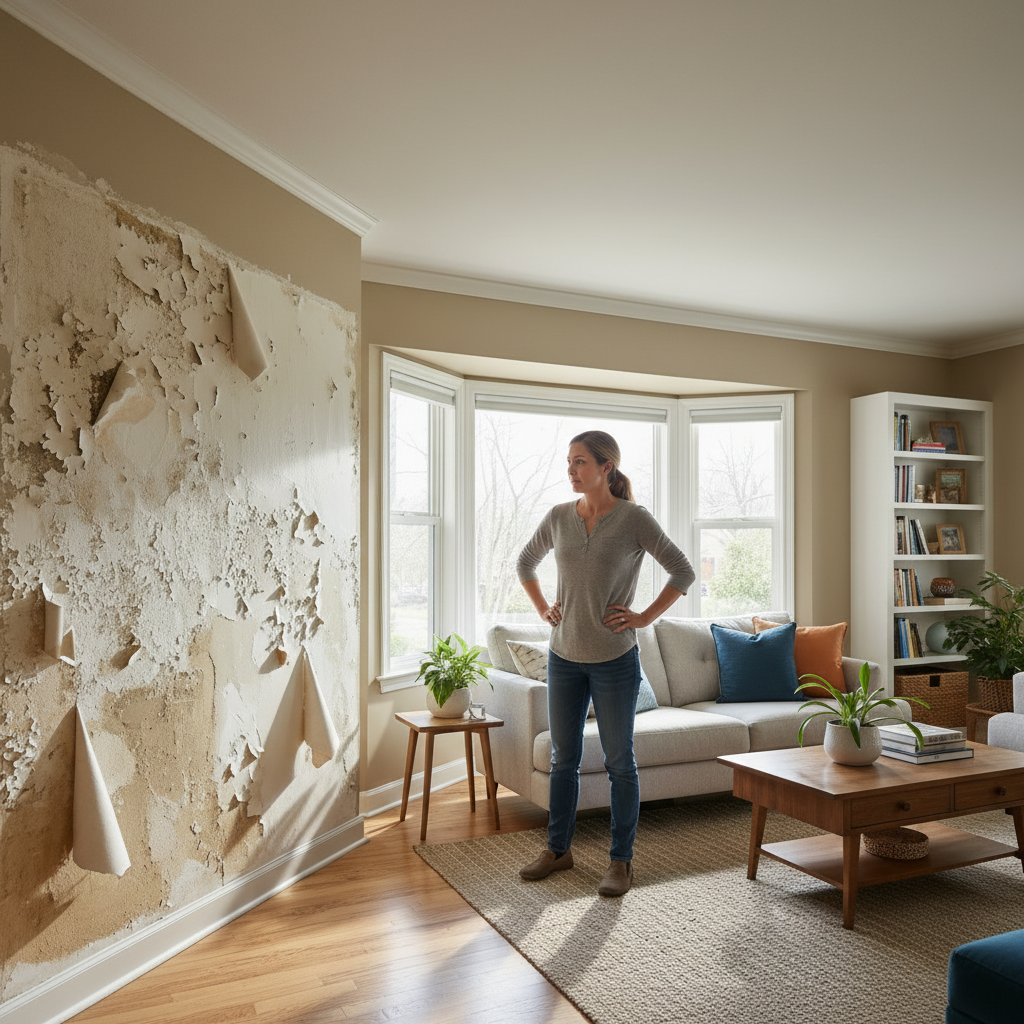
Is your home's paint bubbling, cracking, or peeling off in frustrating sheets? You're not alone. This incredibly common problem is rarely due to a "bad batch" of paint from the manufacturer.
Look — when paint starts failing, it's trying to tell you something. Could be moisture creeping in through a window you didn't know was leaking. That's the real issue. Could be someone (maybe you, maybe the last guy) who basically ignored surface prep entirely. Could be mixing products that chemically hate each other. Seriously, paint rarely fails on its own. Just scraping and repainting? That gives you maybe six months before you're back to square one. Our team has learned (the hard way, trust me) that a lasting solution starts with actually figuring out what went wrong. We don't guess. Let's dig into the real reasons behind paint failure and how to fix it so you don't have to deal with this mess again in a year.
Unmasking Paint Delamination: Beyond the Visible Surface
So your paint's coming off in sheets. The technical term? Delamination. But forget the jargon for a second—here's what's actually happening: you've got trapped moisture pushing from behind, or somebody skipped the surface prep (like, completely skipped it), or there's a chemical war happening between incompatible paint layers.
Pick one. Or all three. I've seen all three.
With over two decades doing this work, our certified painters consistently find that the paint itself is almost never to blame.
Never.
What's going wrong? It's the substrate. The foundation. That wall or trim your paint's trying to cling to is sabotaging everything. Think of it like trying to build a deck on rotting joists — you can stain that wood all day long, but it's still gonna fail. Paint relies entirely on the integrity of what's beneath it. If that substrate is compromised, you're wasting your time and money.
The Critical, Non-Negotiable Role of Surface Preparation
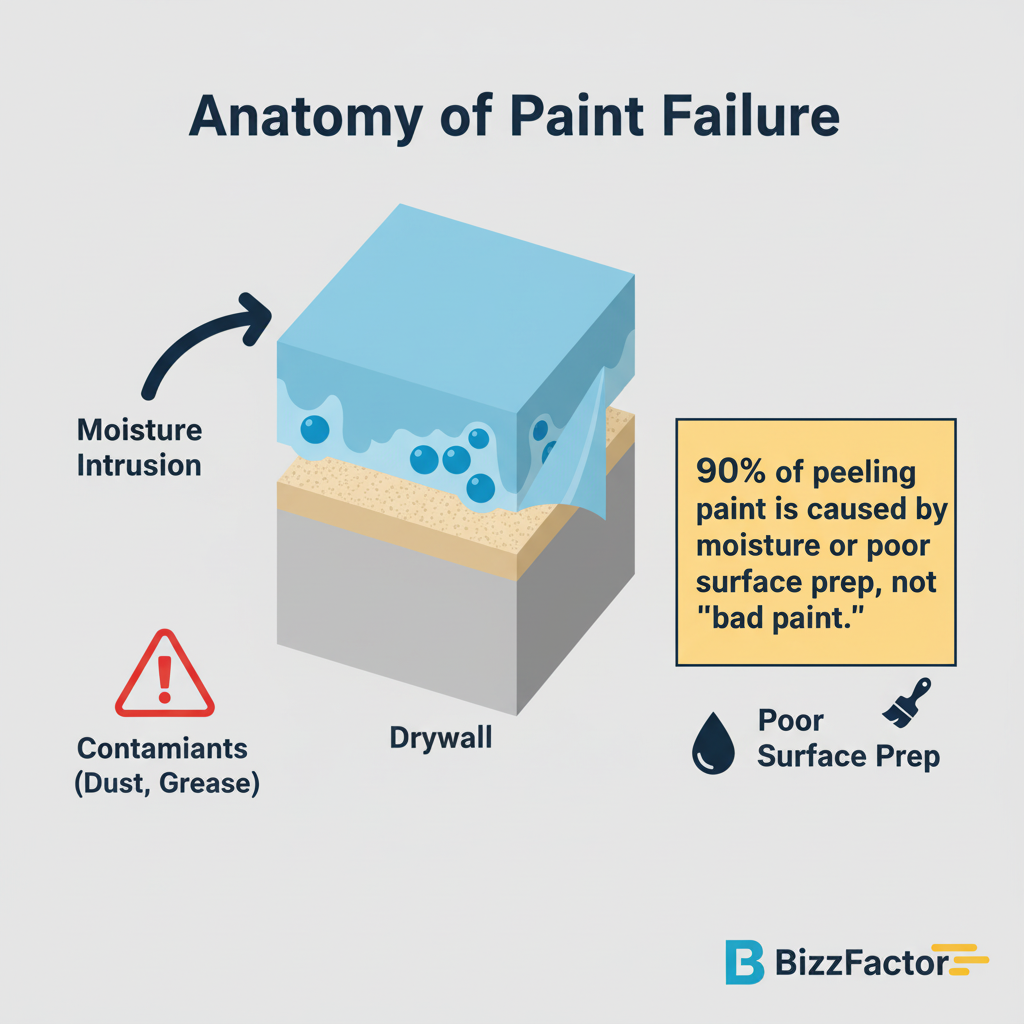
Dirt kills paint jobs. Old chalk residue from weathered coatings. That invisible film of kitchen grease near the stove. Mildew spores in the bathroom. These aren't minor details—they're deal-breakers that'll sabotage even $80/gallon premium paint.
Look — a dirty or improperly prepared surface? Hands-down the most frequent reason we get called out for paint failures. Your new coating needs something clean to grab onto — microscopically etched is ideal, which is why we sand everything to at least 180-grit. If your walls are covered in dust, grease, grime, or that chalky residue from old degraded paint, the new coating just sits on top like a sticker on a greasy bumper.
Won't stick. Can't stick.
We recently got called to a kitchen in Phoenix where bubbles and peel-back appeared within six weeks (six weeks!). The previous crew had completely skipped degreasing, leaving years of cooking oils to effectively repel the new paint. We had to strip everything back to bare drywall. Cost the homeowner around $3,200 to fix what should've been done right the first time for probably $1,800.
Now, Sherwin-Williams and Benjamin Moore publish detailed technical data sheets for *every* product. These sheets specify exact surface prep requirements—stuff like SSPC-SP1 solvent cleaning or SSPC-SP2 hand tool cleaning. Seriously. But most DIYers and even less experienced painters gloss over this step (pun intended, sorry). They're in a hurry or they just don't think it matters that much.
Spoiler: it matters everything.
Moisture: The Undisputed Arch-Enemy of Lasting Paint
Real talk — moisture isn't just surface-level dampness we're worried about.
We're talking hidden plumbing leaks within walls. Compromised flashing around windows or roofs. Excessive humidity in poorly ventulated bathrooms and basements. Even general high ambient humidity in coastal regions (looking at you, Charleston and Savannah).
Here's the thing: water trapped behind your paint builds pressure. Physics 101. That moisture literally shoves the coating away from the wall—first you get those telltale bubbles and blisters, then eventually large peeling patches that look awful. You can't fight water with paint alone.
It always wins.
Our team in South Florida sees this constantly—high humidity coupled with homes that aren't properly sealed. Water works its way in like it has all the time in the world (because it does). Seriously. That's why we always carry professional-grade moisture meters like the Tramex Moisture Encounter or Flir MR160. No guesswork. We need accurate readings—typically aiming for below 12% moisture content in wood and below 5% for drywall before painting—to identify the source and extent of moisture damage before any paint touches the wall.
Chemical Incompatibility and Layering Mistakes: A Recipe for Disaster
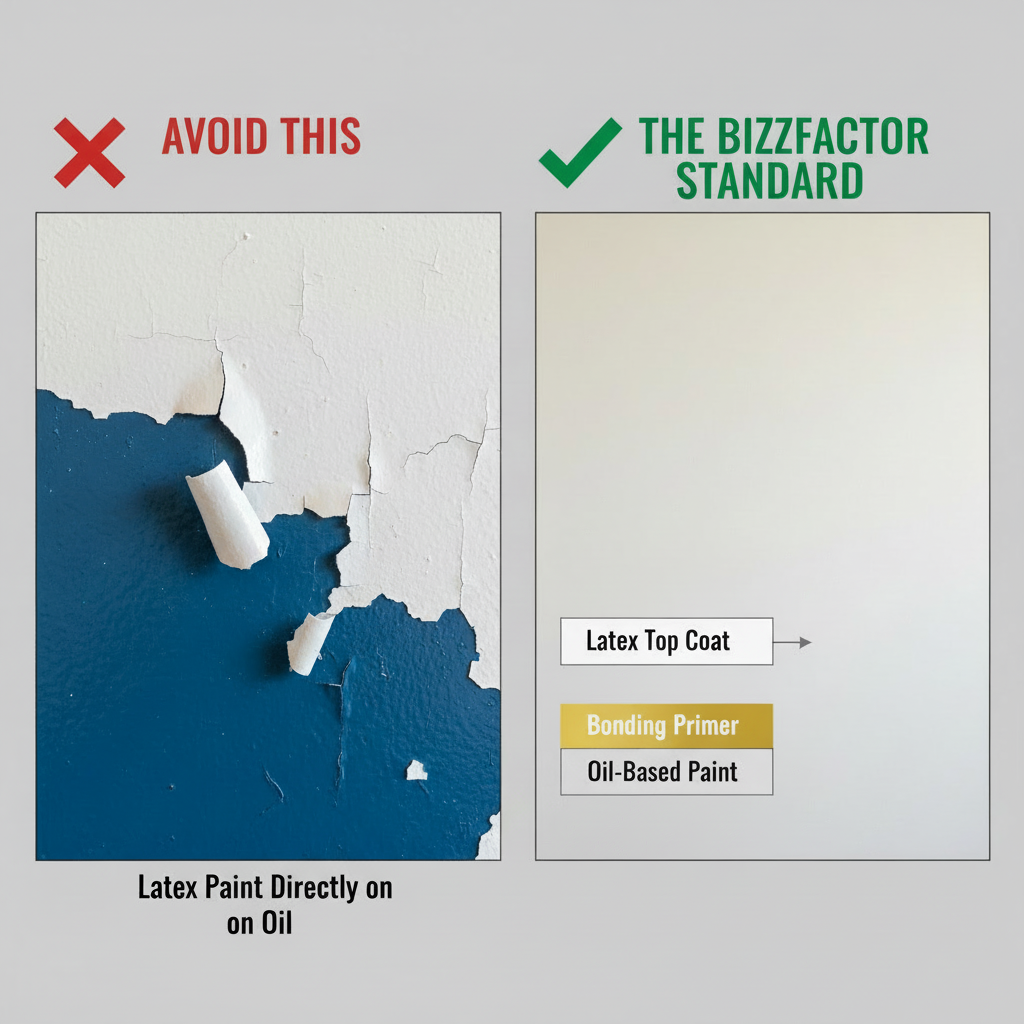
You know what makes me cringe? Watching someone roll modern latex right over glossy old oil-based trim. No primer between them. No scuff-sanding to give it tooth. Just slap it on because "paint is paint," right?
Wrong. So wrong.
Oil-based and latex paints don't play nice together—different molecular structures, different flexibility, different everything. That latex literally can't grab the slick oil surface. Then winter comes, summer comes, the house breathes, and those two layers start moving at different rates. The top layer says "I'm outta here" and just... pops off in sheets. I've pulled off sections the size of dinner plates with my bare hands.
Even premium products like [Sherwin-Williams Emerald](https://www.sherwin-williams.com/homeowners/products/emerald-interior-latex-paint) or [Benjamin Moore Aura](https://www.benjaminmoore.com/en-us/interior-exterior-paints-stains/product-catalog/aura/aura-interior-paint) will fail dramatically if applied incorrectly over an unprepared incompatible surface.
The solution?
A dedicated bonding primer—a critical step frequently overlooked by homeowners and even less experienced painters. It's simple chemistry. If they don't like each other, they'll separate. Always.
**Common Incompatibility Issues:**
- **Latex over Alkyd/Oil:** Without proper sanding (to dull the gloss to at least a 180-grit profile) and a dedicated bonding primer, the latex will 'alligator' or peel in sheets. This is classic for older homes with original oil trim. We see it in older Philadelphia homes all the time.
- **Exterior Primer Mismatch:** Using an interior-grade primer outdoors will lead to chalking and peeling due to UV degradation and moisture susceptibility. Exterior primers demand robust resin systems.
- **Gloss Level:** Applying a flat paint over an un-sanded high-gloss finish, even of the same type, can lead to adhesion problems. The tooth isn't there. The mechanical bond is nil.
⚠️ The Costly Myth of the Quick Fix
So you grab a scraper, knock off the loose stuff, maybe hit it with some sandpaper, slap on a fresh coat. Done in an afternoon, right?
I get it. You're busy. You want it fixed now.
But this approach is merely a temporary cosmetic repair. You haven't found the leak. You haven't tested for incompatible layers underneath. You haven't checked if your bathroom fan even works (spoiler: probably not). That new paint job? Destined for premature failure within 8-14 months. Guaranteed. This cycle then leads to recurring expenses for repainting without ever truly resolving the problem.
It's throwing good money after bad.
Now, we've seen homeowners in Buckhead spend close to $5,000 over three years just masking the same moisture problem instead of spending $2,100 once to actually fix it. That's the real killer. Don't be that person.
Our Professional Diagnostic Approach: Solving the Root Cause & Ensuring Durability
Here's what most people don't get: another gallon of paint won't fix chronic peeling. Not even close. Quality paint is just the final step—and honestly, the easiest part—of actually solving the problem.
We show up for persistent peeling with diagnostic equipment, not paintbrushes. Moisture meters (Tramex or Delmhorst models, usually around $300-400). Adhesion tests with actual blades and tape (ASTM D3359 cross-hatch testing—sounds fancy, but it just tells us how well paint is bonded). Thermal cameras to see where water's sneaking in. Sometimes we're crawling around in attics. Sometimes we're outside staring at your gutters for twenty minutes.
Because painting over a leak is like putting a band-aid on a bullet wound.
We've called roofers before touching a single wall. We've recommended $400 dehumidifiers before opening a paint can. Last month in Marietta, we found a pinhole leak in a shower pan that nobody knew existed—had been there probably two years, just slowly destroying the hallway wall on the other side. Fixed the plumbing first, then stripped and repainted. That job hasn't failed, and it won't, because we fixed what was actually broken.
Pro Tip: Reinforcing Stubborn Edges
Okay, so you've scraped off all the loose stuff. But you're left with these feathered edges of old paint that won't fully come off—they're still stuck, but they create these visible ridges that'll absolutely show through your new topcoat. Drives people crazy.
So — so — here's what the pros do that nobody tells you about: peel-bonding primer. Stuff like [Zinsser Peel Stop Triple Thick](https://www.rustoleum.com/product-catalog/consumer-brands/zinsser/peel-stop-triple-thick-primer) or X-I-M Peel Bond. You brush this thick, almost glue-like primer right over those stubborn edges, and it literally glues them down while filling in the transition. Dries hard as a rock. Creates a smooth, uniform surface that doesn't telegraph through your finish coats.
Game changer. Costs maybe $35 a quart, but it's the difference between a repair that looks professional versus one that looks like... well, a repair.
Case Study: Restoring a 1920s Colonial Home's Interior in Chevy Chase, MD
So we got called out to Chevy Chase (just outside D.C.) for a homeowner whose beautiful 1920s Colonial had widespread paint peeling on the main floor. This was less than a year after a supposedly full repaint. The previous contractor blamed "bad paint" and—shocker—was conveniently unreachable.
Our lead technician, Sarah, immediately suspected deeper issues. It's almost never the paint. Never.
She pulled out a Tramex Moisture Encounter meter and started scanning. High moisture readings along exterior-facing walls. High readings around window frames. These readings were way above the acceptable 8-12% range for interior drywall (we like to see below 8% before painting).
Active water intrusion, confirmed.
Then we discovered the second problem: the previous crew had slapped latex paint directly over the home's original, glossy oil-based trim. No prep. No primer. Nothing.
Moisture *plus* incompatibility.
Nightmare scenario.
The solution wasn't quick or cheap, but it guaranteed permanence. Our EPA RRP-certified team meticulously:
1. **Stripped all failing paint:** Careful scraping, infrared heat guns (on non-lead surfaces, max 700°F to avoid vaporizing lead), and targeted chemical strippers (methylene chloride-free for safety) where necessary. For lead paint areas (which this home definitely had), we implemented strict containment protocols per EPA RRP guidelines—poly sheeting, negative air pressure, immediate HEPA vacuuming. This is serious business. Don't mess around with lead.
2. **Addressed the moisture source:** External repairs included re-caulking windows with [Sherwin-Williams 850A Elastomeric Sealant](https://www.sherwin-williams.com/homeowners/products/sherwin-williams-850a-elastomeric-sealant) (up to 50% joint movement capability), repairing a small gutter leak we identified via water test, and improving attic ventilation by adding passive vents to meet 1:300 attic ventilation ratio requirements. We also found a small, almost invisible crack in a downspout allowing water to wick directly into the wall cavity. Unbelievable.
3. **Applied
In-Depth Look
Detailed illustration of key concepts
Visual Guide
Infographic illustration for this topic
Side-by-Side Comparison
Visual comparison of options and alternatives
Sources & References
- How to Fix Flaking, Cracking, and Peeling Paint - Sherwin-Williams
- Science of Paint Failure: Why Peeling, Bubbling, and Fading
- How to Repair Wall Paint: A Step-by-Step Guide🛠️ - Tribble Painting
- Solving the Puzzle of Paint Peeling: Expert Tips from a Professional ...
- Interior Painting Tips: Best Practices From an Expert - This Old House
- Best Interior & Exterior Paint Buying Guide - Consumer Reports
- Best Paint for Commercial Buildings - Miko LLC
- Best Industrial Painting Brands: A 2025 Comparison Guide
- PCA Industry Standards - Made Possible by the PCA Education ...
- Building Codes, Standards, and Regulations: Frequently Asked ...
Frequently Asked Questions
Need Professional Help?
Find top-rated house painters experts in your area