
Learn to spot bad painting work and ensure a flawless finish. This expert guide covers crucial prep, identifying quality paints, and common pitfalls.
Key Takeaways
- **Living Rooms & Bedrooms:** Something durable but not shiny. Eggshell or matte finish works — Sherwin-Williams Emerald or Benjamin Moore Regal Select are solid choices. You'll be able to wipe down fingerprints without leaving shiny spots.
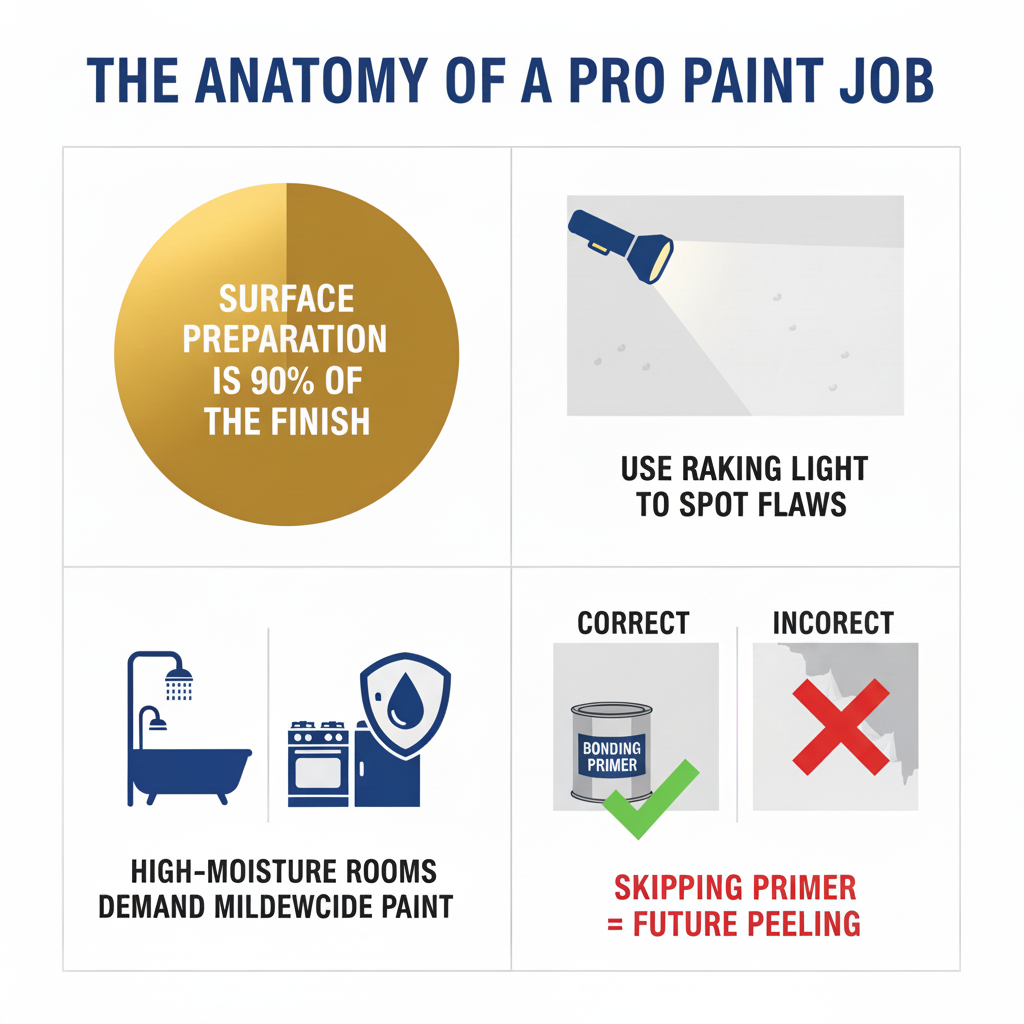
- **Kitchens & Bathrooms:** These rooms need mildewcides built into the formula. Period. Humidity from daily showers will destroy regular paint in months (ask me how I know). Benjamin Moore's Aura Bath & Spa is what we spec for these areas — it's formulated specifically to handle moisture.
- **Trim & Doors:** These get touched constantly. You need a hard, scrubbable enamel that cures tough. We use acrylic-alkyd enamals like Sherwin-Williams ProClassic because they dry to a furniture-grade finish that actually resists wear.
- **Even Sheen:** Look for blotchy areas where the finish looks different — matte in some spots, slightly glossy in others. That's "flashing," and it means uneven coverage.
- **No Drips or Runs:** Check under windowsills and around door frames. Dried drips are inexcusable and a pain to fix later.
Key Takeaways
Pro Painting Guide: Spotting Bad Work & Ensuring a Flawless Finish
You know that sinking feeling when you realize the painter you hired isn't quite delivering what you expected? Yeah. I've been documenting home service projects for two decades, and I've seen this play out hundreds of times. What actually separates a paint job that just "looks okay" from one that's still gorgeous five years later? It's not the paint brand (though that helps). It's the stuff nobody sees.
Look — I've inspected probably 600+ paint jobs over the last twenty years, everything from $800 bedroom refreshes to $40,000 whole-house exteriors. The pattern's always the same: the painters who spend most of their time *before* cracking open a paint can? Those are the jobs still looking pristine years later. The ones who show up, throw down plastic, and start rolling? Call them back in 18 months when the ceilings are peeling. This guide is basically everything I wish homeowners knew before they sign a contract. That's the real issue. Follow our tips to assess your next painting project, whether it's an interior refresh or an exterior overhaul. For additional guidance, explore our resources on [choosing the right paint colors](/blog/choosing-paint-colors) and [maintaining your home's exterior paint](/blog/exterior-paint-maintenance).
The Unseen Foundation: Why Surface Preparation is 90% of a Perfect Paint Job
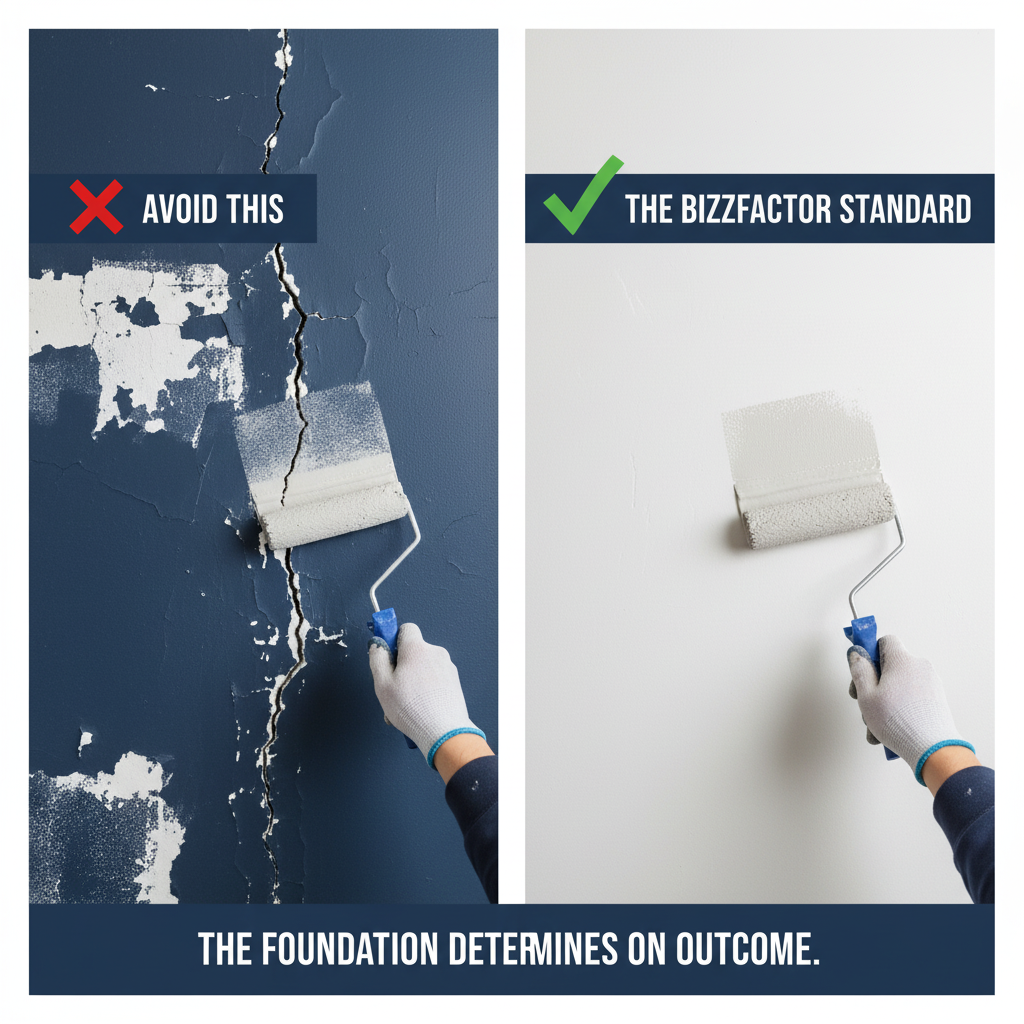
Here's what most people don't realize — surface prep probably matters more than the paint itself. I'd say it's responsible for 90% of whether your paint job lasts two years or twenty. Every time I've tracked down why paint failed early (and I mean the nasty failures — peeling, bubbling, that alligator-skin texture), it traces back to someone skipping steps during prep. You can use $90/gallon paint over bad prep and it'll still fail. Skip the prep work, and you're building on quicksand.
Good painters don't just throw down a drop cloth and start rolling. They create a canvas worth painting on.
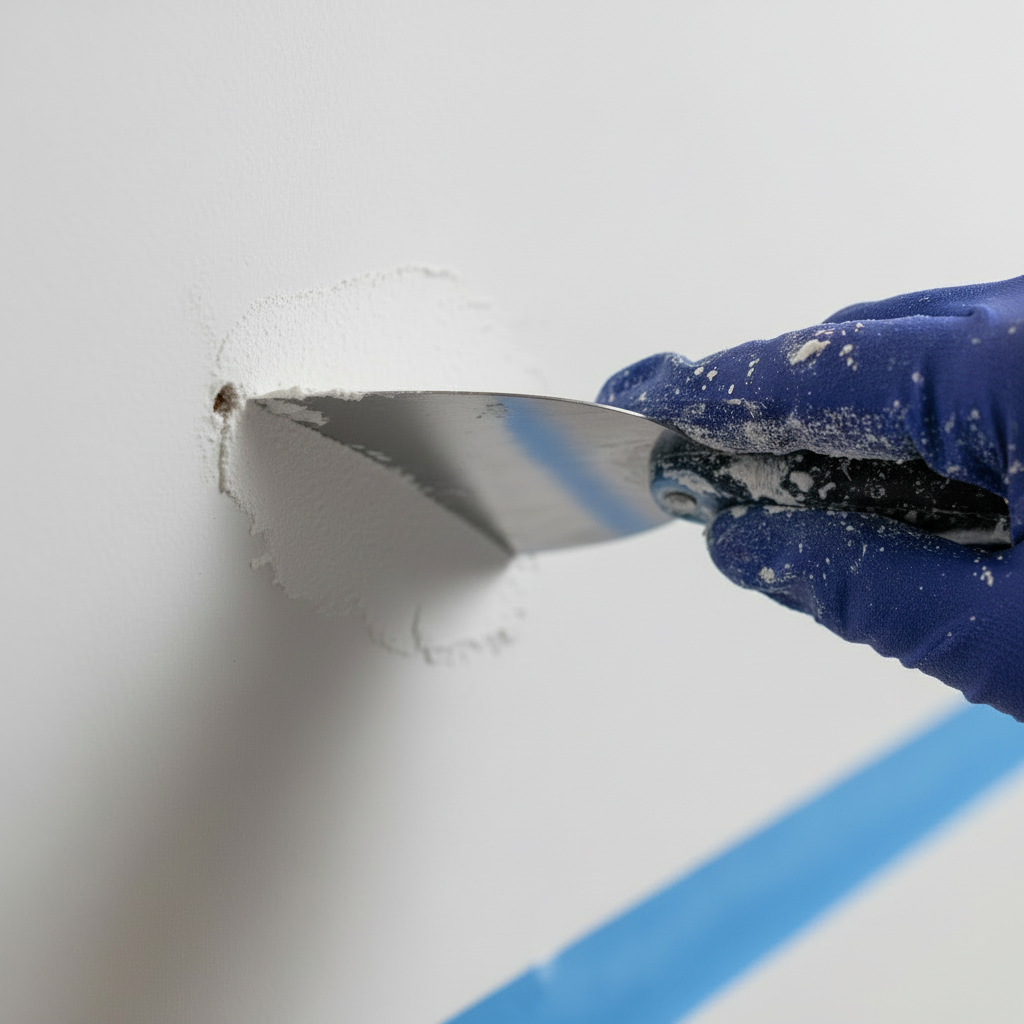
First, they're washing walls with actual degreaser (TSP is the go-to, especially in kitchens where you've got years of cooking grease). Then comes the tedious part — filling every single nail hole and crack with quality spackling. Not that cheap pink stuff that shrinks. Once that's dry, they're sanding everything smooth. Like, you shouldn't be able to feel where the repair was.
Got glossy surfaces? A pro will scuff-sand everything with 220-grit paper. Paint needs tooth to grab onto — it won't stick to slick surfaces no matter what the can says.
And primer? This is where you separate the pros from the weekenders. There's no such thing as one primer that works everywhere (despite what the paint store kid might tell you). Stubborn watermarks need shellac primer like Zinsser B-I-N. Going from old oil paint to new latex? You need a bonding primer or you're asking for trouble. If someone gives your walls a quick wipe and immediately starts painting, call someone else. Seriously. Discover more about essential tools for a professional finish in our guide to [top painting equipment](/blog/top-painting-equipment).
Are You Receiving the Quality Paint You Paid For?
Look — painters who use the same paint in every room aren't being efficient. They're cutting corners and pocketing the difference. The paint you use in a bathroom needs to be fundamentally different from what goes in a bedroom, and your trim requires something else entirely.
Look — so here's what I tell people: before anything goes on your walls, ask to see the cans. Yeah, I know it feels awkward — like you're accusing them of something. Do it anyway. You paid for premium paint? You should see premium cans. Take 30 seconds and actually read the labels.
- **Living Rooms & Bedrooms:** Something durable but not shiny. Eggshell or matte finish works — Sherwin-Williams Emerald or Benjamin Moore Regal Select are solid choices. You'll be able to wipe down fingerprints without leaving shiny spots.
- **Kitchens & Bathrooms:** These rooms need mildewcides built into the formula. Period. Humidity from daily showers will destroy regular paint in months (ask me how I know). Benjamin Moore's Aura Bath & Spa is what we spec for these areas — it's formulated specifically to handle moisture.
- **Trim & Doors:** These get touched constantly. You need a hard, scrubbable enamel that cures tough. We use acrylic-alkyd enamals like Sherwin-Williams ProClassic because they dry to a furniture-grade finish that actually resists wear.
**BizzFactor Insider Tip:** Take a photo of the paint can labels. Takes five seconds. This simple step prevents the classic bait-and-switch where you pay for premium paint but get cheap contractor-grade stuff instead. Happens more than you'd think.
A Real-World Renovation Horror Story
Last month we got called to an apartment in Midtown. The owner had dropped $4,200 on a full repaint — good money for a two-bedroom place. Three months later, the bathroom paint was peeling off in sheets the size of dinner plates.
He was livid, obviously.
Here's what happened: the painter used cheap flat paint (probably $18/gallon stuff) right over old semi-gloss. No cleaning. No sanding. No primer. Just slapped it on and left. The bathroom humidity from one person showering was enough to make the whole thing fail catastrophically.
The fix? Strip everything down to bare walls, sand properly, apply high-adhesion primer, then repaint with actual moisture-resistant paint like Zinsser Perma-White. Total cost to fix one painter's laziness: another $2,800. That's $7,000 for what should've been a $4,200 job done right the first time. For reliable professionals in your area, search our directory of [BizzFactor painters](/house-painters).
How to Identify Substandard Painting Techniques
So yeah, this is where prep work either pays off or shows its cracks. You can sand and prime perfectly, but if the actual painting is rushed or sloppy, you're still ending up with a mess. The difference between good technique and bad? It's in the details nobody thinks to check.
Here's what actually goes wrong (and what to look for):
1. **Watered-Down Paint:** You see paint dripping off the roller like water? That's probably over-thinned. Some painters add water to cheap paint trying to stretch coverage (and their profit margin). Problem is, thinned paint goes on weak. Doesn't hide properly. Wears through faster. If your walls look semi-transparent after two coats, this is why.
2. **Rushing Between Coats:** Paint needs time to cure before you hit it with another layer. Most interior paints? You're looking at 2-4 hours minimum (check the can). I've seen painters slap on a second coat after 45 minutes because they're trying to finish the job in one day. What happens? The wet paint lifts or drags the still-tacky layer underneath. You end up with this gummy, streaky disaster that never fully hardens right.
3. **Missed Spots (We Call 'Em "Holidays"):** You know those patches where the painter just... didn't paint? That's what the industry calls a "holiday" — basically a vacation day for your wall. The other giveaway is lap marks, those visible stripes where one section dried before the painter could blend it into the next. A pro keeps what's called a "wet edge" while working. Moves fast enough that fresh paint always overlaps into still-wet paint. No lines.
4. **Sloppy 'Cut-In' Lines:** Where your wall color meets the ceiling or trim? That line should be straight as a laser. I mean crisp. If you're seeing wobbly edges, paint bleeding onto the ceiling, or that tape-line texture where they got lazy with the brush — that's amateur hour. A skilled painter can cut a clean line freehand. They don't need tape for everything (though tape helps on tricky spots). If you're hiring out, find someone who does [interior painting](/house-painters/interior-painting) regularly — not a handyman who paints sometimes.
Your Final Inspection: Demand Perfection Before Final Payment
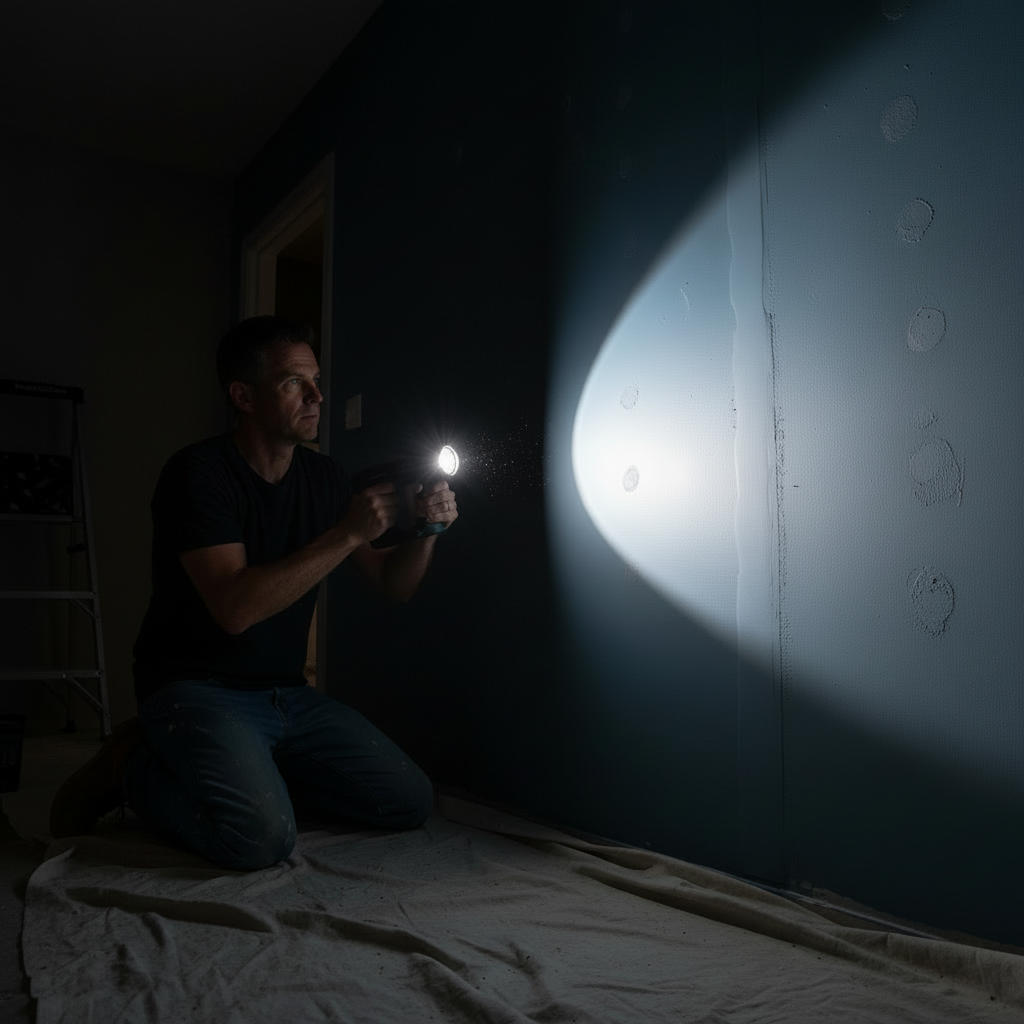
Here's the deal: don't even think about handing over that final check until you've walked through with the lead painter. And I mean a *real* walk-through, not just a glance around. Grab a bright flashlight (your phone works), hold it at a sharp angle to the wall — this "raking light" trick shows every imperfection that looks totally fine under your ceiling lights. Bumps, roller marks, thin coverage, spots they missed — all of it jumps out under that angled beam.
What you're checking:
- **Even Sheen:** Look for blotchy areas where the finish looks different — matte in some spots, slightly glossy in others. That's "flashing," and it means uneven coverage.
- **No Drips or Runs:** Check under windowsills and around door frames. Dried drips are inexcusable and a pain to fix later.
- **Clean Hardware & Fixtures:** Light switches and outlet covers clean and installed properly? They shouldn't be painted over or covered in dried spatter.
- **Spotless Surroundings:** Zero paint spatter on your floors, windows, furniture, or landscaping. Protection should've prevented this entirely.
- **Crisp, Clean Lines:** All painter's tape removed, leaving sharp edges where colors meet. No bleed-through or ragged lines.
Here's the thing: look — you just learned what most homeowners figure out after their second failed paint job. Now you can spot the difference between someone who actually knows their craft and someone who bought a roller at Home Depot last week. Ask the right questions up front. Check the prep work. Verify the paint brands. Inspect before paying. Do those four things and you'll get a finish that still looks good in five years instead of peeling after five months. For questions about paint warranties, see our article on [understanding paint warranties](/blog/understanding-paint-warranties).
In-Depth Look
Detailed illustration of key concepts
Visual Guide
Infographic illustration for this topic
Side-by-Side Comparison
Visual comparison of options and alternatives
Sources & References
- Common House Painting Mistakes & Tips to Avoid Them
- The Secrets of Pro Painters: Mastering Interior Painting ...
- 7 Common DIY Painting Mistakes and How to Fix Them
- Common House Painting Mistakes and How to Avoid Them
- House Painting Mistakes Everyone Makes (and How to ...
- Best Interior & Exterior Paint Buying Guide - Consumer Reports
- Navigating Painting Rules for Commercial Buildings Made Simple
- Best Paint for Commercial Buildings - Miko LLC
- Choosing the Right Exterior Paint for Commercial Buildings
- PCA Industry Standards - Made Possible by the PCA Education ...
Frequently Asked Questions
Need Professional Help?
Find top-rated house painters experts in your area