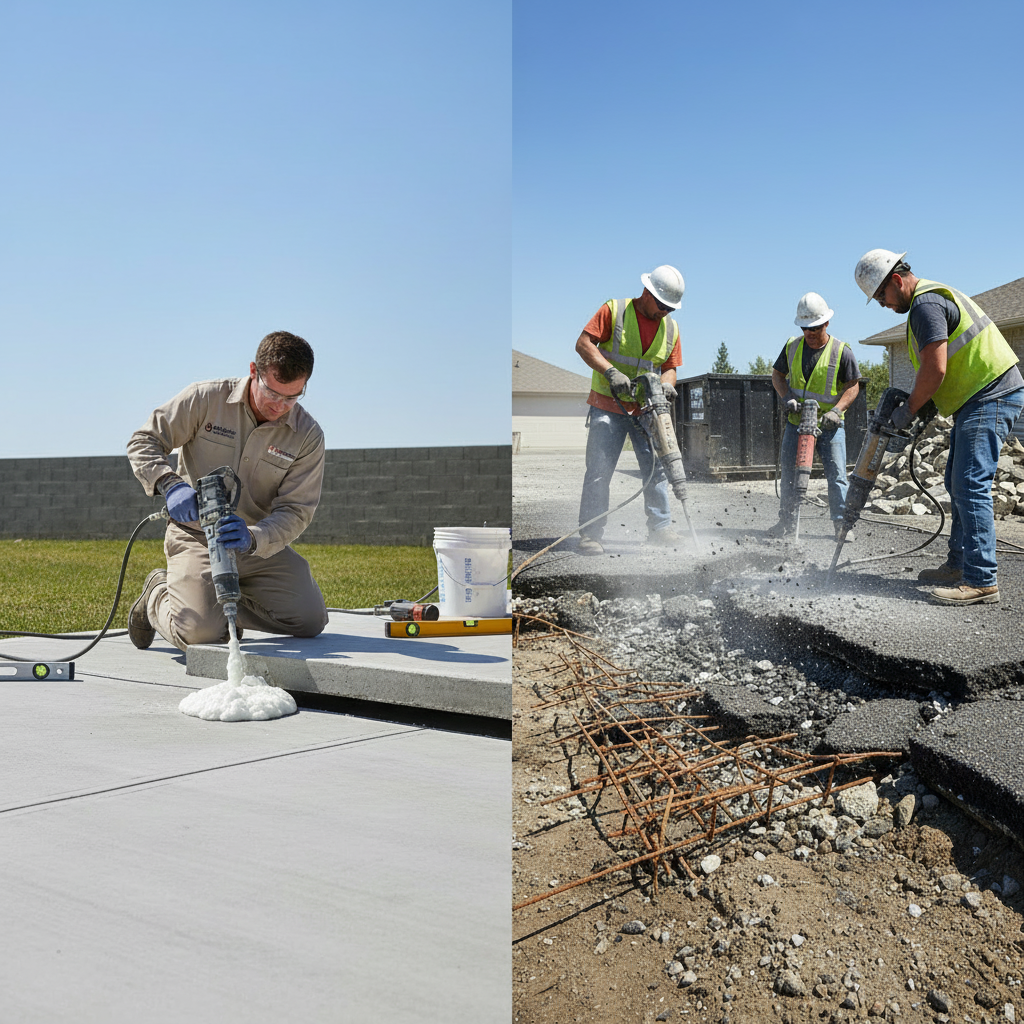
Compare concrete leveling vs. replacement costs in 2025. Learn when to repair settled slabs or opt for full removal, with prices from $3-$25 per sq ft.
Key Takeaways
- **Excessive Settlement:** Over 3-4 inches with widespread connecting cracks. Sub-base failure *and* structural collapse. This usually means catastrophic underlying soil issues or severe subsidence.
- **Widespread Cracking:** Cracks exceeding 1/4" width with vertical displacement, or dense interconnected patterns (alligator cracking, map cracking). Systemic failure that compromises load transfer. The American Concrete Institute defines significant cracking as anything affecting structural integrity or serviceability.
- **Exposed Rebar or Aggregate:** The slab's guts are showing. That's advanced deterioration. Freeze-thaw cycles and de-icing salts accelerate this, leading to rebar corrosion, spalling, and further breakdown.
- **Spalling & Crumbling:** Severe pitting or efflorescence indicates compromised concrete mix or freeze-thaw damage. Water infiltrates and freezes, or salts draw moisture and recrystallize, exerting internal pressure. Poor concrete cover over rebar (less than 1.5 inches for exterior slabs) accelerates this.
- **Multiple Sinking Zones:** Large sections uniformly compromised. Systemic, not localized. This suggests a widespread sub-base issue that spot leveling won't address.
Key Takeaways
Concrete Leveling vs. Replacement: The Definitive 2025 Cost Guide
A cracked driveway in Magnolia just cost a homeowner $14,300 because she waited too long to act. The settling started at maybe half an inch. Two years later? Four inches, with a crack you could lose your keys in.
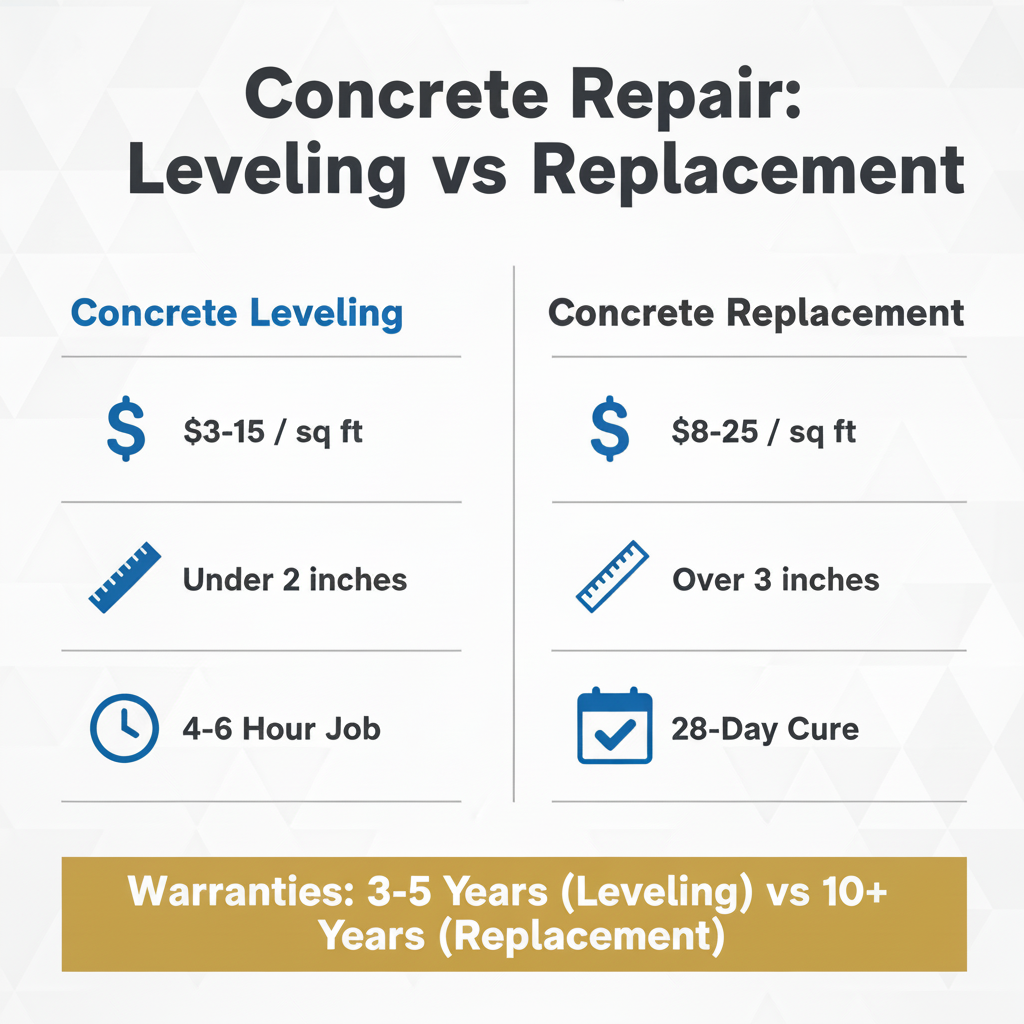
Concrete issues sneak up on you — one day it's a minor trip hazard, the next you're watching water pool against your foundation after every rain. But here's what actually matters: concrete leveling (for slabs that dropped 2-3 inches or less) typically costs **$3 to $15 per square foot**. Full replacement — ripping everything out and starting fresh — runs **$8 to $25 per square foot**. That's a big spread, and choosing wrong costs you twice.
Look — look — at BizzFactor, my team evaluated 500+ concrete projects this year across Puget Sound alone. Most homeowners face the exact same question: repair or replace? The answer isn't about price tags. It's about damage severity, what *caused* the damage, and what's happening in the soil underneath. Skip those factors and you're gambling.
Deciphering Your Concrete Conundrum: Repair or Replace?
You've got three options here. Slab jacking. Polyjacking. Foam jacking. They're all the same basic concept — inject stuff under settled concrete to push it back up. Replacement? That's the nuclear option. Rip everything out, haul it away, start over.
Our certified pros assess three things: settlement depth, crack patterns, and soil stability. I've seen panicked homeowners in Wallingford after harsh winters, convinced their cracked patio means foundation collapse. That's the real issue. Twenty years in this business taught me that surface cracks don't automatically equal disaster. (But sometimes they do — that's why you need actual measurements, not guesswork.
Here's our approach: laser levels that read settlement to 1/16th of an inch. Why that precise? Because guessing costs you thousands. Those crack patterns tell a story, too. Hairline cracks radiating from a central point? Usually just natural settling. Wide cracks with vertical displacement — that's soil erosion or washout underneath. The diagnostic phase costs maybe $150-$300, and it'll save you from wasting five grand on the wrong fix.
The Art and Science of Concrete Leveling
So leveling works by shooting stabilizing materials into voids below the slab — either high-density polyurethane foam or cementitious slurry. The slab lifts back to original height, fixing drainage and eliminating trip hazards. Most residential jobs? 2-6 hours, start to finish.
**Polyurethane Foam Injection (Polyjacking/Foamjacking):** Two chemicals mix and expand into a rigid foam. Cures fast — 15 minutes to maybe an hour. Super light (2-4 pounds per cubic foot), which matters when you're dealing with soil that's already questionable.
Most contractors I know prefer foam. Speed. Precision. Done by lunch. Creates a stable base that won't wash out when the next storm rolls through.
We use formulations that meet ASTM D2842 for water absorption — basically testing to make sure the foam won't soak up moisture and fail. The density matters here. Lighter foams (under 4 pounds per cubic foot for lifting) put less stress on already unstable soil. That's a huge benefit.
**Mudjacking (Slab Jacking):** The old-school method from the 1930s. Hydraulic pump forces cement-sand-water slurry under the slab. Add some bentonite clay sometimes to reduce shrinkage. Cheaper for big, simple voids.
Downside? Cure time runs 24-72 hours before you can park on it. You're waiting three days to use your own driveway. The mix is straightforward — Portland cement (Type I or Type II), fine sand, water. Nothing fancy, but it works.
From my experience — foam gives you precision and speed. Mudjacking works fine for older slabs where budget trumps everything and you don't mind waiting.
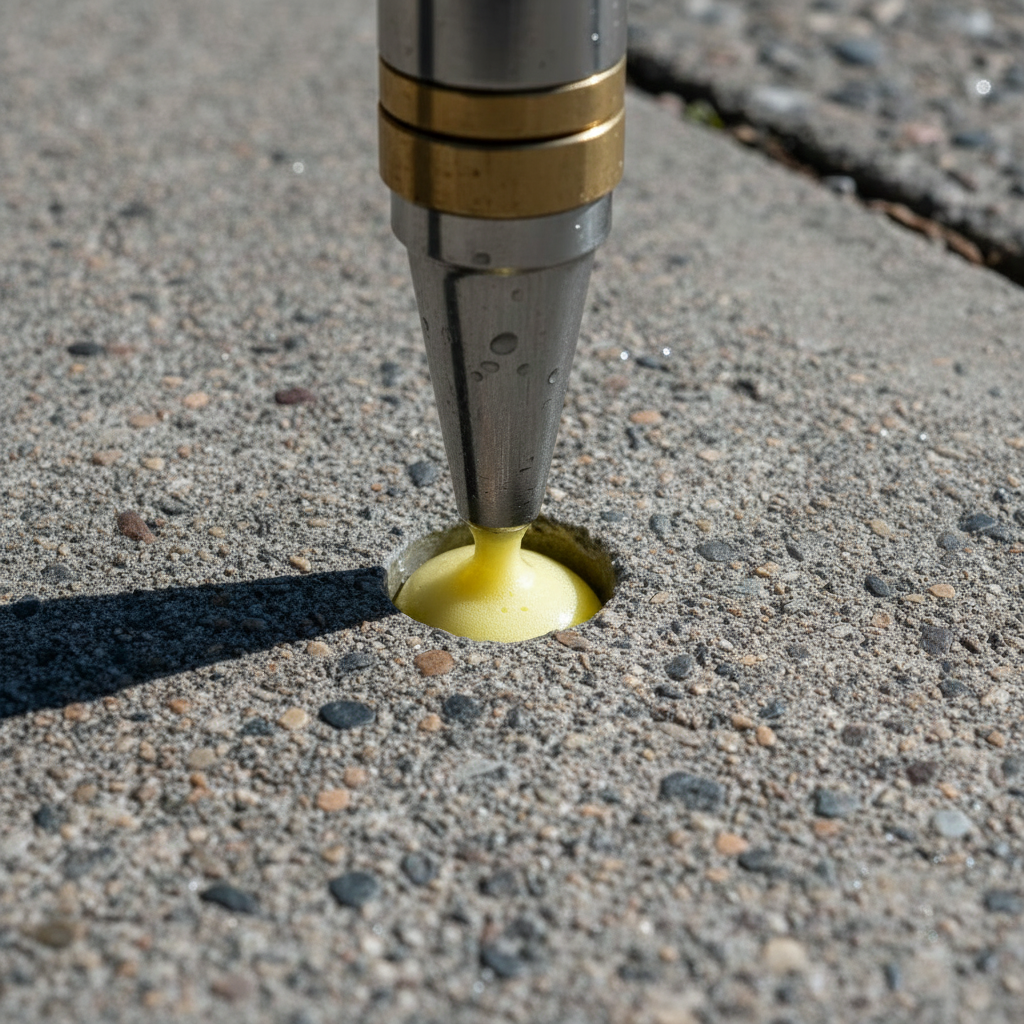
The process: we drill small holes (5/8" for foam, 1-2" for mud) at strategic load points. Inject the lifting material while monitoring laser levels in real-time. Physics, not magic. Controlled lifting prevents over-correction. Seal the holes with non-shrink caulk or cement patch. Double-check stability and drainage. Done. (Good crews make those patches practically invisible.)
**How Leveling Works: The Technical Nitty-Gritty**
1. **Site Assessment & Prep:** Utility markings (call 811!), debris removal, safety protocols. Don't skip this. In older Seattle neighborhoods, we'll sometimes use ground-penetrating radar for unknown underground utilities. You don't want to drill into a gas line.
Here's the thing: 2. **Drill Precise Holes:** Tiny, calculated penetrations based on void location and load distribution. Not random. For critical areas like stairs or pool decks, we might drill holes as close as 18-24 inches apart, following load-bearing points. For walkways, 3-4 feet spacing usually works. Drill bits are carbide-tipped masonry bits — carefully chosen so we don't crack the surface while drilling.
3. **Insert Injection Ports:** Think medical IVs for concrete. These ports seal against backflow and distribute the material laterally for even lift. For foam, we use specialized injection guns that mix the two chemical components instantly before injection.
4. **Pump Material:** This step separates pros from hacks. We're using digital laser levels accurate to plus or minus 1/32 inch. Real-time feedback to the pump operator. We lift incrementally — not all at once — to prevent over-stressing the concrete.
Pressure gauges stay below 300 psi (for both foam and slurry). Go higher and you'll crack something or lift the wrong section. Ask me how I know.
5. **Seal Holes:** Color-matched patching compound fills the drill points. For mudjacking holes, we use rapid-setting, non-shrink cementitious compounds (sometimes epoxy-modified mortars). For foam holes, specialized elastomeric sealants. Color matching is important — nobody wants obvious circles all over their driveway.
6. **Test Stability & Drainage:** Non-negotiable final checks. Is it stable? Is water running *away* from structures? These questions determine whether the job lasts 6 months or 20 years. We do walk-over tests and visual inspections of drainage patterns. Sometimes we'll run a hose test to confirm water runoff direction.
When Does Concrete Replacement Become Non-Negotiable?
Sometimes leveling won't work. Period.
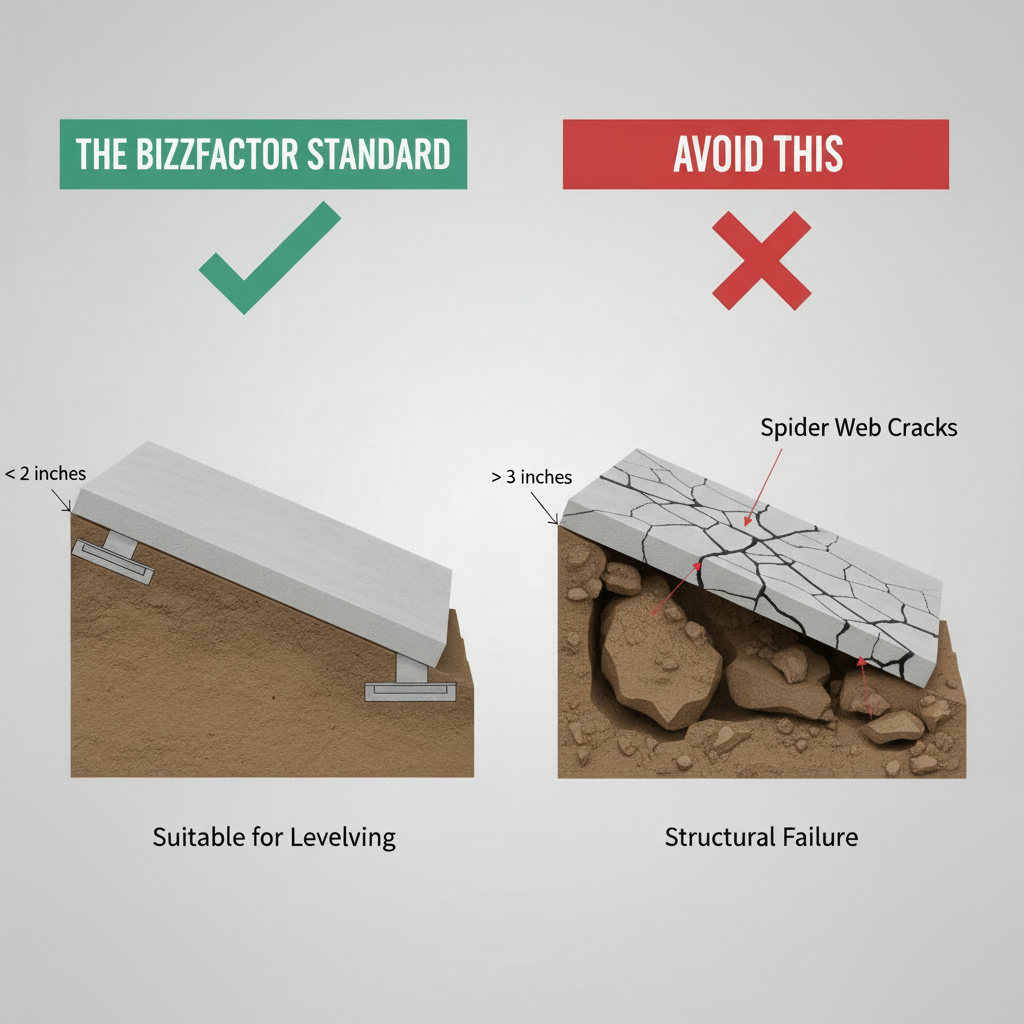
Now, you need replacement when the slab's structural integrity is completely shot. We're talking cracks wider than a quarter-inch running through the entire thickness. Deep spalling (surface peeling from freeze-thaw cycles or bad concrete mix). Sections crumbling to the touch. Or settlement exceeding 3-4 inches *with* multiple severe fracture lines connecting them.
A North Seattle driveway I inspected last year: 20 years old, destroyed by freeze-thaw cycles. Spiderweb cracks everywhere, edges crumbling, pothole-sized section near the garage. The homeowner wanted leveling (cheaper, right?). Five minutes of inspection showed the concrete *itself* had failed. Leveling that would've been like putting a band-aid on a compound fracture — temporary at best, useless at worst. That repair would've wasted about $3,500 on a 400 sq ft driveway, only for it to fail again months later. The full replacement ended up costing $8,000, but it's a permanent fix.
Okay, so replacement. We're talking full excavation — dig out 4-6 inches minimum for a proper gravel sub-base. Compact the hell out of it. We test compaction density with a nuclear densometer (or sometimes a dynamic cone penetrometer) to hit at least 95% Proctor density.
Not optional.
Then #4 rebar (half-inch diameter) on 18-24 inch centers, tied at intersections. Or 6x6 welded wire mesh on chairs so it sits in the middle third of the slab (where it actually does something).
Concrete strength? 3000-4000 psi at 28 days, usually a 5-6 sack mix with a water-cement ratio around 0.45-0.50. Modern mixes include fiber additives for tensile strength and crack resistance — polypropylene fibers at about 1.5 pounds per cubic yard work well.
Control joints get saw cut within 24 hours of pouring. Spacing matters — we don't exceed 30 times the slab thickness. Four-inch slab means cuts every 10 feet. This manages shrinkage cracking. You skip this step, you'll have random cracks running everywhere within six months.
Isolation joints (using asphalt-impregnated fiberboard) go where the new slab meets existing structures. Garage walls. Foundation edges. Sidewalks connecting to driveways. These details matter.
That justifies the bigger investment. You're not just fixing a problem — you're building something that'll outlast your mortgage.
**When Replacement Is Required: No Cutting Corners**
- **Excessive Settlement:** Over 3-4 inches with widespread connecting cracks. Sub-base failure *and* structural collapse. This usually means catastrophic underlying soil issues or severe subsidence.
- **Widespread Cracking:** Cracks exceeding 1/4" width with vertical displacement, or dense interconnected patterns (alligator cracking, map cracking). Systemic failure that compromises load transfer. The American Concrete Institute defines significant cracking as anything affecting structural integrity or serviceability.
- **Exposed Rebar or Aggregate:** The slab's guts are showing. That's advanced deterioration. Freeze-thaw cycles and de-icing salts accelerate this, leading to rebar corrosion, spalling, and further breakdown.
- **Spalling & Crumbling:** Severe pitting or efflorescence indicates compromised concrete mix or freeze-thaw damage. Water infiltrates and freezes, or salts draw moisture and recrystallize, exerting internal pressure. Poor concrete cover over rebar (less than 1.5 inches for exterior slabs) accelerates this.
- **Multiple Sinking Zones:** Large sections uniformly compromised. Systemic, not localized. This suggests a widespread sub-base issue that spot leveling won't address.
- **Foundation Movement Signs:** Cracks extending into adjacent structures or severe differential settlement across wide areas. If severe movement compromises utility lines under slabs, you might need utility repair on top of replacement.
For deeper insights into underlying problems, check our guide on [Foundation Repair Costs](link to foundation repair article). Understanding the *cause* saves you from throwing money at symptoms.
The Common Mistake Most Homeowners Make (And How to Avoid It)
So — real talk — a Bellevue homeowner spent serious money leveling their driveway. Two years later? Settled again. Same spot, same problem. It was a 600 sq ft driveway, and they paid about $6,500 for the polyjacking. When it settled again, they called us. After identifying the drainage issue, the *real* fix cost another $2,000 for regrading and downspout extensions, plus another $4,000 for a more robust (and permanent) polyjacking. Total wasted initial investment: $4,500. Not good.
The mistake? Focusing *only* on lifting the slab while ignoring *why* it sank.
The biggest culprit? Inadequate drainage and water management. Every. Single. Time.
My crew sees this constantly across Seattle. People pay for leveling, and
In-Depth Look
Detailed illustration of key concepts
Visual Guide
Infographic illustration for this topic
Side-by-Side Comparison
Visual comparison of options and alternatives
Sources & References
- The Ultimate Guide [2025 Prices] - Concrete Leveling Costs
- Concrete Leveling vs. Replacement: Which Is the Better Option?
- Concrete Leveling vs. Replacement: Which is Right for You?
- Concrete Repair vs Replacement - Make the Right Choice [Guide]
- What Is Concrete Leveling? - Angie's List
- The 6 Best Home Warranty Companies in North Carolina in 2026
- Building Codes, Standards, and Regulations: Frequently Asked ...
- Building Codes and Standards - 101 Guide | ROCKWOOL Blog
- [PDF] Building Codes Toolkit for Homeowners and Occupants - FEMA
- Home Insurance Building Code Coverage - Allstate
Frequently Asked Questions
Need Professional Help?
Find top-rated home services experts in your area