Expert guide to professional garden & yard lighting installation. Learn proper electrical setup, safety standards, LED efficiency & smart controls from licensed pros.
Key Takeaways
- Professional installation ensures safe 12V systems with proper GFCI protection and code compliance
- Strategic zone planning maximizes efficiency while LED technology reduces energy consumption by 75%
- Weatherproof connections and marine-grade components provide decades of reliable outdoor performance
BizzFactor Quick Guide
The BizzFactor Standard: Always use licensed electricians for 12V outdoor lighting systems with GFCI protection
Key Takeaways
The BizzFactor Standard
3 Non-Negotiable Requirements for Elite Workmanship
Licensed & Insured Professionals Only
Outdoor electrical work requires licensed electricians with proper insurance coverage to ensure safety and code compliance.
12V Low-Voltage Systems Required
Safe outdoor lighting uses 12V systems with GFCI protection to eliminate shock hazards in wet conditions.
Marine-Grade Weatherproof Components
All connections and fixtures must be rated IP65 or higher for continuous moisture exposure and seasonal temperature changes.
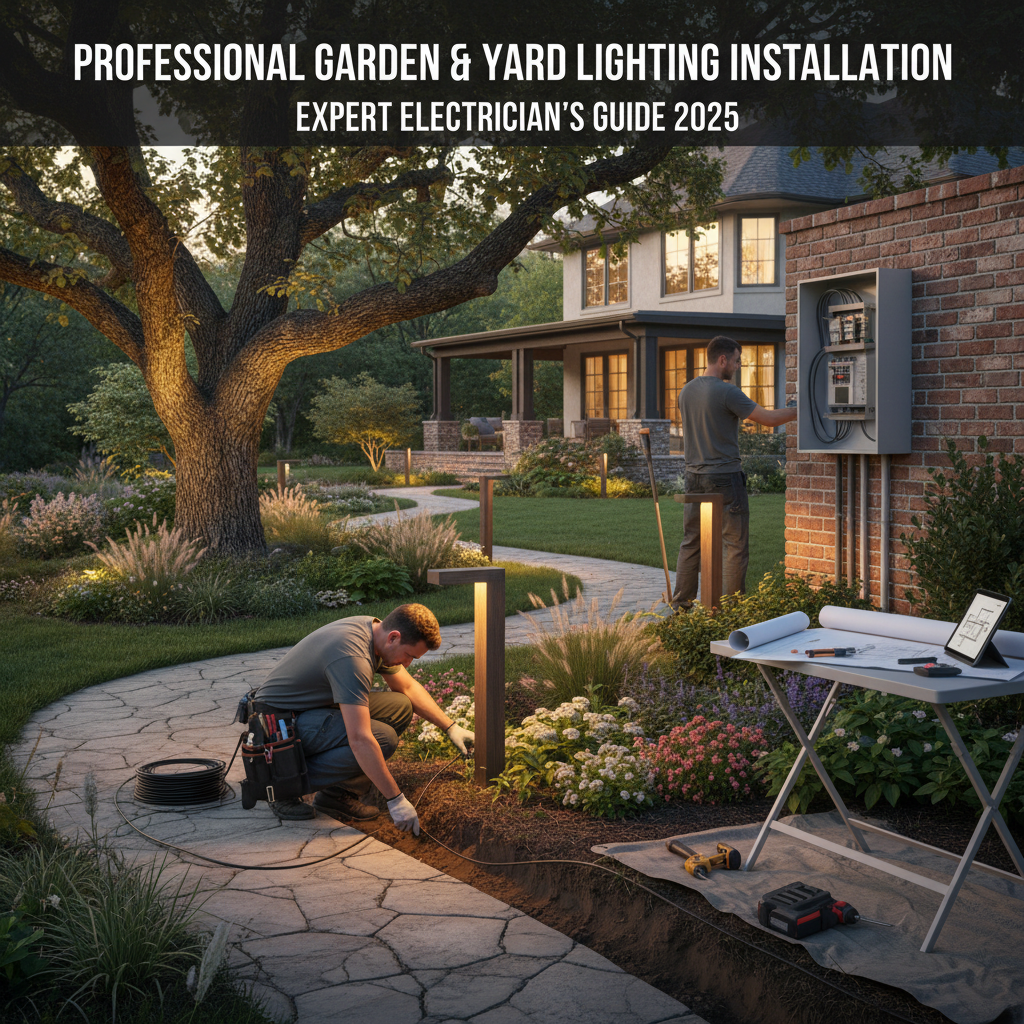
Professional Garden & Yard Lighting Installation: Expert Electrician's Guide 2025
You know what kills most outdoor lighting projects? Not the fixtures. Not the bulbs. It's the electrical foundation nobody sees until it fails at 11 PM on a Saturday.
I've pulled permits in everything from Plano cookie-cutters to custom Frisco estates, and the pattern's always the same: homeowners drop $3,000 on gorgeous fixtures, then balk at spending $800 on proper electrical infrastructure. Six months later, I'm back there troubleshooting voltage drop issues while they're wondering why half their yard is dark.
Don't be that homeowner.
Essential Electrical Infrastructure: The Unseen Hero of Outdoor Lighting Systems
The electrical work nobody sees? That's what actually matters. And most homeowners completely skip this part — they fixate on which bronze finish looks better while the wiring underneath is basically a disaster waiting to happen.
Seriously.
Skip the foundation work and you're setting yourself up for constant problems. Lights that flicker when it rains. Breakers that trip during dinner parties. Service calls that cost three times what the proper install would've cost upfront. I've seen this exact scenario play out in neighborhoods from Phoenix to Scottsdale to North Dallas.
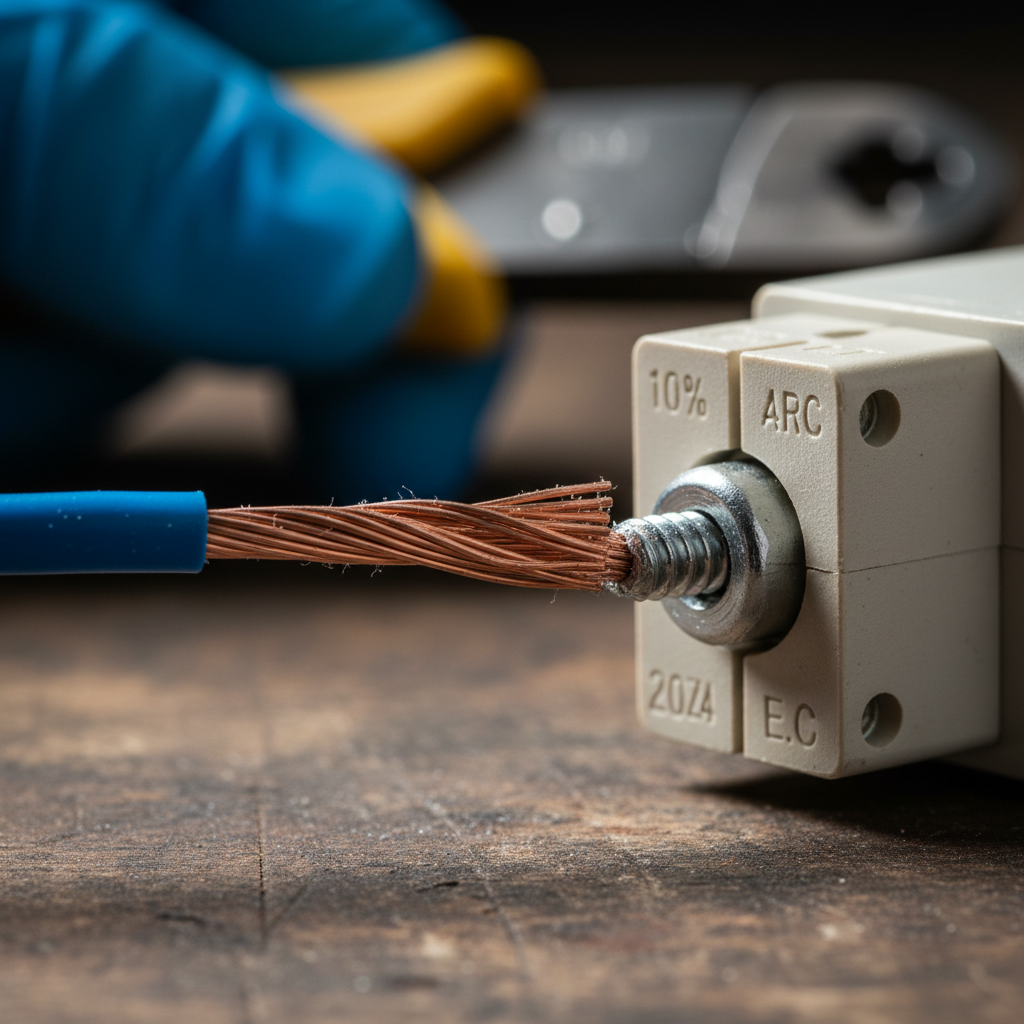
**Start with a dedicated 12-volt low-voltage system.** Why 12V? Two reasons: it basically eliminates shock hazards (you can grab a live 12V wire and just feel a tingle), and it delivers consistent, beautiful illumination for intricate landscape features. Your electrical supply originates at the main service panel. There, we install a dedicated Ground Fault Circuit Interrupter (GFCI)-protected circuit breaker—non-negotiable, 5mA trip-level protection.
So from that breaker, we're pulling outdoor-rated 12 AWG copper. Usually THHN/THWN if we're running conduit, UF-B if we're going direct burial. I've used both for 15+ years — the UF-B costs about $0.47/foot more but you skip the conduit labor on simple runs. We thread it through Schedule 40 PVC for anything that's getting buried near driveways or high-traffic areas. Protects against someone driving a fence post through your lighting circuit three years from now (happened to a client in Allen, TX — $1,800 repair). This all feeds your transformer, which steps your house's 120V down to 12V or 24V.
Think about it: a system built for safety from the source.
Look — look — underground cable installation demands meticulous, almost surgical, planning. Why? To proactively avoid conflicts with existing irrigation lines, gas pipes, and other critical utilities. Believe me, you do *not* want to hit a gas line trying to run a light cable. We exclusively use direct-burial cable explicitly rated for wet locations, typically 12 AWG to 10 AWG, sometimes even 8 AWG if the load and length demand it. The larger the gauge, the lower the number, offering superior current carrying capacity and reducing voltage drop.
Voltage drop is a real thing.
We account for it precisely, utilizing voltage drop calculators to ensure less than a 5% drop across the entire circuit. That's the real issue. Utilizing professional-grade tools like Klein Tools cable pullers and Milwaukee hole saws ensures clean, precise installations when routing cables through foundation walls and various landscape features. We don't guess; we measure, we plan, we execute. It's the difference between a system that fails in a year and one that lasts decades.
Grounding isn't optional — it's legally required and it's what keeps your family safe. We drive grounding electrodes (copper-clad steel rods, 8 feet minimum) and bond them to your home's main ground. That's the real issue. Then we test the resistance to make sure it's under 25 ohms. This isn't about checking boxes on a permit form. It's about physics. Without proper grounding, a lightning strike or power surge has nowhere to go except through your expensive equipment — or worse, through a person touching a fixture.
That's following **NFPA 70 (National Electrical Code)**, Article 250 specifically.
For more detailed information on electrical panel upgrades, because often outdoor lighting needs extra capacity, refer to our guide on [Electrical Panel Upgrade: When to Modernize Your Home's Circuit Breaker Box](link-to-electrical-panel-upgrade-article). Don't skimp on the foundation.
Strategic Planning for Maximum Impact and Energy Efficiency: It's All About the Layers
Here's what separates professional installations from Pinterest fails: **lighting layers**.
Here's the thing: most DIYers grab a box of solar stakes from Costco and wonder why their yard looks like a sad airport runway. Real landscape lighting? It's about creating distinct zones that work together—depth, drama, and actual usability instead of just throwing light everywhere like you're searching for a dropped contact lens.
Different areas need different light levels and different controls. Pathways get their own zone. Accent lighting on another. Security floods on a third. Each zone runs independently because — real talk — you don't need your decorative tree uplights on when you're taking out the trash at 6 AM.
For pathway lighting, we're usually spec'ing 3W to 5W LED fixtures. Space them 8-10 feet apart, maybe closer on curved paths where you need more visual guidance. I've installed hundreds of TCPI path lights — they run about $45-65 per fixture but they're still working five years later while the $12 big-box specials are in a landfill. Color temp matters more than people think. 2700K gives you that warm, inviting glow (like old incandescent bulbs). 3000K is a bit crisper, works better in modern designs. And the fixture itself needs proper shielding or you're just blinding people walking toward them.
Nobody wants to navigate your driveway squinting like they're staring into the sun.
Accent lighting's where you get to be creative. Big oak tree? Hit it with a 60-degree beam from the base and suddenly you've got cathedral-worthy drama. Narrow architectural column? That needs a tight 15-degree spot or you're just washing light everywhere. We'll use adjustable fixtures from PacLights or Kichler — yeah, they're $90-150 each versus $30 knockoffs, but the knockoffs use plastic housings that crack in two winters and reflectors that oxidize within a year. FX Luminaire makes solid brass fixtures. Heavy. Expensive. Still working perfectly on installs I did in 2011.
A well-placed accent light can literally transform a drab wall into a textured canvas, adding depth and drama.
Security lighting's a different animal. You want coverage on entry points — front door, garage, any gate latches, dark corners where someone could hang out unnoticed. We're installing motion-activated LED floods with PIR sensors. You can dial in the sensitivity (so it doesn't trigger every time a cat walks by) and the duration (10 seconds to 10 minutes, depending). These put out anywhere from 2000 to 5000 lumens when they kick on. That's *bright*. During the day? They're using basically zero power.
We did a setup in Westlake last year where the homeowner was dealing with coyotes coming into the yard at night. After we installed motion floods on the back perimeter? Problem solved. Coyotes don't like sudden spotlights any more than burglars do.
**Automate everything with smart controls.** Modern timer controls, photocell sensors, and smart controllers (Lutron, Caseta) integrate with home automation platforms—Apple HomeKit, Google Home, Amazon Alexa. You can set schedules, adjust brightness (0-100% dimming), and even change colors (with RGBW LED fixtures) from your couch or across the globe. Energy savings? Around 40% compared to manual switching, probably more if you're the type who forgets to turn things off.
Learn more about enhancing your home's security in our article on [Home Security System Installation: Top Tips from Electricians](link-to-home-security-installation-article).
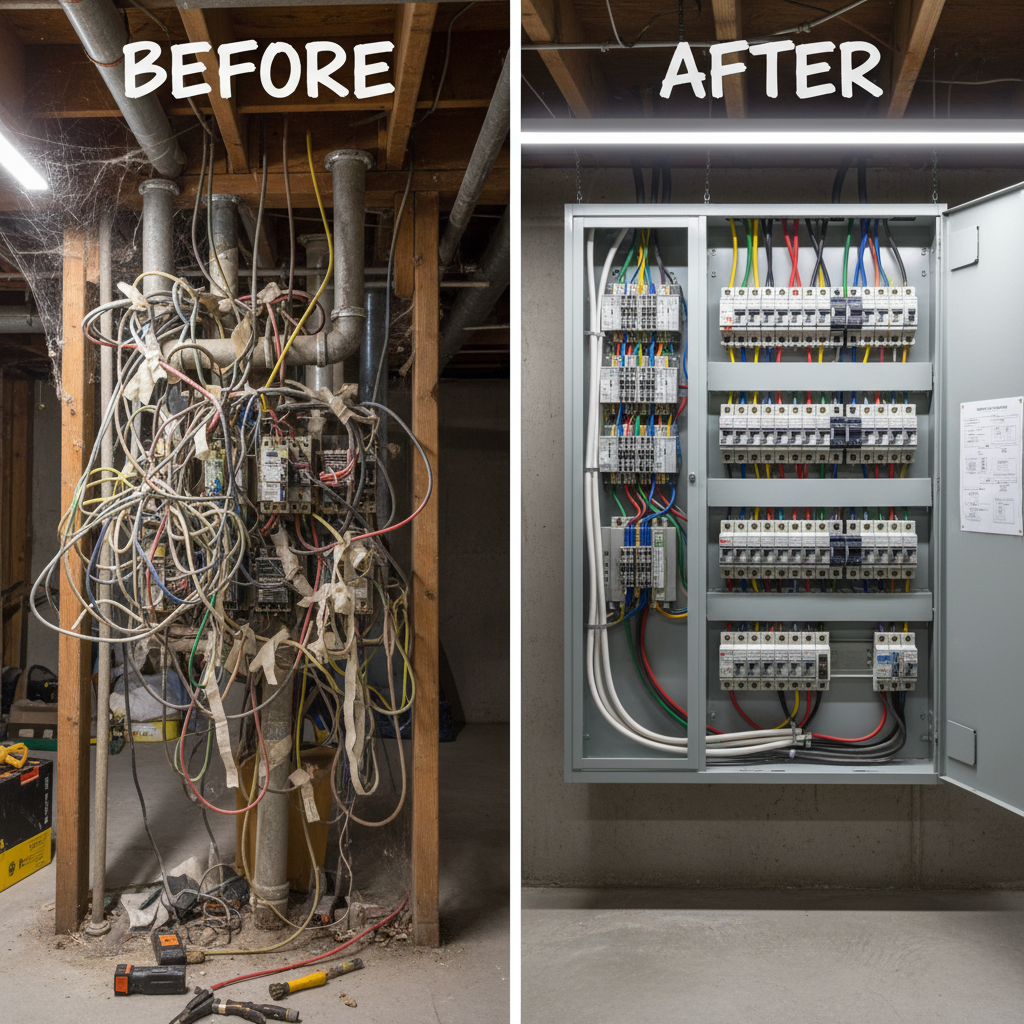
Case Study: A Nightmare in Tempe, Arizona
Recently, our team conducted an inspection at a property in Tempe where the previous contractor had installed standard 120V fixtures throughout the garden, regrettably using improper and downright unsafe wiring methods.
Does this scenario sound familiar? It's more common than you'd think.
The homeowner reported frequent circuit breaker trips—a sure sign of trouble—and alarmingly corroded connections after enduring just a single Arizona monsoon season. The homeowner, a lovely retired teacher, was frustrated and actively concerned about safety.
We opened up the first junction box and I knew we had problems. Exposed wire splices wrapped in electrical tape (which disintegrates in UV light within months). No proper grounding whatsoever. Fixtures rated IP20 — meaning they're fine for your bathroom but absolutely not for outdoors where water actually exists. And the transformer? Undersized by about 40%, which explained why the lights at the far end of the run were barely glowing. This wasn't just bad work. It was dangerous work masquerading as professional installation.
That's a classic symptom of poor design and cheaper components.
Now, so here's what we did. Ripped it all out. Started from scratch with a 300-watt multi-tap transformer — Vista brand, around $340 but built like a tank. The multi-tap feature lets you compensate for voltage drop on longer runs (you bump certain zones to 13V or 14V at the source so they're getting a solid 12V at the fixtures). Swapped in new LED fixtures — mix of PacLights, Kichler, and FX Luminaire, all IP65 or better. That means dust-tight and protected against water jets from any direction.
We mounted the transformer in a vented housing about 15 feet from her panel. Keeps it accessible for maintenance but protected from weather. Ran fresh 12 AWG direct-burial cable to each zone — buried it 6 inches deep with warning tape 3 inches above (code requirement, but also just smart so the next contractor doesn't accidentally dig into it). For the 120V supply to the transformer, we went 18 inches deep because that's what code requires.
Whole job took three days. Cost her about $4,200. But now? System works flawlessly. Survived two monsoon seasons without a single callback. Lights are bright and even across all zones. And most importantly — it's *safe*. She can actually enjoy her backyard at night without worrying her house is going to catch fire.
That's what proper installation looks like.
Weatherproof Installation Techniques for Lasting Durability: Built to Last, Not Just to Look Good
Durable outdoor lighting installations demand meticulous attention to moisture protection, resilience against repeated temperature cycling (think blazing summer days, freezing winter nights, and everything in between), and overall physical robustness.
Frankly, this is often where many contractors attempt to cut corners, hoping you won't notice. They focus solely on the appealing fixtures while neglecting the critical (though less glamorous) weatherproofing details. That's a costly mistake, leading to premature failure.
We exclusively utilize fixtures explicitly rated IP65 or higher for direct weather exposure.
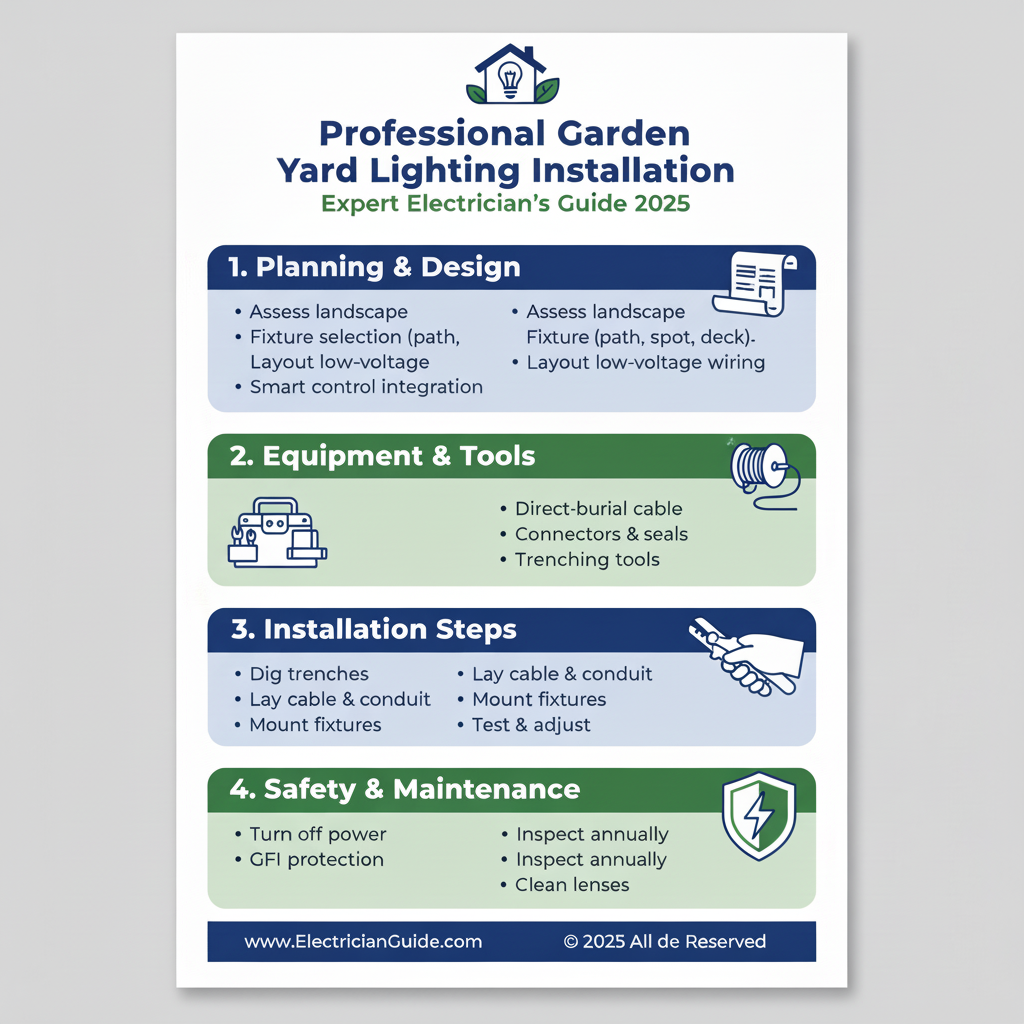
In-Depth Look
Detailed illustration of key concepts
Visual Guide
Infographic illustration for this topic
Side-by-Side Comparison
Visual comparison of options and alternatives
Sources & References
- Landscape Lighting Install: 7 Powerful Tips for Stunning Yards 2025
- Backyard Landscape Lighting Installation - YouTube
- Learn How to Install Outdoor Lighting the Right Way | LOA
- A Step-by-Step Guide to Outdoor Lighting Installation for Beginners
- Best Tool Brand for Electricians 2025: Expert Rankings - Wood Guide
- Top 20 Essential Electrician Tools for Pros (2026 List) - Workiz
- Best Electrician Tools Brand Guide
- Essential 2025 Electrician Tools & Safety Warnings (New & Pro Tips!)
- 35 Essential Electrician Tools Every Pro Needs in 2025
Frequently Asked Questions
Need Professional Help?
Find top-rated electricians experts in your area