Get pro-quality painting results using techniques from licensed painters with 20+ years experience. Real tips for prep, tools, and application that actually work.
Key Takeaways
DIY Interior Painting Tips That Actually Work (2024): The Ultimate BizzFactor Guide
Transforming your home with a fresh, vibrant coat of paint is one of the most impactful and cost-effective ways to revitalize any living space. While the prospect of a DIY interior painting project might seem daunting, achieving results that rival those of a seasoned professional is entirely within reach for the dedicated homeowner. The fundamental difference between a breathtaking, durable finish and a frustrating, subpar outcome often hinges on meticulous preparation, judicious selection of tools and materials, and the precise application of proven techniques.
This comprehensive guide, meticulously curated by BizzFactor's panel of home improvement experts and informed by the latest industry best practices for 2024, delves deep into every aspect of interior painting. We'll equip you with the knowledge, strategies, and insider tips necessary to confidently tackle your next project, ensuring a stunning, long-lasting finish that you'll be proud to showcase.
Section 1: The Essential Arsenal – Tools and Materials for Superior Interior Painting
Underestimating the importance of quality tools and premium materials is a gateway to frustration and compromised results. Think of your painting project as a culinary endeavor: you wouldn't attempt a gourmet meal with dull knives and inferior ingredients. Similarly, investing in the right equipment will not only simplify the process but also significantly elevate the quality and longevity of your paint job. Prioritize durability and performance, as better tools yield superior finishes, enhance efficiency, and often outlast multiple projects. Shoddy equipment, conversely, is a false economy, frequently leading to uneven application, visible imperfections, and the exhausting need for costly rework.
1.1 High-Performance Roller Covers: The Foundation of Even Coverage
Roller covers are the primary workhorses for applying paint across expansive wall and ceiling surfaces. Their effectiveness is largely determined by the 'nap' size, which refers to the length of the fibers. Selecting the correct nap is crucial for achieving an even, smooth finish tailored to your specific wall texture:
- **3/8-inch Nap (Smooth Surfaces):** Ideal for perfectly smooth walls such as new drywall, plaster, or previously painted surfaces in excellent condition. This nap length applies a thin, uniform layer of paint, minimizing texture. Microfiber rollers with this nap are particularly excellent for achieving a lint-free, sprayed-on look with various paint types, excelling with modern latex and acrylic formulations.
- **1/2-inch Nap (Lightly Textured Surfaces):** A versatile option suitable for walls with a slight texture, such as orange peel or light knockdown finishes, or for older walls with minor imperfections. This nap allows for better paint pickup and penetration into subtle textures.
- **3/4-inch to 1-inch Nap (Heavily Textured Surfaces):** Reserved for very rough surfaces like stucco, brick, concrete block, or heavily textured ceilings (e.g., popcorn ceilings). These longer naps are necessary to push paint into deep crevices and ensure comprehensive coverage. However, they can also leave a more textured finish.
**Expert Insight:** Avoid inexpensive foam rollers for walls. They tend to create air bubbles upon application and lack the capacity to hold sufficient paint, leading to frequent reloading and an inconsistent finish.
1.2 Angled Sash Brush: Precision in Every Stroke
The angled sash brush is an indispensable tool for 'cutting-in,' the critical process of painting neat, straight lines along edges where walls meet ceilings, trim, corners, and around windows and doors. A 2.5-inch or 3-inch angled sash brush with high-quality synthetic bristles is generally recommended for water-based (latex/acrylic) paints. Natural bristles are typically reserved for oil-based paints.
**Key features to look for:**
- **Flagged Tips:** The ends of the bristles should be split (flagged) to hold more paint and provide a smoother, streak-free application.
- **Tapered Filaments:** Bristles should taper towards the tip, offering superior control and allowing for finer lines.
- **Ergonomic Handle:** A comfortable handle reduces hand fatigue during prolonged use.
1.3 Canvas Drop Cloths: Superior Surface Protection
Often overlooked but critically important, canvas drop cloths offer vastly superior protection compared to thin plastic sheeting. Their advantages are numerous:
- **Durability:** Canvas resists tearing and punctures, providing robust, long-term protection.
- **Absorbency:** Unlike plastic, canvas absorbs paint spills and drips, preventing them from spreading or tracking. This significantly reduces the risk of costly damage.
- **Safety:** Canvas provides better foot traction, mitigating slip hazards that are common with slippery plastic. This is especially crucial when working with ladders or moving furniture.
- **Reusability & Sustainability:** Canvas drop cloths are washable and reusable for countless projects, making them a more environmentally friendly and cost-effective choice in the long run.
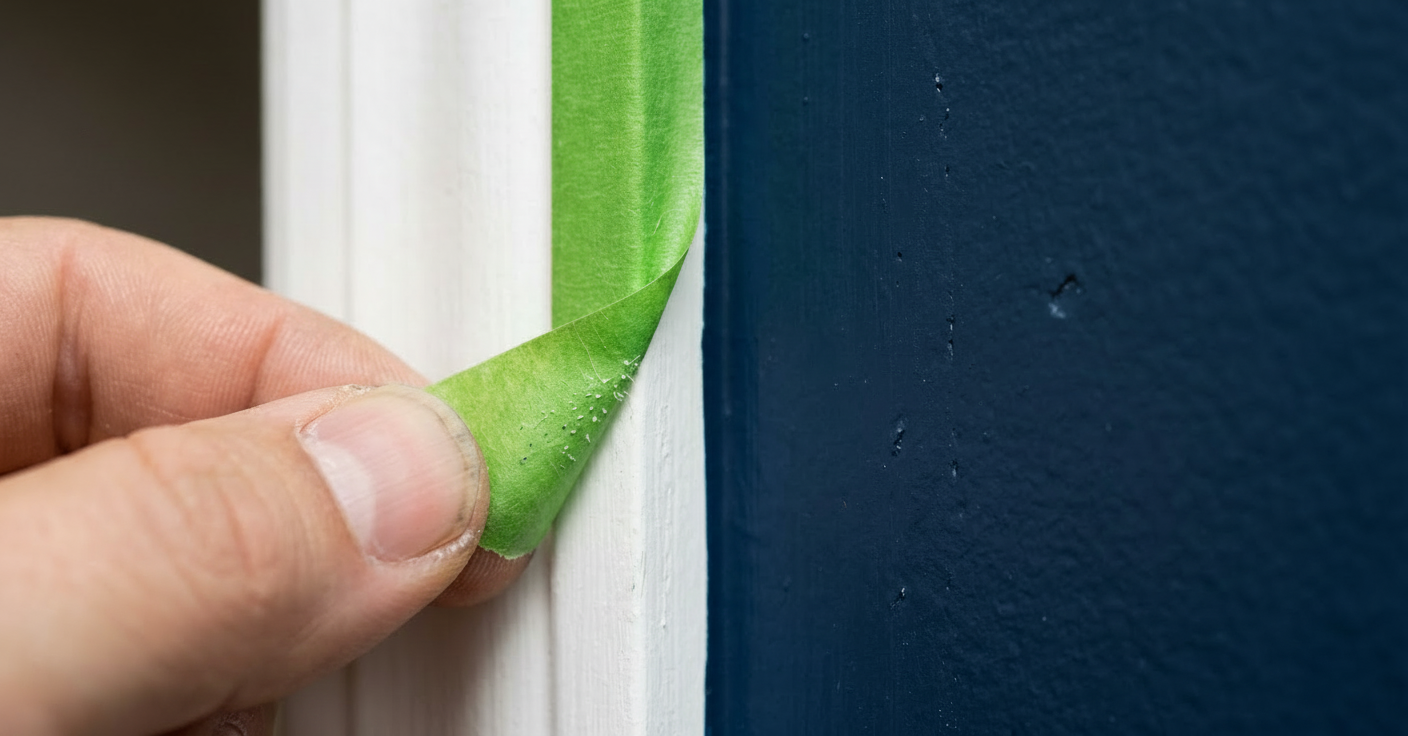
1.4 Premium Painter's Tape (e.g., FrogTape): Sculpting Razor-Sharp Edges
While standard blue painter's tape can suffice for masking less critical areas, achieving crisp, bleed-free lines – the hallmark of a professional paint job – necessitates a higher-grade product. **FrogTape (specifically the green 'Multi-Surface' or 'Delicate Surface' versions)** stands out as the industry benchmark.
**Why FrogTape?** Its patented 'PaintBlock' technology employs a super-absorbent polymer that, upon contact with water-based paint, forms a micro-barrier. This barrier instantly seals the tape's edge, preventing paint seepage, even on lightly textured surfaces where conventional tapes notoriously fail. This investment, though slightly higher initially, saves significant time and effort in touch-ups, directly contributing to a truly flawless finish.
1.5 Paint Tray & Liners: Efficiency in Management
A sturdy metal or plastic paint tray provides a stable platform for loading your roller. The true game-changer, however, is the use of disposable tray liners. These inexpensive additions streamline cleanup, allowing for quick color changes without washing the main tray, and prevent hardened paint residue from accumulating. Ensure liners fit snugly to avoid slippage during use.
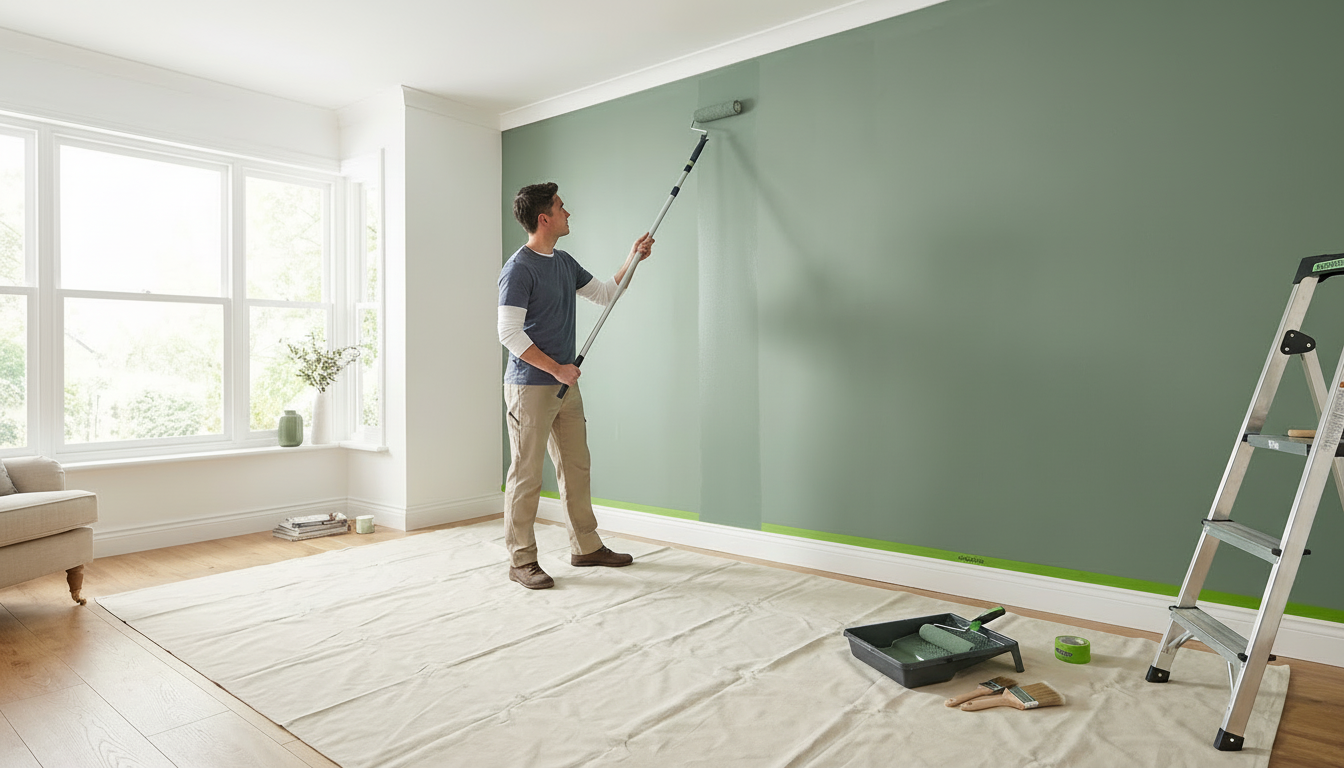
1.6 Extension Pole: Reach, Consistency, and Reduced Fatigue
An adjustable extension pole is an indispensable accessory for any interior painting project, and its utility extends far beyond just reaching high ceilings. When properly utilized, it transforms the painting process:
- **Enhanced Efficiency:** Allows for continuous, long strokes from floor to ceiling or across wide wall sections, significantly reducing painting time.
- **Consistent Coverage:** Promotes more uniform paint application by maintaining consistent pressure and angle across broad areas, minimizing lap lines and streaks.
- **Reduced Physical Strain:** Alleviates back and shoulder fatigue, allowing for longer, more comfortable painting sessions.
Look for a pole with a sturdy, threaded attachment mechanism that securely locks into your roller frame.
1.7 Spackling Compound & Putty Knife Set: Flawless Surface Repair
The foundation of any exceptional paint job is a perfectly smooth surface. Spackling compound and putty knives are crucial for addressing wall imperfections:
- **Lightweight Spackling:** Ideal for small nail holes, minor dings, and fine cracks. Dries quickly and sands easily.
- **Heavy-Duty Patching Plaster/Joint Compound:** Necessary for larger holes, wider cracks, or areas of damaged drywall. May require mesh tape for structural reinforcement.
- **Putty Knives:** A flexible 2-inch or 4-inch putty knife is suitable for precise application, while a wider 6-inch knife can be useful for feathering larger patches.
1.8 Fine-Grit Sandpaper & Sanding Sponges: The Smoothest Finish
Sanding is often perceived as a chore, but it is a non-negotiable step for achieving a professional finish. Sandpaper and sanding sponges are used for:
- **Smoothing Patches:** Creating a seamless transition between repaired areas and the existing wall.
- **De-glossing:** Scuffing glossy surfaces (e.g., semi-gloss trim, old oil-based paint, factory-primed drywall) creates a better mechanical profile for new paint adhesion. A 180-220 grit is typically sufficient for this.
- **Removing Imperfections:** Lightly sanding between coats can eliminate dust nibs or minor roller marks, ensuring a glass-smooth final layer.
A range of grits (e.g., 120-grit for initial smoothing, 180-220 grit for final finish and de-glossing) is recommended. Sanding sponges conform better to curved or contoured surfaces.
1.9 Cleaning Supplies: The Unsung Hero of Adhesion
Thorough surface cleaning is the most frequently skipped step, yet it is arguably the most critical for proper paint adhesion and a durable finish. You'll need:
- **Degreaser:** Trisodium Phosphate (TSP) substitute or sugar soap are highly effective commercial-grade cleaners for cutting through grease, grime, and accumulated dirt. Always follow manufacturer's dilution instructions.
- **Sponges & Rags:** Several clean sponges and lint-free rags for washing and rinsing.
- **Buckets:** At least two – one for the cleaning solution, one for clean rinse water.
**Warning:** Residual cleaning solution or moisture will compromise paint adhesion. Ensure surfaces are completely dry and free of residue before proceeding.
1.10 Quality Paint Mixer: Uniformity from the Can
Simply stirring paint by hand is often insufficient, especially after the paint has been sitting for some time. Pigments and binders can separate, leading to inconsistent color and sheen. A drill attachment paint mixer ensures thorough, uniform blending, preventing color stratification and ensuring consistent paint properties from the first drop to the last.
1.11 Caulk Gun & Acrylic Latex Caulk: Sealing for Seamlessness
For a truly polished, professional appearance, use paintable acrylic latex caulk to seal gaps and cracks between trim and walls, around windows, door frames, and baseboards. This creates a seamless transition and prevents paint from seeping into unsightly crevices, enhancing both aesthetics and moisture resistance.
Section 2: Preparation – The Indispensable Foundation for Lasting Results
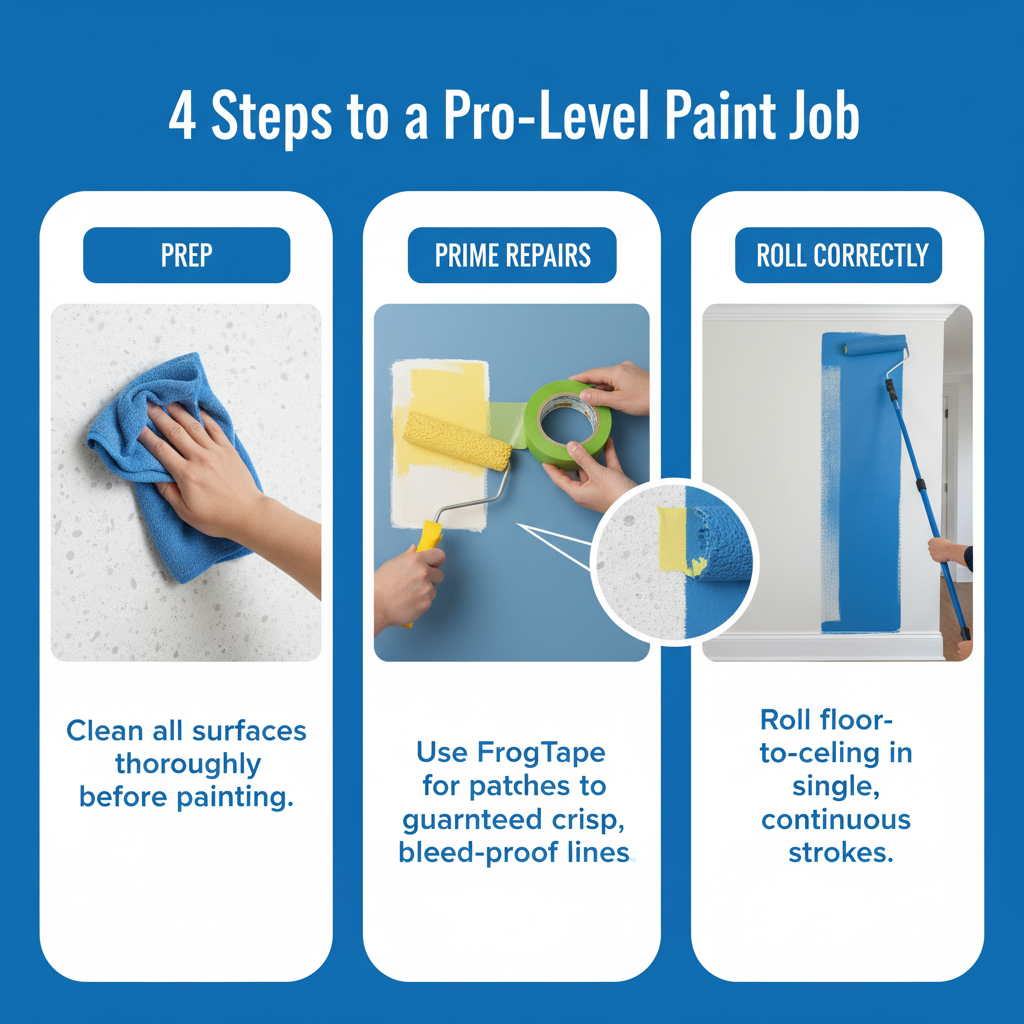
Thorough wall preparation is not merely a beneficial preliminary step; it is the absolute, non-negotiable bedrock upon which a professional-grade, aesthetically pleasing, and long-lasting paint finish is built. Attempting to cut corners here will inevitably compromise your final aesthetic, often leading to adhesion failures, visible imperfections, premature paint peeling, and a significantly shortened lifespan for your investment. Adhere to every step diligently; your efforts in preparation will be repaid tenfold in the final result.
2.1 Strategic Clearing and Comprehensive Protection
1. **Empty the Battlefield:** Completely remove all small, movable items, wall hangings, decorative objects, and electrical faceplates from the room. Label hardware and plates by location for easy reinstallation.
2. **Furniture Fortification:** Relocate larger furniture pieces to the center of the room, or completely remove them if possible. Drape all furniture with substantial plastic sheeting (minimum 0.7-1.0 mil thickness for effective dust and drip protection), securing it tightly with painter's tape or clamps. This prevents accidental contact and fine paint mist from settling.
3. **Floor Shield:** Lay down heavy-duty canvas drop cloths across *all* floor areas, extending precisely to the baseboards. Unlike plastic, canvas absorbs paint spills, provides superior slip resistance (a critical safety factor when working with ladders), and is reusable. Avoid creating wrinkles or tripping hazards.
2.2 The Multi-Stage Surface Cleaning Protocol
This is arguably the most critical and frequently overlooked step. Dirt, grease, fingerprints, and other contaminants act as release agents, preventing paint from properly adhering.
1. **Degrease and Clean:** Mix a potent cleaning solution using TSP (trisodium phosphate) substitute or sugar soap according to manufacturer's instructions with warm water. Using a clean sponge or lint-free rag, wipe down every square inch of walls and trim. Work in manageable sections, from bottom to top, to prevent dirty water streaks. Pay particular attention to high-touch areas like light switches and door frames.
2. **Rinse Thoroughly:** After cleaning, fill a second bucket with clean, plain water. Using a separate, clean sponge, thoroughly rinse all surfaces, removing every trace of cleaning solution residue. Remnants of cleaners can interfere with paint adhesion.
3. **100% Dry:** Allow all surfaces to dry *completely* – this may take several hours, especially in humid conditions. Use fans to assist airflow, but do not rush this step. Residual moisture will cause paint to blister, peel, or fail prematurely.
2.3 Meticulous Imperfection Remediation
Conduct a detailed, systematic inspection of all walls and trim under good lighting to identify every imperfection.
1. **Fill Small Holes and Dings:** For small nail holes, screw holes, and minor dents, apply a lightweight spackling compound with a flexible putty knife. Overfill slightly and then smooth flush with the surrounding surface. For larger holes (over 1/2 inch), consider using drywall repair kits or mesh tape with joint compound.
2. **Address Cracks:** For hairline cracks, a flexible acrylic caulk can sometimes be used. For wider or structural cracks, a patching plaster or joint compound, potentially reinforced with fiberglass mesh tape, is required. Scrape loose paint edges before patching.
3. **Multiple Thin Coats:** For larger repairs, apply several thin coats, allowing each to dry completely according to manufacturer instructions, rather than one thick coat. Thick applications are prone to cracking, shrinking, and longer drying times.
2.4 Precision Sanding for a Glass-Smooth Surface
Sanding after patching creates an imperceptible repair.
1. **Smooth Patches:** Once all patched areas are completely dry, gently sand them with 120-180 grit sandpaper or a sanding sponge. The objective is to achieve a patch that is perfectly smooth and absolutely flush with the surrounding wall, with no discernible edges or raised areas. Progress to 220-grit for an even finer finish.
2. **De-gloss Existing Surfaces:** Lightly scuff any glossy surfaces (e.g., existing semi-gloss paint, high-traffic areas, or shiny factory-primed drywall) with 180-220 grit sandpaper. This 'roughens' the surface microscopically, creating a better mechanical profile for the new paint to adhere to, significantly enhancing bonding.
3. **Thorough Dust Removal:** After all sanding is complete, meticulously wipe down all surfaces with a damp tack cloth or a slightly damp microfiber cloth, followed by a dry one, to remove every trace of sanding dust. Lingering dust is a primary contaminant that will embed in your wet paint, creating a rough texture and compromising adhesion and appearance.
2.5 The Primer Prerogative: When and Why to Prime
Applying a high-quality primer-sealer is not always mandatory for an entire room, especially if you're painting a similar color over an existing, uniform finish with premium self-priming paints. However, it is **critically important** in several specific scenarios:
- **Over All Patched Areas:** As detailed previously, this prevents unsightly 'flashing' by sealing the porous repair material.
- **On Raw, Unpainted Surfaces:** New drywall, bare wood, or fresh plaster are highly porous and require priming to ensure even paint absorption, preventing splotchy finishes and ensuring optimal adhesion.
- **Significant Color Changes:** When transitioning from a dark color to a light color, or vice-versa, a tinted primer can dramatically reduce the number of topcoats required, saving time and paint. Your paint retailer can often tint the primer to a shade close to your final color.
- **Stain Blocking:** For smoke, water, pet, or oil-based stains, a specialized stain-blocking primer (e.g., shellac-based or oil-based) is essential to chemically lock in the stain and prevent bleed-through into your topcoat.
- **Substrate Transition:** When painting latex over old oil-based paint, a specialized bonding primer is necessary to create an adhesion layer, as latex paint will not adhere directly to oil-based finishes. Conversely, if painting oil over latex, an alkyd/oil-based primer is recommended for optimal bond.
Primer creates a uniform, consistent base for your topcoat, ensuring superior adhesion, truer color representation, enhanced durability, and ultimately a more professional final finish.
Section 3: Mastering Application Techniques for Flawless Walls
With meticulous preparation complete, the focus shifts to application. Proper technique is paramount for achieving a smooth, even, and durable finish free of roller marks, drips, and inconsistent sheen.
3.1 Cutting-In: Precision Before Power
Cutting-in refers to using a brush to paint edges and corners before rolling the main wall surfaces. For the crispest lines and best blend:
1. **Sequential Approach:** Cut-in all edges – ceilings, trim, corners, and around windows/doors – with your angled sash brush. Aim for a consistent 2-3 inch wide band of paint along these perimeter lines.
2. **Immediate Rolling:** While the brushed edge paint is still wet, immediately roll the adjacent wall section. This allows the roller to subtly feather the brush marks, seamlessly blending the two applications. If the cut-in paint dries before rolling, you risk visible 'frame' lines.
3. **Second Coat Repetition:** Repeat this cut-in-then-roll process for the second coat as well, ensuring a deep, uniform color and seamless transitions.
3.2 The Upward Roll: Preventing Drips and Splatter
A common oversight among novice DIY painters is the initial roller application. When you first load your roller and bring it to the wall, always **roll upwards** from a lower point (e.g., knee height). This technique offers several crucial advantages:
- **Controlled Distribution:** Helps distribute the paint more effectively onto the surface, preventing heavy loading at the bottom that can lead to drips and runs.
- **Reduced Splatter:** Minimizes airborne paint mist and splatter by controlling the initial momentum and paint release.
- **Smoother Initial Transfer:** Ensures a more controlled and uniform initial transfer of paint onto the wall.
3.3 The "W" or "M" Pattern: Even Coverage Every Time
For optimal wall coverage and to minimize lap marks, employ a systematic rolling pattern:
1. **Work in Manageable Sections:** Divide large walls into smaller, approximately 3x3 or 4x4 foot sections. This helps maintain a 'wet edge.'
2. **Apply in a Pattern:** Load your roller generously and apply paint in a distinct **'W' or 'M' pattern** within your section. Do not lift the roller from the surface during this process.
3. **Fill and Even Out:** Without reloading, roll back through the 'W' or 'M,' using light, overlapping vertical strokes to fill in unpainted areas and gently smooth out the paint film. Maintain consistent, even pressure.
4. **Maintain a Wet Edge:** As you move to the next section, slightly overlap your newly painted area into the previous, still-wet section. This prevents hard lines and ensures a seamless blend between sections.
**Pro Tip for Challenging Surfaces:** For areas where maintaining a perfectly wet edge is difficult or for achieving superior tactile control, consider temporarily ditching the extension pole for primary coats. Using a sturdy step stool allows you to work in these 3x3 foot sections with greater direct pressure and control, ensuring more thorough paint transfer and meticulous blending, often resulting in a discernibly higher quality finish.
3.4 Back-Rolling: The Final Touch for Uniformity
After applying paint to each section of wall (especially when using an extension pole), pause and lightly 'back-roll' the entire freshly painted area. This involves one final, very light pass with the roller, often without any new paint on it. The purpose of back-rolling is to:
- **Even Out Film Thickness:** Redistribute paint to ensure a uniform film across the surface.
- **Remove Roller Marks:** Gently smooth out any subtle roller tracks or lines.
- **Uniform Texture and Sheen:** Create a consistent texture and sheen that will dry evenly across the entire surface.
3.5 Respecting Drying Times: Patience is a Virtue
Always adhere strictly to the paint manufacturer's recommended drying times between coats. Rushing this step is a common mistake that leads to:
- **Adhesion Failure:** Applying a second coat over still-tacky paint can lift the first coat.
- **Uneven Sheen:** Insufficient drying can trap solvents, leading to dull or blotchy areas.
- **Poor Durability:** The paint film may not fully cure, compromising its longevity and washability.
Strategic use of box fans or ceiling fans can accelerate drying, particularly in humid environments. Position fans to gently circulate air throughout the room, avoiding blowing directly onto wet paint, which can cause dust adherence or uneven drying. Always ensure adequate ventilation for fume dissipation, especially with any oil-based products or for safety with low-VOC paints.
Section 4: Advanced Tips and Troubleshooting for the Perfectionist
Beyond fundamental techniques, several nuanced considerations can further refine your DIY painting project, elevating it from good to truly exceptional.
4.1 Understanding Paint Sheen and Its Impact
Paint sheen (or finish) significantly influences both the aesthetic and functional properties of your painted surfaces. Choosing the right sheen is crucial:
- **Flat/Matte:** Offers a sophisticated, non-reflective look that effectively conceals minor surface imperfections. It is, however, the least durable and most difficult to clean, making it best for low-traffic areas like formal dining rooms or ceilings.
- **Eggshell/Satin:** Provides a subtle, soft sheen (eggshell being slightly less glossy than satin) and improved durability over flat finishes. These are excellent choices for living rooms, bedrooms, and hallways, offering good washability.
- **Semi-Gloss:** Features a noticeable sheen and provides excellent durability and scrubbability. Ideal for kitchens, bathrooms, trim, doors, and cabinets where moisture and frequent cleaning are concerns.
- **Gloss/High-Gloss:** The most reflective, durable, and easiest to clean finish. Best reserved for highly architectural details, furniture, or areas requiring maximum resilience.
4.2 Strategic Lighting for Flawless Reveals
Before and during your final paint coat, utilize a bright, movable work light or floodlight positioned at a low angle to the wall. This technique, a favorite among professional painters, casts shadows that reveal even the slightest imperfections: missed spots, subtle roller marks, dust nibs, or uneven texture. Addressing these issues while the paint is still workable allows for corrections before they become permanent and noticeable under natural light.
4.3 Temperature and Humidity Control
Environmental conditions play a significant role in paint drying and curing. Ideal conditions for painting are typically between 60-80°F (15-27°C) with moderate humidity (around 50%).
- **Too Cold/Humid:** Prolongs drying times, can lead to sagging, uneven sheen, and poor film formation.
- **Too Hot/Dry:** Can cause paint to dry too quickly, making it difficult to maintain a wet edge and leading to lap marks or poor adhesion.
Use your home's HVAC system or portable heaters/dehumidifiers to maintain optimal conditions for superior results.
4.4 Inter-Coat Scuff Sanding
For the ultimate smooth, professional finish, especially on trim or doors, consider a very light scuff sand (with 220-grit or finer sandpaper) after the first coat has fully dried. This removes any minor imperfections, dust nibs, or slight texture from the first coat, creating an even smoother base for the second, final coat. Always clean thoroughly with a tack cloth after scuff sanding.
Section 5: Safety First – Prioritizing Well-being in Your Project
While the allure of a beautifully painted room is strong, never compromise on safety. Proper precautions protect both you and your home.
5.1 Ventilation is Paramount
- **Ample Airflow:** Always ensure ample airflow by opening windows and doors, and using fans to circulate air and flush out fumes. Even 'low-VOC' (Volatile Organic Compound) paints release some chemicals, and robust ventilation is critical.
- **CO Detectors:** Ensure carbon monoxide detectors are operational if using any combustion-based heating during cold weather, as paint fumes can restrict airflow.
5.2 Personal Protective Equipment (PPE)
- **Gloves:** Wear chemical-resistant gloves (nitrile is excellent) to protect your hands from paint, solvents, and cleaning solutions, preventing skin irritation and absorption.
- **Eye Protection:** Safety glasses or goggles are non-negotiable to protect your eyes from paint splatter, dust during sanding, or chemical splashes.
- **Respiratory Protection:** A high-quality N95 respirator is recommended when sanding extensively (to prevent inhaling fine dust particles) or when using paints/primers with strong fumes, especially in poorly ventilated areas or if you have respiratory sensitivities. For oil-based paints or lacquers, an organic vapor respirator cartridge is necessary.
5.3 Ladder and Step Stool Safety
- **Stability:** Always use sturdy, properly rated ladders or step stools. Ensure they are placed on a stable, level surface. Never place ladders on drop cloths that could slip.
- **Reach vs. Reposition:** Never overreach or lean too far from your ladder. The 'belt buckle rule' states that your belt buckle should always remain between the ladder rails. Reposition frequently to maintain a safe working posture.
- **Inspection:** Before each use, inspect ladders for damage, loose screws, or wobbly joints.
5.4 Electrical Safety during Preparation
- **Power Off:** Turn off power to outlets and switches at the circuit breaker before removing covers. Use painter's tape to cover exposed wires if they cannot be fully removed or capped.
- **Water and Electricity:** Never mix water and electricity. Ensure all surfaces are completely dry before painting or touching electrical components.
5.5 Proper Disposal of Materials
- **Paint Disposal:** Never pour paint down drains or into the ground. Allow latex paint to thoroughly dry out in its can (add kitty litter or sand to speed this up) before disposing with regular household trash. For oil-based paints, primers, and solvents, contact your local waste management services for hazardous waste collection events or designated drop-off sites.
- **Tool Cleaning:** Clean brushes and rollers thoroughly immediately after use with appropriate cleaners (water for latex, mineral spirits for oil-based) to ensure longevity and reusability.
By integrating these safety measures into your painting routine, you can ensure a successful project without compromising your well-being or the environment. Proper planning, meticulous execution, and unwavering attention to detail are the hallmarks of a professional-quality DIY interior paint job, ensuring results that stand the test of time and bring lasting satisfaction.
Key Takeaways for Your DIY Painting Success (2024 Edition)
Achieving a truly professional-quality interior paint job yourself is not just a dream but an entirely attainable reality, provided you approach the task with careful planning, disciplined execution, and an unwavering commitment to detail. By internalizing and rigorously implementing these core principles and BizzFactor's expert recommendations, your next DIY project will yield results worthy of admiration and significantly enhance your home's aesthetics and value:
- **Invest Strategically in Quality Tools and Materials**: This is not an area for compromise. Good angled sash brushes (2.5-3 inch, synthetic bristles for latex), the correct roller covers based on nap size and surface texture (e.g., microfiber for smooth walls), premium painter's tape (FrogTape is non-negotiable for crisp lines), and durable canvas drop cloths are foundational necessities. They directly impact ease of application, efficiency, and the final finish's quality.
- **Prioritize Exemplary Surface Preparation**: The success of your paint job is overwhelmingly dependent on meticulous cleaning, thorough patching and filling of all imperfections, diligent sanding to achieve a uniform surface, and comprehensive dust removal. These exhaustive steps ensure optimal paint adhesion, a smooth base, and prevent visible flaws.
- **Master and Execute Correct Application Techniques**: Understand the critical nuances of roller loading (always upwards initially), consistent rolling patterns (the 'W' or 'M' technique for even coverage), maintaining a 'wet edge,' back-rolling for uniformity, and precise cutting-in. Consistency and control are paramount to avoiding streaks, drips, and lap marks.
- **Never Deviate from the 'Primer Prerogative'**: This critical step for all patched areas, raw surfaces, stain blocking, or significant color changes cannot be stressed enough. Priming prevents unsightly 'flashing' and ensures a uniformly beautiful, professional-looking finish across all repaired sections and disparate surfaces.
- **Employ the Right Painter's Tape**: For unequivocally crisp, bleed-free paint lines, especially on textured surfaces or around delicate trim, the investment in a premium tape like FrogTape (green version) is essential. It significantly reduces the frustration and labor-intensive task of touch-ups.
- **Strictly Respect Adequate Drying and Curing Times**: Always adhere to the paint manufacturer's specified drying times between preparation steps (e.g., patching, priming) and between successive coats of paint. Rushing this stage is a primary cause of adhesion failure, cracking, and a compromised finish and durability.
- **Work in Deliberate, Manageable Sections**: Break down large wall areas into smaller, focused sections (e.g., 3x3 to 4x4 feet). This approach helps in consistently maintaining a wet edge, ensures even paint application, and significantly reduces physical fatigue, supporting better overall technique.
- **Maintain Scrupulous Ventilation**: Essential not only for safety (dissipating fumes, even with low-VOC paints) but also for promoting optimal, consistent drying and curing of paint. Use mechanical fans strategically to circulate air without directly blasting wet surfaces.
- **Caulk All Gaps for a Seamless Aesthetic**: Before applying your final paint coats, meticulously caulk any existing gaps between trim, molding, baseboards, and walls. This detail provides a perfectly sealed, integrated, and professional appearance that distinguishes amateur from expert work.
There's no magic in achieving a professional-grade paint job—just a meticulous, step-by-step approach coupled with an unwavering commitment to details that many people overlook. By consistently following this BizzFactor-approved expert guidance and adhering to these best practices, your next DIY interior painting project will not only be more enjoyable and efficient but will also proudly display results you can genuinely be proud of, rivaling those achieved by seasoned professionals."
, "faqs": [ { "question": "What's the most common mistake DIY painters make that compromises the final result?",
"answer": "The most common and impactful mistake DIY painters make is inadequate surface preparation. This includes skipping thorough cleaning, impatiently rushing through patching and sanding, or neglecting to properly prime patched areas. These shortcuts inevitably lead to poor paint adhesion, visible imperfections like 'flashing,' and a significantly reduced lifespan for the paint job. Meticulous preparation is the bedrock of a professional finish."
}, { "question": "How much paint will I need for my interior painting project?", "answer": "A gallon of paint typically covers approximately 350-400 square feet with one coat. To calculate your needs, measure the length of each wall and multiply by the height to get the total square footage. For two coats, double this number. Subtract the square footage of windows and doors. It's always better to slightly overestimate to ensure you have enough paint for touch-ups. Factor in whether you're using primer, which might reduce topcoat requirements."
}, { "question": "What is the difference between latex and oil-based paint, and which should I use?",
"answer": "Latex (water-based) paint is generally preferred for interior walls due to its faster drying time, easier cleanup with water, lower VOCs, and flexibility which resists cracking. Oil-based paint offers a harder, more durable finish, especially good for trim and high-traffic areas, but it has strong fumes, requires mineral spirits for cleanup, and yellow over time. Modern acrylic-latex paints offer excellent durability, making them suitable for most interior applications."
}, { "question": "How do you achieve straight lines when painting along trim or ceilings?",
"answer": "Achieving straight lines involves several steps: ensure thorough surface cleaning; apply premium painter's tape like FrogTape firmly along the edge to be protected, pressing down with a putty knife for a tight seal; 'cut-in' with a high-quality angled sash brush, working patiently and steadily; and remove the tape slowly while the paint is still slightly wet. This prevents the tape from pulling off dried paint and ensures crisp edges."
}, { "question": "Can I paint over wallpaper, or does it need to be removed?", "answer": "Painting over wallpaper is generally not recommended. Lingering moisture from wallpaper glue or the weight of new paint can cause bubbling, peeling, or adhesion issues over time. For optimal, long-lasting results, it is always best to thoroughly remove wallpaper, clean, repair, and properly prime the underlying wall surface before applying paint. This ensures a smooth, durable, and professional finish."
} ], "answer_boxes": [ {
"question": "What is the best way to clean walls before painting?", "answer": "Sugar soap or TSP (trisodium phosphate) substitute is the best solution for cleaning walls. Apply with a sponge, working from bottom to top, then rinse thoroughly with clean water. This removes dirt, grease, and grime, ensuring superior paint adhesion. Allow ample drying time before starting to paint."
}, { "question": "Why do professionals use canvas drop cloths instead of plastic?", "answer": "Canvas drop cloths offer superior protection to plastic. They are absorbent, trapping paint spills and drips rather than allowing them to spread. Unlike slippery plastic, canvas provides better foot traction, reducing accident risk. Canvas is also durable, reusable, and less prone to tearing, making it a more reliable and environmentally conscious choice."
}, { "question": "How do I get crisp paint lines without bleed-through?", "answer": "Premium painter's tape, specifically FrogTape (the green version), provides the crispest lines. Its unique 'PaintBlock' technology reacts with latex paint to form a micro-barrier, sealing the tape's edge against bleed-through. Press the tape firmly onto a clean, dry surface immediately before painting, and remove it slowly while the paint is still slightly wet."
} ], "answer_nuggets": [ {
"topic": "The Power of a Damp Rag", "text": "Dust removal post-sanding is paramount for a smooth finish. After sanding patches and scuffing surfaces, a slightly damp tack cloth or microfiber rag effectively picks up fine dust particles that vacuums or dry cloths miss. This critical step prevents dust from embedding into your wet paint, ensuring a glass-smooth, professional texture."
}, { "topic": "Strategic Lighting for Perfection", "text": "Before and during your final paint coat, use a bright, movable work light positioned at a low angle to the wall. This technique, often overlooked, highlights imperfections, missed spots, and roller marks, allowing you to address them before the paint dries. It's a professional trick for achieving uniformly flawless surfaces."
}, { "topic": "Understanding Paint Sheen", "text": "Paint sheen significantly impacts a room's aesthetic and durability. Flat/matte hides imperfections but is less washable. Eggshell/satin offers a soft glow and good durability, ideal for living areas. Semi-gloss/gloss is highly durable and washable, perfect for kitchens, bathrooms, and trim. Choose based on desired look and functional need.
In-Depth Look
Detailed illustration of key concepts
Visual Guide
Infographic illustration for this topic
Side-by-Side Comparison
Visual comparison of options and alternatives

Sources & References
- Interior Painting Tips: Best Practices From an Expert - This Old House
- DIY How to Paint like a Pro Series A to Z - YouTube
- How Do You Professionally Paint The Interior Of A House ...
- House Painting Guide: DIY Tips from Pro Painters
- Best Interior & Exterior Paint Buying Guide - Consumer Reports
- Best Paint for Commercial Buildings - Miko LLC
- Best Industrial Painting Brands: A 2025 Comparison Guide
- Choosing the Right Exterior Paint for Commercial Buildings
- Building Codes, Standards, and Regulations: Frequently Asked ...
Frequently Asked Questions
Need Professional Help?
Find top-rated house painters experts in your area