Tired of scuffs and fading? Our pro guide shows you how to clean painted walls, remove tough stains, and protect paint from UV rays. Keep walls looking brand new for years.
Key Takeaways
- **Grease and Oil Stains (Kitchens & Dining Areas):** Kitchen grease is its own beast. Make a paste from baking soda and just enough water to hold it together. Smear it on the greasy spot, let it sit maybe 10-15 minutes so the baking soda can pull out the oil. Wipe it off with a barely-damp cloth. For really stubborn grease, one drop of Dawn in a spray bottle of water does the job — spray it on your cloth (not the wall), then wipe gently. Don't soak the wall.
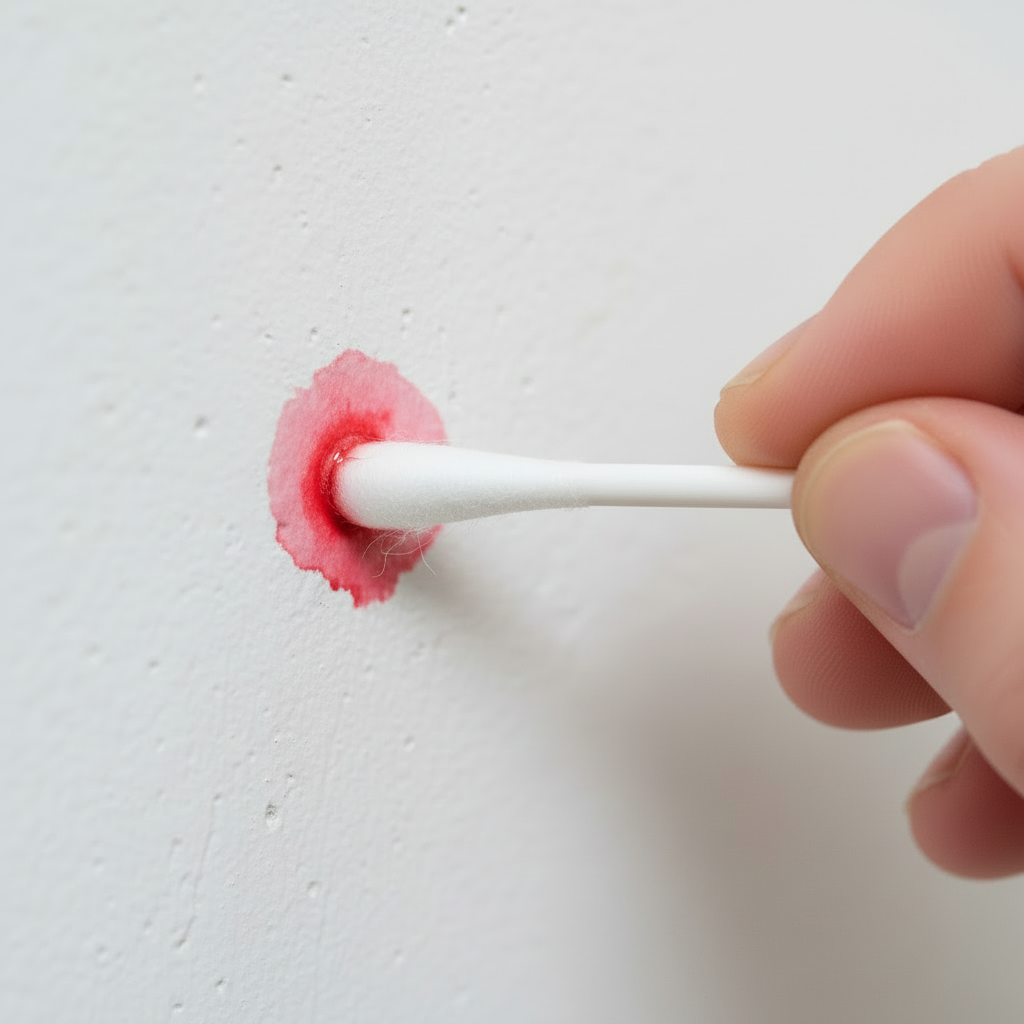
- **Marker and Crayon Marks (Kids' Rooms):** Ah, the joys of parenthood! For these frequent culprits, start with a simple pencil eraser—it often works surprisingly well for crayon, rubbing it gently back and forth. For permanent marker, lightly dab with isopropyl alcohol on a cotton swab and work from the outer edge of the mark inward to prevent spreading. Don't rub hard; just blot. Magic erasers *can* work, but they're abrasive and can dull a painted finish, so use them as a last resort and with extreme caution, testing first. I've patched more Magic Eraser "clean-ups" than I can count.
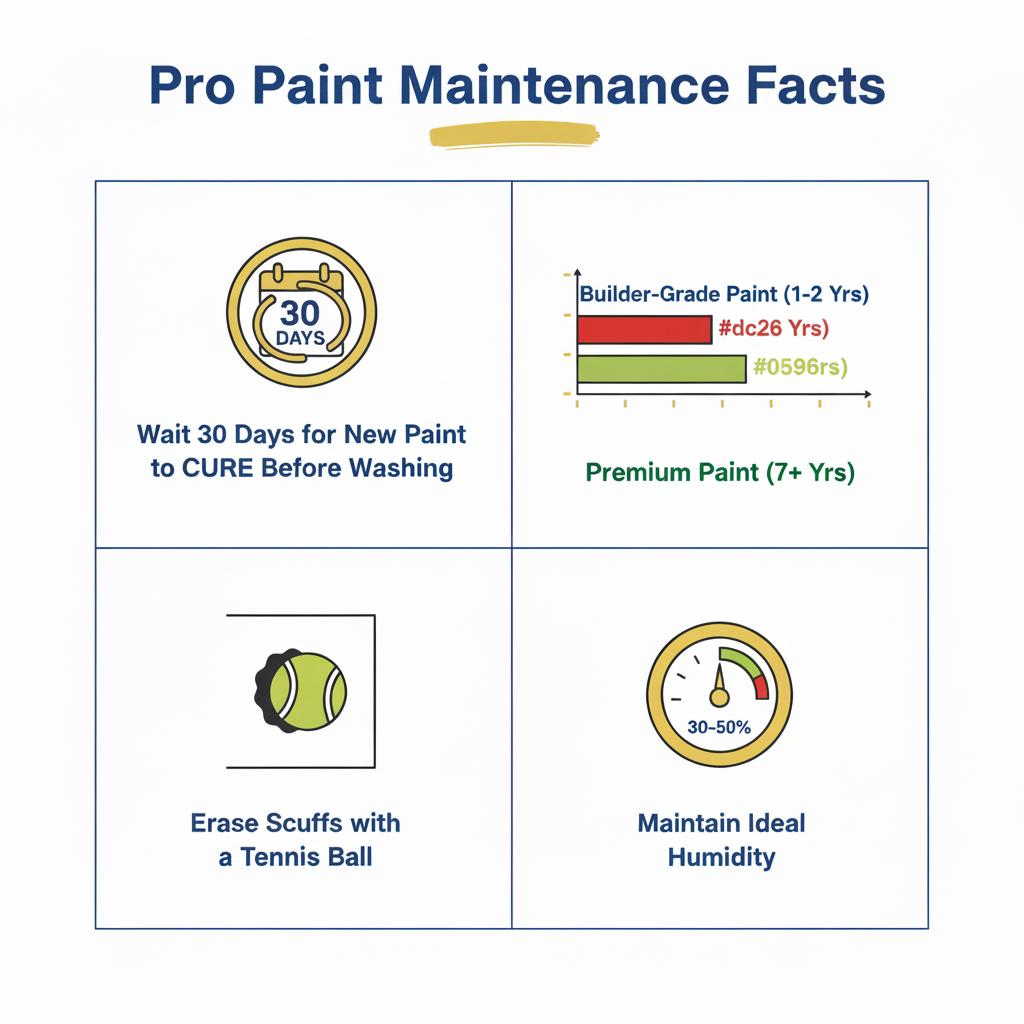
- **Ugly Scuff Marks:** Forget the wet rag for scuffs; that often just creates a larger, smeared mess. Instead, grab a clean, dry tennis ball. Believe it or not, firmly rubbing the scuff mark with the tennis ball lifts the rubber or shoe residue right off without harming the underlying paint. It's one of those old-school tricks that actually works! You could also try a kneaded eraser if you've got one lying around from your kid's art supplies.
- **Mildew and Mold Spots:** This often pops up in damp bathrooms, basements, or forgotten corners. Mix one part bleach with three parts water, dab it on with a cloth — don't drench the wall, just get the spot damp. For non-bleachable surfaces or if you prefer a milder approach, white vinegar (undiluted) works too. Always wear gloves and ensure good ventilation when using bleach. And remember, thorough drying afterward is key to preventing recurrence. Moisture is key.
Key Takeaways
Wall Paint Maintenance: A Pro's Guide to Fresh Walls and Longevity
Ever stare at your walls and wonder why they're looking a bit tired after just a year or two? Happens to the best of us. The simple truth? Good wall paint maintenance is absolutely key. Keeping your painted surfaces looking sharp and extending their lifespan isn't complicated, but it *demands* a consistent approach. We're talking gentle cleaning, effective stain removal, and speedy minor repairs. Seriously, don't skip those steps. It'll save you headaches and cash.
At BizzFactor, our certified house painters have perfected a system that works. It can help your paint job last an extra 3 to 5 years, often with way less effort than you'd expect. It's all about smart, regular upkeep.
Why Choosing the Right Paint is CRUCIAL for Long-Term Wall Care
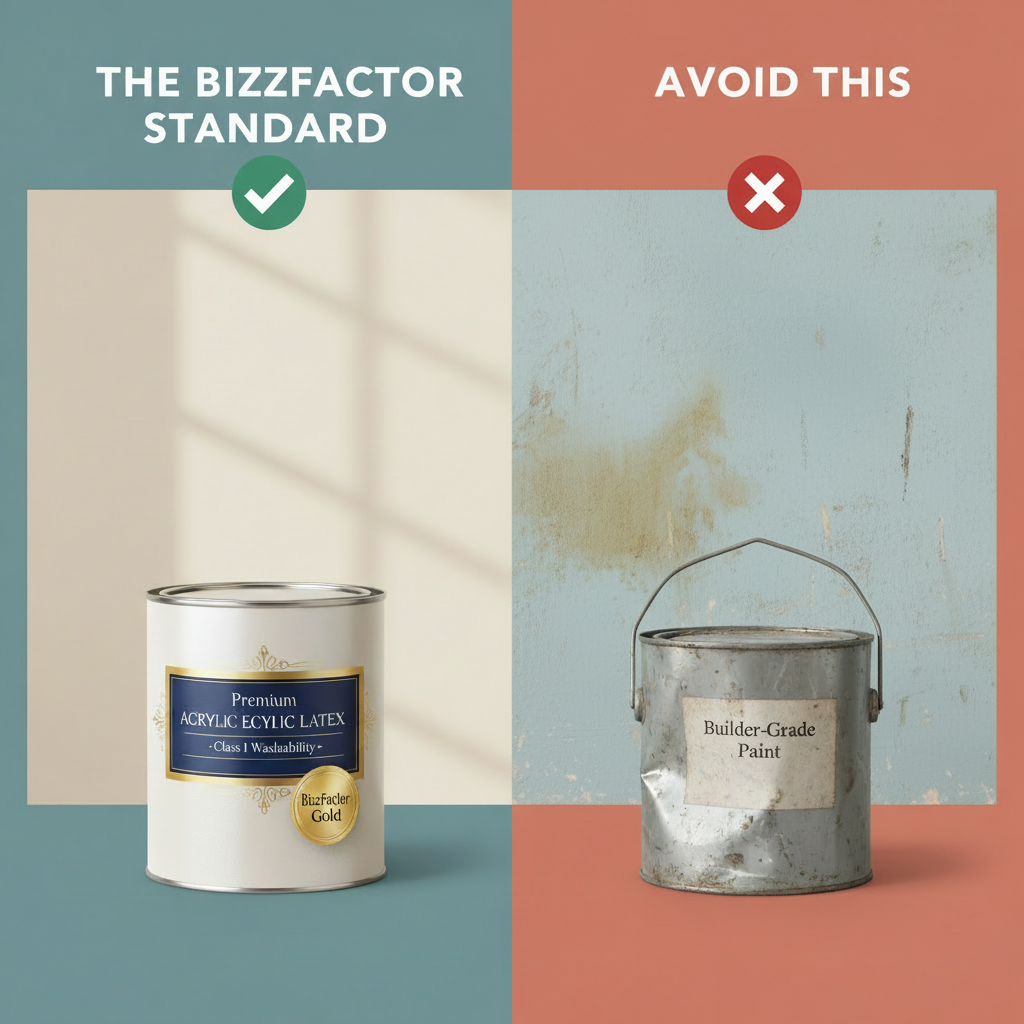
Look — washable paint isn't some upgrade you think about later. It's the foundation. Our crews won't touch a wall without premium acrylic latex in the sprayer. These paints use polymer technology that creates a surface you can actually *clean* instead of just gently wipe and pray. Sticky fingers? Coffee splatter? That random mark that appeared overnight? Good paint handles all of it.
Spend the money now, skip the repaint in three years. A couple in Buckhead learned this the hard way — used builder-grade stuff throughout their 3,200 sq ft home. Within eighteen months, we were back repainting their kitchen and hallways. Cost them an extra $4,800 they didn't need to spend.
"Builder-grade paint is cheap for a reason—it just can't stand up to real life." That's a direct quote from one of our most experienced crew leaders, Frank, who's been painting homes in the Dallas area for over 30 years. And he's right. We frequently inspect homes where the original, low-grade paint shows significant staining and scuffing after only a couple of years. This happens because such paints lack the advanced polymer technology found in top-tier options like Benjamin Moore Aura or Sherwin-Williams Emerald. That's the real issue. Instead of just colored liquid, you're getting a film that actually flexes with your walls. It pushes back against fading. Resists moisture creeping in. Laughs at scuffs. The chemistry is just different — those polymer chains bond tighter, cure harder, last longer. They're just built different. You get what you pay for.
So here's our standard: We only use Class I washability-rated paints. Period. That rating means you can scrub your walls when your nephew decides the hallway is his canvas — and the paint won't lift or streak or fade. It's a baseline requirement for all our [house painting services](link_to_house_painting_services_page), and honestly? You shouldn't accept anything less.
Understanding the Difference: 'Dry Time' vs. 'Cure Time' for Paint
So many people get this wrong (and I totally did with my first house). Paint feels dry after maybe two hours, right? You touch it, seems fine. But that's not when it's actually *ready*. Full cure? That's when your paint hits maximum hardness, becomes as tough as it'll ever get — and it takes three to four weeks to get there. Yeah. Weeks.
I watched a homeowner in Plano try to wipe down her freshly painted guest bathroom after five days. She used a regular all-purpose cleaner. Took the paint right off in streaks. We had to sand, prime, and repaint two full walls. Wait the full 30 days before any serious cleaning. Just wait. Your impatience isn't worth a $600 repair bill.
How to Effectively Dust and Clean Your Painted Walls
Dust builds up faster than you think. And once it embeds into your paint's surface, you're dealing with dingy walls that won't come clean no matter how hard you scrub. Weekly dusting isn't exciting, but it's the difference between walls that stay bright and walls that turn gray-ish within two years. Grab a microfiber cloth or your vacuum's soft brush attachment (low setting only). Hit the walls before that airborne grime becomes part of your finish.
It's not complicated. Just follow these expert steps:
1. **Start High, Go Low:** Work from the ceiling down — gravity does half your work for you. Everything you knock loose falls onto sections you haven't touched yet instead of the parts you already cleaned. Smart, right?
2. **Focus on High-Traffic and Accumulation Zones:** Pay extra attention to areas near air vents, ceiling fans, and busy hallways. That's where dust loves to gather—it's like a magnet. Also, consider the tops of door frames and window sills. Little details, big difference.
3. **Handle Textured Walls Gently:** For walls with texture (like stucco or orange peel), use a soft-bristled brush or an electrostatic duster. This helps you reach into crevices and nooks without scratching or damaging the delicate paint surface. You don't want to create new problems where there weren't any.
We tell clients to set up a simple rotation: dust living areas weekly and bedrooms every other week. A little maintenance now beats the hell out of scrubbing hard later (which usually damages the paint anyway). That's the real issue. Think of it as a little bit often, rather than a whole lot once in a blue moon. Consider integrating this into your [home cleaning routine](link_to_home_cleaning_services_page).
The Best Way to Safely Remove Common Wall Stains
Here's what you need to know about stain removal: your cleaning method needs to match the mess you're dealing with. You can't use the same approach on crayon that you'd use on grease — that's how people wreck perfectly good paint jobs. Our painting professionals always recommend testing any cleaning method in an inconspicuous area first. What's an inconspicuous area? Think behind a large piece of furniture, inside a closet, or a small corner that's rarely seen. Try your cleaner there first so you don't accidentally bleach or strip paint off your main wall. With most household stains, gentle wins. Every time. Heavy scrubbing is usually the enemy (and your paint's).
I've watched too many homeowners destroy perfectly good finishes trying to muscle through a stain with a Brillo pad. Don't be that person. Frank (my crew lead with three decades under his belt) keeps a little kit in his truck — baking soda, white vinegar, isopropyl alcohol, tennis balls. Sounds random, but these basics solve probably 90% of the stains we see. He learned most of this from his dad, who painted houses in North Dallas starting in the '70s. Old-school methods that actually work.
- **Grease and Oil Stains (Kitchens & Dining Areas):** Kitchen grease is its own beast. Make a paste from baking soda and just enough water to hold it together. Smear it on the greasy spot, let it sit maybe 10-15 minutes so the baking soda can pull out the oil. Wipe it off with a barely-damp cloth. For really stubborn grease, one drop of Dawn in a spray bottle of water does the job — spray it on your cloth (not the wall), then wipe gently. Don't soak the wall.
- **Marker and Crayon Marks (Kids' Rooms):** Ah, the joys of parenthood! For these frequent culprits, start with a simple pencil eraser—it often works surprisingly well for crayon, rubbing it gently back and forth. For permanent marker, lightly dab with isopropyl alcohol on a cotton swab and work from the outer edge of the mark inward to prevent spreading. Don't rub hard; just blot. Magic erasers *can* work, but they're abrasive and can dull a painted finish, so use them as a last resort and with extreme caution, testing first. I've patched more Magic Eraser "clean-ups" than I can count.
- **Ugly Scuff Marks:** Forget the wet rag for scuffs; that often just creates a larger, smeared mess. Instead, grab a clean, dry tennis ball. Believe it or not, firmly rubbing the scuff mark with the tennis ball lifts the rubber or shoe residue right off without harming the underlying paint. It's one of those old-school tricks that actually works! You could also try a kneaded eraser if you've got one lying around from your kid's art supplies.
- **Mildew and Mold Spots:** This often pops up in damp bathrooms, basements, or forgotten corners. Mix one part bleach with three parts water, dab it on with a cloth — don't drench the wall, just get the spot damp. For non-bleachable surfaces or if you prefer a milder approach, white vinegar (undiluted) works too. Always wear gloves and ensure good ventilation when using bleach. And remember, thorough drying afterward is key to preventing recurrence. Moisture is key.
How to Prevent Sun Damage and Fading in Painted Walls
Sun damage sneaks up on you. One day your living room looks great, two years later you move a picture frame and there's this perfect rectangle of the original color staring back at you. UV rays are relentless, especially in bright rooms facing south or west.
Window films work. So do cellular shades (the kind with the honeycomb structure). Either option blocks around 99% of UV while still letting light through. I installed 3M window film in my own sunroom after the paint started shifting from "Accessible Beige" to something closer to "Sad Yellow" within four years. Cost me about $180 for the film. Would've cost $1,200+ to repaint.
Another trick: rotate your furniture and artwork maybe twice a year. Sounds silly until you see a house where someone left the same couch against the same wall for seven years. The outline is brutal. For rooms that get hammered by afternoon sun, ask your painter about UV-protective topcoats during your next [exterior painting project](link_to_exterior_painting_page) or interior refresh. Adds maybe 10% to the paint cost, doubles how long your color stays true.
Does Humidity Impact My Painted Walls? (Spoiler: YES!)
Yeah, absolutely. And it's probably doing more damage than you realize. Moisture attacks paint at the molecular level — breaks down the bond between your paint and the wall itself. I've seen blistering so bad in a Frisco bathroom that the paint literally bubbled off in sheets. Homeowner never ran the exhaust fan. Ever. We had to strip, treat for mold, prime with a moisture-blocking product, then repaint. Whole job ran around $1,800 for one bathroom.
Keep your indoor humidity somewhere between 30-50%. Get a cheap hygrometer (they're like $15 at Lowe's) so you actually know what you're dealing with instead of guessing. Run exhaust fans in kitchens and bathrooms for at least 30 minutes after you cook or shower — that steam needs to go somewhere besides into your drywall. If your house consistently feels clammy, a dehumidifier isn't a luxury. It's insurance against paint failure.
Look — look — look — look — temperature swings matter too. If you're cranking heat in winter and blasting AC in summer without any transition, your paint expands and contracts constantly. That's what causes cracking, especially around windows and doors. Keep things relatively stable if you can. Your walls (and your utility bill) will thank you. Might be worth checking out [moisture control and damage repair](link_to_moisture_control_service_page) services if you're already seeing signs of trouble.
Protecting Walls from Furniture Scuffs and Minor Dings
Real talk — most wall damage happens within three feet of the floor. Chairs get pushed back. Kids lean stuff against walls. Vacuum cleaners bump corners. It's just life.
Keep furniture about 2-3 inches away from walls when possible. Not a huge gap, just enough breathing room. Stick clear adhesive bumpers or felt pads on anything that touches your walls regularly: headboards, desk corners, the backs of dining chairs, picture frames. You can get a pack of 50 felt pads at Home Depot for maybe $6. That's way cheaper than touch-up paint and your Saturday afternoon.
For high-traffic hallways or rooms with kids, consider a clear chair rail or even a tougher semi-gloss finish on the lower half of walls. Semi-gloss cleans easier and resists scuffs better than flat or eggshell. We painted a house in Alpharetta where the family had
In-Depth Look
Detailed illustration of key concepts
Visual Guide
Infographic illustration for this topic
Side-by-Side Comparison
Visual comparison of options and alternatives
Sources & References
- The Ultimate Guide to Maintaining Your Painted Walls
- The Secrets of Pro Painters: Mastering Interior Painting Techniques
- How Often Should I Repaint My Walls? A… - All Covered Painting
- A Pro Painter's Top House Painting Tips and Tricks | HGTV Home Tips
- Best Interior & Exterior Paint Buying Guide - Consumer Reports
- Best Paint for Commercial Buildings - Miko LLC
- Best Industrial Painting Brands: A 2025 Comparison Guide
- [PDF] INDUSTRY STANDARDS - Painting Contractors Association
- Building Codes, Standards, and Regulations: Frequently Asked ...
Frequently Asked Questions
Need Professional Help?
Find top-rated house painters experts in your area