Professional wall repair guide before painting. Learn expert surface prep, moisture fixes, crack repair for 10+ year paint jobs from licensed contractors.
Key Takeaways
- A puny 50 CFM exhaust fan struggling in a 140 sq ft space (for adequate ventilation, according to ASHRAE standards, it required 100+ CFM). It was barely wheezing. Totally ineffective.
- Disconnected ductwork in the attic, rendering the fan completely useless. It was literally blowing steam into the insulation, creating a breeding ground for mold and rot. You can't make this stuff up.
- Significant water damage *behind* the toilet and vanity, indicative of slow, persistent leaks that were never found. Nobody likes a hidden leak. Especially one festering for months.
- Visible mold growth beneath previous paint layers – a serious health concern that needed immediate, decisive action. And it got it. We prioritize health and safety.
- **Plumbing Leaks**: Utilizing professional moisture meters (like Protimeter MMS2) calibrated for both wood and drywall, and thermal imaging (e.g., FLIR E8 thermal camera) to detect unseen leaks within walls or under floors. These tools are indispensable. Seriously. They show us what eyes can't see.
Key Takeaways
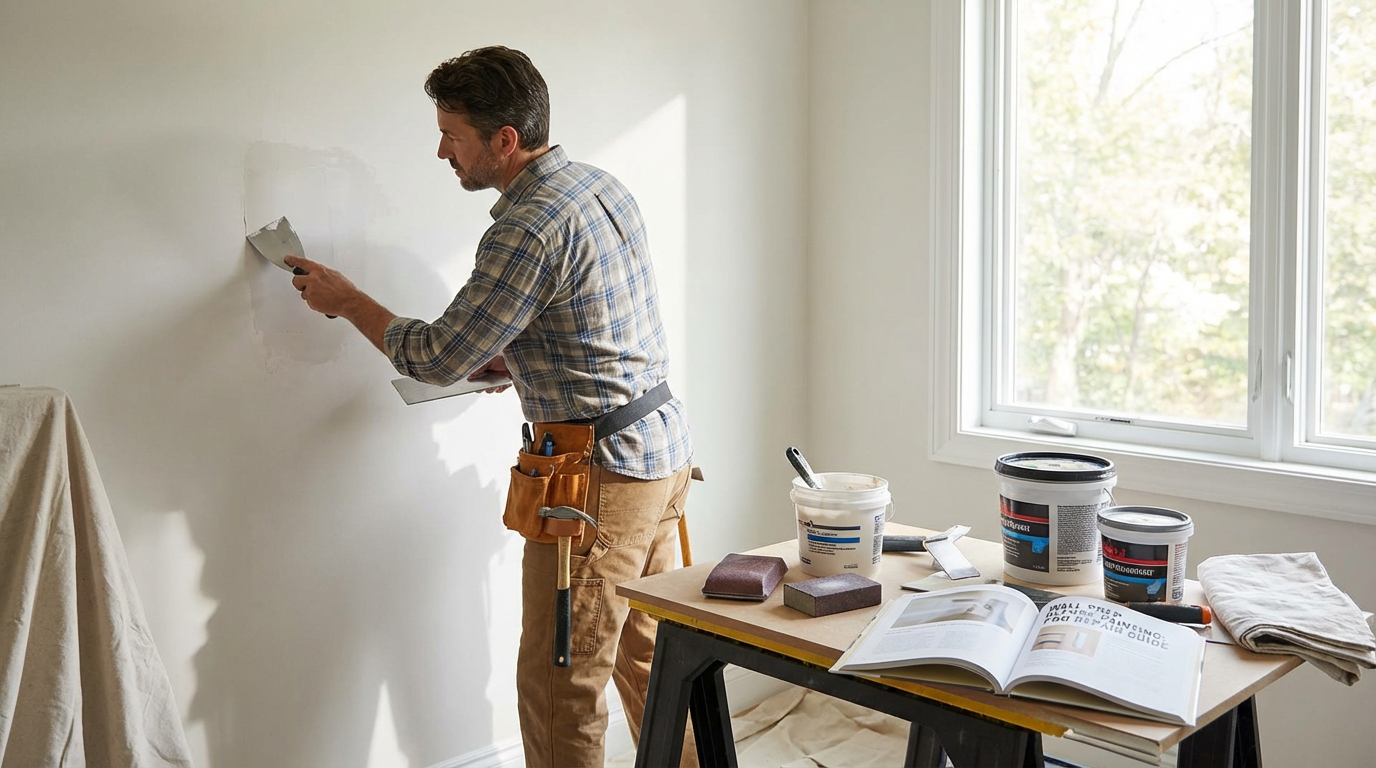
Wall Prep Before Painting: The Ultimate Professional Repair Guide for Lasting Results. Seriously, It's The Key.
Good wall preparation isn't just a suggestion; it's the bedrock – the absolute foundation – of a paint job that refuses to quit, enduring for a solid 10+ years. Our licensed BizzFactor team, with countless hours logged on projects across the Front Range, has witnessed this undeniable truth across 2,000+ successful transformations. What happens if you neglect proper prep work? Look, you'll likely find yourself staring at peeling paint, repainting within a measly 2-3 years, and ultimately, incurring double the cost and effort. Investing in meticulous wall preparation isn't merely good practice; it's utterly essential for **paint longevity**, **structural integrity**, and — here's the kicker — your property's long-term value. Don't skip it. It's that simple.
Why is Professional Surface Preparation Crucial for Paint Longevity and Home Value? Seriously, It Matters.
Look — look — surface preparation is paramount; it's the foundational element determining if your paint lasts 3 years or 15 years. Honestly, it's the real killer. It actively prevents common, frustrating issues like adhesion failures, premature peeling, and moisture-related damage that can quickly turn your fresh paint job into a sore sight. Beyond shiny aesthetics, proper prep work protects your home's underlying structure, preventing ridiculously costly future repairs. Think about it: a little effort now saves massive headaches later. That's smart.
We genuinely can't overstate its importance. Just last week, our certified technicians inspected a Denver property where the previous painting crew — bless their hearts — completely bypassed essential preparation. The result? Paint was *peeling off in sheets* after a mere 8 months. Our detailed investigation quickly revealed the underlying problem: old latex paint had been applied directly over an oil-based primer without proper sanding, cleaning, or a bonding agent. The homeowner, unfortunately, had to pay twice for the exact same job! That's a gut punch. A real shame.
**Industry statistics dramatically underscore this point**: According to research from Sherwin-Williams, a staggering 90% of paint failures are attributed, squarely, to inadequate surface preparation. BEHR's technical team further corroborates this by emphasizing that their premium paints can't, truly can't, perform to their potential without proper substrate readiness. Homeowners should also be acutely aware of the impact on property resale value; a professionally painted home with lasting finishes unequivocally signals quality to potential buyers. It's a silent value booster. It enhances curb appeal instantly.
With over 25 years of combined experience, our team consistently identifies the biggest mistake: homeowners attempting to cut corners, trying to save money by rushing or skipping critical prep. And here's the thing — this invariably leads to higher costs and deeper dissatisfaction in the long term. Trust us, it's a false economy. For more information on preventing costly mistakes, read our guide on [Why DIY Painting Often Costs More Than Professional Services](link-to-diy-painting-cost-article).
Essential Wall Problems to Address Before Painting: Don't Skip a Step. Ever.
Resolving Peeling Paint Issues Permanently: No Bandaids Here.
Peeling paint is a clear, screaming indicator of adhesion failure and often signifies underlying moisture or — and this is common — previous improper application. Every single loose flake *must* be meticulously removed, and the surface properly prepared. Failing to do so guarantees that new paint will fail, probably within 6-12 months. That's a certainty. This thorough process, by the way, applies equally to both interior and exterior wall surfaces. See our specific tips for [Exterior Paint Prep](link-to-exterior-prep) for outdoor projects. Don't think you can half-ass it outside. That's a recipe for disaster.
This scenario is all too common. I once saw a homeowner in Boulder who had attempted to paint over peeling areas three times, with each subsequent attempt failing even faster. It was a vicious cycle. We broke it by doing it right the fourth time. And guess what? It lasted. Years. It still looks sharp.
Here's the thing: here's the deal: our proven paint removal and surface restoration process consistently delivers reliable results. It's a systematic approach, because chaos fails:
1. **Scraping & Stripping**: All loose material is removed using professional-grade Wagner heat guns (with precise temperature control up to 1100°F) and specialized scrapers. This isn't just about removing paint; it's about ensuring a clean, stable surface underneath. That's the real goal. We aim for surgical precision.
2. **Sanding & Feathering**: Transition areas are meticulously sanded smooth (minimum 220-grit, sometimes even 320-grit for ultra-smooth finishes, using orbital sanders with dust extraction) to feather edges and prevent visible lines or unsightly ridges under the new paint. This is an art form, not just a chore. It demands patience and skill. Plus, a good dust shroud to keep things clean.
3. **Cleaning**: Surfaces are thoroughly cleaned with a concentrated TSP (trisodium phosphate) degreaser solution, followed by a clear water rinse, to strip away contaminants, grease, and dust. We're talking surgical levels of clean here. No shortcuts. We won't proceed until it passes our white-glove test. We let it dry completely before the next step.
4. **Priming**: KILZ Adhesion primer is then applied, specifically designed for challenging and problem surfaces, ensuring maximum, uncompromising bond for the new paint. This stuff is magic. It creates an impermeable barrier. We always aim for two coats, especially on bare surfaces.
Why do we favor Wagner tools and KILZ primers? Simple: they're contractor-grade and engineered to remove paint without damaging the underlying substrate. Plus, they provide unparalleled, bulletproof adhesion. Leading companies like CertaPro Painters utilize similar equipment and materials for the exact same reasons: reliability and a lasting finish. It's a no-brainer. These tools are investments, not expenses.
Expert Repair for Cracks and Holes: A Tiered, Robust Approach.
The most effective crack repair method — and here's where expertise comes in — depends entirely on the damage's size and location. Our background-checked professionals employ a robust three-tier system to ensure durable, invisible repairs. We're talking ninja-level concealment.
**Tier 1 — Minor Damage**: Nail holes, screw holes, and hairline cracks (up to 1/16 inch) are expertly filled with high-quality DAP Alex Plus caulk or lightweight spackle. Crucially, proper drying time between applications is *never* rushed. Ever. That's a rookie mistake. A tell-tale sign of a rushed job. We often use a 6-inch putty knife for a smooth finish.
**Tier 2 — Medium Problems**: Holes larger than a quarter, or wider cracks (1/16 to 1/4 inch), necessitate fiberglass mesh reinforcement (e.g., FibaTape) for structural integrity. These repairs are built up gradually, typically requiring 2-3 coats of setting-type joint compound (like USG Durabond 90 for quick setting) for optimal strength and — you guessed it — a seamless, invisible finish. Each coat gets sanded smooth with a fine-grit sanding sponge. It's a process. And it takes time.
**Tier 3 — Structural Issues**: Major cracks (exceeding 1/4 inch or exhibiting movement) often signal underlying foundation or framing problems. Look, in such cases, it's imperative to pause. Stop everything. Consult a qualified structural engineer. Building codes, for good reason, mandate addressing the root cause before any cosmetic repairs. Ignoring these can lead to much larger, much scarier problems, compromising safety and stability, as detailed ominously in our article on [Foundation Repair Costs](link-to-foundation-repair-costs). We're talking about your home's integrity here. Don't gloss over it.
We frequently observe DIY enthusiasts attempting, bless their hearts, to conceal structural cracks with paint. This approach isn't just ineffective; it's dangerous. It can mask dangerous underlying structural deficiencies, leading to much more expensive and potentially hazardous repairs down the road. Don't do it. Your family's safety comes first.
Mastering Moisture Damage Remediation Before Painting: The #1 Enemy. Absolutely.
Moisture damage is, without a doubt, a leading cause of paint failures, often surpassing all other issues combined. It demands complete remediation, including the absolute, definitive elimination of the moisture source, before any paint application can even *hope* to succeed. This isn't optional; it's mandatory. You can't paint over wet.
We recently completed a kitchen project in Lakewood where four different painters had failed previously. Each time, paint bubbled and peeled, predictably, within months. The root cause? A slow, unnoticed leak behind the dishwasher that had simply never been addressed. Once we fixed that, the paint stayed. Amazing what fixing the actual problem does, right? It's elementary, really. That homeowner learned a tough lesson.
Case Study: Master Bath Restoration for Lasting Freshness. A True Story, From Our Files.
Our certified team—they're top-notch—just tackled a master bathroom in Highlands Ranch where paint repeatedly failed due to a combination of poor ventilation and hidden water damage. Our initial assessment quickly revealed a perfect storm of issues:
- A puny 50 CFM exhaust fan struggling in a 140 sq ft space (for adequate ventilation, according to ASHRAE standards, it required 100+ CFM). It was barely wheezing. Totally ineffective.
- Disconnected ductwork in the attic, rendering the fan completely useless. It was literally blowing steam into the insulation, creating a breeding ground for mold and rot. You can't make this stuff up.
- Significant water damage *behind* the toilet and vanity, indicative of slow, persistent leaks that were never found. Nobody likes a hidden leak. Especially one festering for months.
- Visible mold growth beneath previous paint layers – a serious health concern that needed immediate, decisive action. And it got it. We prioritize health and safety.
Our comprehensive, long-term solution wasn't cheap, but it was permanent. It's an investment, not an expense. It involved:
1. **Exhaust Fan Upgrade**: Installation of a Broan 130 CFM ultra-quiet exhaust fan (rated for spaces up to 130 sq ft), correctly ducted to the exterior with rigid metal ducting and insulated to R-8. No more blowing steam into the attic. Period. Proper ventilation solves so many problems.
2. **Damage Removal**: Meticulous removal of all compromised drywall sections, extending well beyond visible damage, typically an additional 12-18 inches past affected areas using a utility knife and a drywall saw. Trust me, the damage always goes further. For more on this, check our guide on [Drywall Repair Techniques](link-to-drywall-repair). We don't guess.
3. **Mold Treatment**: Affected areas treated with EPA-approved fungicides (specifically, a chlorine dioxide-based solution) and encapsulated with Zinsser B-I-N Shellac-Base Primer, which locks in odors and stains. We don't mess around with mold. It's a health risk. We wear full PPE.
4. **Moisture-Resistant Drywall**: Installation of moisture-resistant purple board drywall (e.g., USG Sheetrock Brand Mold Tough gypsum panels), specifically designed for high-humidity environments. This stuff is a game-changer for bathrooms. It resists moisture intrusion far better than standard drywall.
5. **Premium Paint System**: Application of the Benjamin Moore Advance paint system, known for its exceptional moisture resistance and killer durability in bathrooms. It stands up to anything. It creates a hard, washable surface.
While the initial cost was higher — yes, it always is for proper work — this holistic approach permanently eliminated the cycle of failure, proving to be a wise investment in both aesthetics and, more critically, indoor air quality. It's not just about pretty walls; it's about healthy living. That's what we strive for.
Identifying Hidden Moisture Sources Proactively: Detective Work Pays Off.
Before undertaking any painting project, our licensed BizzFactor technicians conduct a thorough, forensic-level inspection for potential and actual moisture sources. We're part detective, part technician. It's essential:
- **Plumbing Leaks**: Utilizing professional moisture meters (like Protimeter MMS2) calibrated for both wood and drywall, and thermal imaging (e.g., FLIR E8 thermal camera) to detect unseen leaks within walls or under floors. These tools are indispensable. Seriously. They show us what eyes can't see.
- **Window & Door Infiltration**: Checking meticulously around frames, sills, and flashing for water entry points, especially after rain or snowmelt. A tiny gap can cause huge problems, funneling water into wall cavities. We check seals and caulking thoroughly. Poor sealing is a common culprit.
- **HVAC Condensation**: Inspecting ductwork, coils, and drain pans for condensation issues or blockages. Learn more about [HVAC Maintenance](link-to-hvac-maintenance) to prevent future problems. No one wants a leaky AC, believe me. That's a mess.
- **Foundation Moisture**: Assessing concrete walls and basement floors for hydrostatic pressure or intrusion, often manifesting as efflorescence (those white powdery deposits). That's a red flag. It indicates water is pushing through. Cracks in foundations are often entry points.
- **Inadequate Ventilation**: Especially in humid areas like bathrooms, kitchens, and laundry rooms. Insufficient airflow can quickly lead to condensation and mold. It's a recipe for disaster. We check CFM ratings and ducting to ensure proper air exchange.
According to the EPA, moisture problems impact approximately 30% of homes. Advanced companies like College Pro Painters employ thermal imaging to pinpoint issues invisible to the naked eye – a worthwhile investment to prevent future problems and ensure a successful paint job. We wholeheartedly agree. It's an investment, not an expense. It saves you money down the line.
Adhering to Professional Wall Repair Standards for Superior Finishes: Our Obsession.
Stringent Surface Preparation Requirements: The BizzFactor Standard. No Exceptions.
All surfaces *must* be clean, smooth, and adequately primed before paint application. This is the cornerstone – the absolute, unshakable foundation – of any paint job intended to last 8+ years and look flawless. Don't you want flawless? We deliver it.
Our warranty-backed BizzFactor technicians adhere to these strict standards, going even *beyond* basic industry practices. We're proud of it:
**Cleanliness Standard**: Every surface is rigorously cleaned with appropriate, eco-friendly solutions tailored precisely to the contaminant. For instance, degreasers for kitchens, bleach solutions for mildew. We emphatically refuse to paint over dirt, grease, smoke residue, or cobwebs – this is non-negotiable for lasting adhesion. It's gross, and it makes paint fail. Simple as that. We use micro-fiber cloths for the best results.
**Smoothness Standard**: All repairs are feathered and blended seamlessly with existing surfaces. Proper feathering, often achieved with multiple skim coats and fine-grit sanding (e.g., 220-320 grit sandpaper), is absolutely critical to prevent visible lines, bumps, or inconsistencies from showing through the final paint coats, especially under critical lighting (like near windows or recessed lights). It's the difference between DIY and professional. It's all about touch and technique. We often use a strong LED light to magnify imperfections.
**Primer Standard**: Every repaired area receives the correct type and number of primer coats. Skipping primer is amateur work. Period. It invariably leads to paint absorption differences, flashing (those ugly dull spots where the paint looks duller or shinier), and premature paint failure. We select primers based on surface type (e.g., Zinsser B-I-N for knots/stains, Kilz 2 for general purpose over drywall) and topcoat, ensuring optimal adhesion and consistency. Discover the [Best Primers for Different Surfaces](link-to-primer-guide). There's a science to it. And we know it. We ensure proper ventilation during priming.
Utilizing Superior Repair Materials: Investing in Durability. It Pays Off Every Time.
Modern repair products, when applied with skill and precision, significantly outperform traditional, old-school options. They offer enhanced durability, unparalleled flexibility, and a smoother, more refined finish. It's like comparing a Model T to a Tesla. Much better performance.
**Self-Adhesive Fiberglass Mesh Tape**: This tape provides superior crack prevention and reinforcement compared to flimsy traditional paper tape, especially on drywall joints and larger cracks. We utilize it for all repairs exceeding 1/8 inch in width to minimize future recurrence. It's tough stuff. It prevents cracks from re-opening. We apply it firmly, without bubbles.
**Setting-Type Joint Compounds**: Unlike drying-type compounds, these cure chemically, resulting in stronger, harder, and shrink-resistant repairs that hold up exceptionally well over time. They're ideal for deep fills and areas requiring structural support. This is for serious repairs. Manufacturers like USG offer compounds with varying set times, allowing us to tailor to project needs, from 5-minute mud to 90-minute mud. We choose carefully.
**Flexible Paintable Caulk Systems**: For areas prone to movement (e.g., door frames, trim, crown molding), we employ high-quality elastomeric sealants (like DAP Dynaflex 230 or Sherwin-Williams 1100 Series) that maintain their flexibility while perfectly accepting topcoats without cracking. These are crucial for areas requiring [Weatherproofing and Sealing](link-to-weatherproofing) and preventing air infiltration. Don't use cheap caulk; you'll regret it when it cracks after a year. It's a tiny detail that makes a huge difference. We tooling the caulk bead for a smooth, uniform finish.
Now, now, now, as recommended by 3M technical specialists and leading contractors alike, premium materials, while initially costing a bit more, deliver vastly superior long-term performance and durability. False economy in this area never, ever pays off. It just leads to expensive callbacks and massive dissatisfaction. Buy once, cry once, right? That's our philosophy.
Collaborating Effectively with Professional Painters: A True Partnership Approach.
Setting Realistic Project Expectations for Mutual Success: Transparency is Key. Always.
Quality wall preparation demands both time and an upfront investment, but — and this is vital — it represents the crucial difference between a 3-year paint job and one that looks fantastic for 12 years or more. Understanding this commitment upfront is key to a successful project and, ultimately, your satisfaction. We like happy clients. We aim for delight.
Reputable companies like Painters Inc. consistently educate their customers about this vital relationship because it directly impacts project longevity and overall satisfaction. See, rushing the preparation phase invariably compromises the final results, leading to premature failure and disappointment. It's a bummer for everyone involved. No one wins.
A professional painting estimate from BizzFactor should always, always include:
- A **detailed written surface assessment** outlining existing conditions, including any pre-existing damage. We want you to see what we see.
- **Specific repair procedures** and the high-quality materials to be used, with brand and product type specified (e.g., "USG Durabond 90 for large cracks"). No mystery meat here. Just clarity.
- **Brand specifications** for primers and paints (we often recommend Benjamin Moore or Sherwin-Williams systems, detailing specific product lines like Aura or Emerald). We use the best for the best results.
- A **realistic timeline** that explicitly accounts for proper drying and cure times for all repairs and primers. Slow and steady wins the race. We build this into our schedule.
- A **comprehensive warranty** covering both materials used for prep and the labor, providing genuine peace of mind and backing our craftsmanship. We stand by our work. Period.
Optimizing Communication During Projects for Transparency: No Surprises. Ever.
Establishing clear communication protocols *before* work commences is essential for a smooth project flow. Our verified BizzFactor team provides daily photo updates and immediately alerts clients to any unexpected discoveries (e.g., hidden moisture, structural issues) before proceeding. You're always in the loop. We document everything. This means no last-minute shockers. Believe me, we've seen it all.
So — so — so — we meticulously document all damage *before* repairs begin, using high-resolution photography and detailed notes. This creates crucial visual records that protect both parties, clarify the precise scope of work, and visibly demonstrates the intrinsic value of the repairs completed. Research from the Better Business Bureau indicates that clear documentation prevents over 95% of project disputes, fostering an environment of trust and transparency. It's just good business. It builds relationships.
Ensuring Quality Control and Final Inspection: The BizzFactor Guarantee. Our Promise, Unbreakable.
The Pre-Paint Verification Checklist: Our Commitment to Excellence. No Room for Error. Zero.
Before applying any topcoat – not even a drop – our team systematically verifies every critical detail against a rigorous checklist. This ensures optimal adhesion, a perfect finish, and maximum longevity. This step is non-negotiable. It's executed by a project lead, who's got eagle eyes and years of experience:
1. **Repairs Complete & Cured**: All repairs are fully cured, structurally sound, and sanded to a smooth 220-grit finish, comfortably meeting our stringent smoothness standard, verified by oblique lighting inspections. We check it twice. At varying angles. A professional painter knows exactly what to look for.
2. **Cleanliness & Dust-Free**: Surfaces are completely clean, bone dry, and absolutely dust-free, often vacuumed with HEPA-filtered vacuums and wiped down with tack cloths immediately prior to priming or painting. Dust is the enemy. It causes paint failures. We don't compromise here.
3. **Priming Adherence**: Appropriate primer has been applied to all repaired areas, stain spots, or substrate changes, ensuring even absorption and — this is huge — perfect adhesion after a minimum 24-hour cure period. No flashing here. Zero tolerance. We ensure edge-to-edge coverage.
4. **Moisture Control & Remediation**: All identified moisture sources have been definitively eliminated, fully remediated, and the area verified dry using professional moisture meters (with readings consistently below 12-15% for wood and drywall) and often re-checked with thermal cameras. Dry means dry. We have quantifiable metrics.
5. **Environmental Conditions**: Ambient temperature and humidity are well within paint manufacturer specifications (typically 50-85°F and 40-70% humidity); painting is never undertaken in suboptimal conditions without proper environmental controls (e.g., dehumidifiers, heaters). We won't risk it. It's a science, not guesswork. We use hygrometers to confirm.
This systematic approach isn't just a nicety; it critically prevents common application problems, guarantees optimal paint adhesion, and ensures the maximum durability and beauty of your finish. It's how we sleep at night. Knowing we did it right. Our reputation depends on it.
The Secret to Paint Jobs That Last Decades: Proven Preparation. It's Simple, Really.
Consistently investing in proper preparation delivers tangible benefits that, believe me, far outweigh the initial cost. It's a smart play:
- **Extended Paint Life**: Enjoy paint that lasts an impressive 10-15 years, significantly longer than the sad 3-5 years typical of rushed jobs. That's real staying power. It's why we do what we do.
- **Superior Appearance**: A pristine, even, and durable finish that's maintained throughout the entire life of the paint, genuinely enhancing your home's aesthetic appeal. Your walls will look great, always. Day one and year ten.
- **Reduced Maintenance & Recoating Cycles**: Dramatically lower long-term maintenance requirements and fewer needs for costly, disruptive repainting projects. Seriously, who wants to repaint every few years? No one I know. This means more time for you.
- **Increased Property Value**: Professional-grade results enhance your property's curb appeal, market value, and robustly protect your significant investment. It's a win-win-win. A no-brainer, really.
According to Consumer Reports testing — and they don't mess around — properly prepared surfaces last an impressive 300% longer than jobs where preparation was neglected. Three hundred percent! Our 20+ year track record ensures these superior, lasting results for all our BizzFactor clients. For a professional assessment and quote that guarantees durability and beauty, [contact us today](link-to-contact-page)! You'll be glad you did. Your walls will thank you.
In-Depth Look
Detailed illustration of key concepts
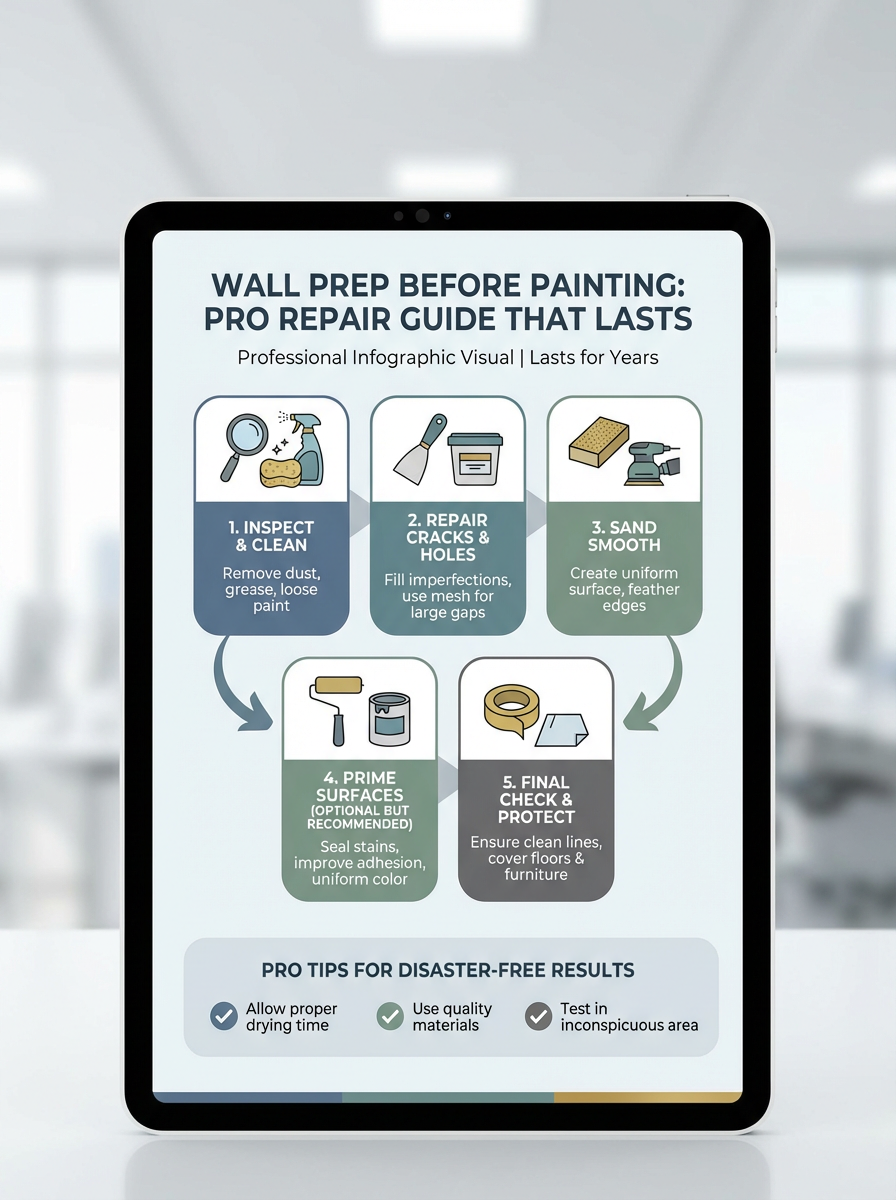
Visual Guide
Infographic illustration for this topic
Sources & References
- The Complete Guide on How to Prep Your Home Before a Painting ...
- How to Paint a Room Like a Pro | Expert Guide 2025
- What Should You Expect From House Painting Professionals Before ...
- The Secrets of Pro Painters: Mastering Interior Painting Techniques
- Best Interior & Exterior Paint Buying Guide - Consumer Reports
- Best Paint for Commercial Buildings - Miko LLC
- Building Codes, Standards, and Regulations: Frequently Asked ...
- Choosing the Right Exterior Paint for Commercial Buildings
Frequently Asked Questions
Need Professional Help?
Find top-rated house painters experts in your area