DIY vs professional spray foam costs revealed. Why 80% of DIY projects fail and cost double. Expert analysis from licensed contractors.
Key Takeaways
- We're talking chemical reactions, structural integrity, and your family's health here
- This isn't painting a wall
- It's a highly technical application with zero room for error
- The savings you think you're getting
Key Takeaways
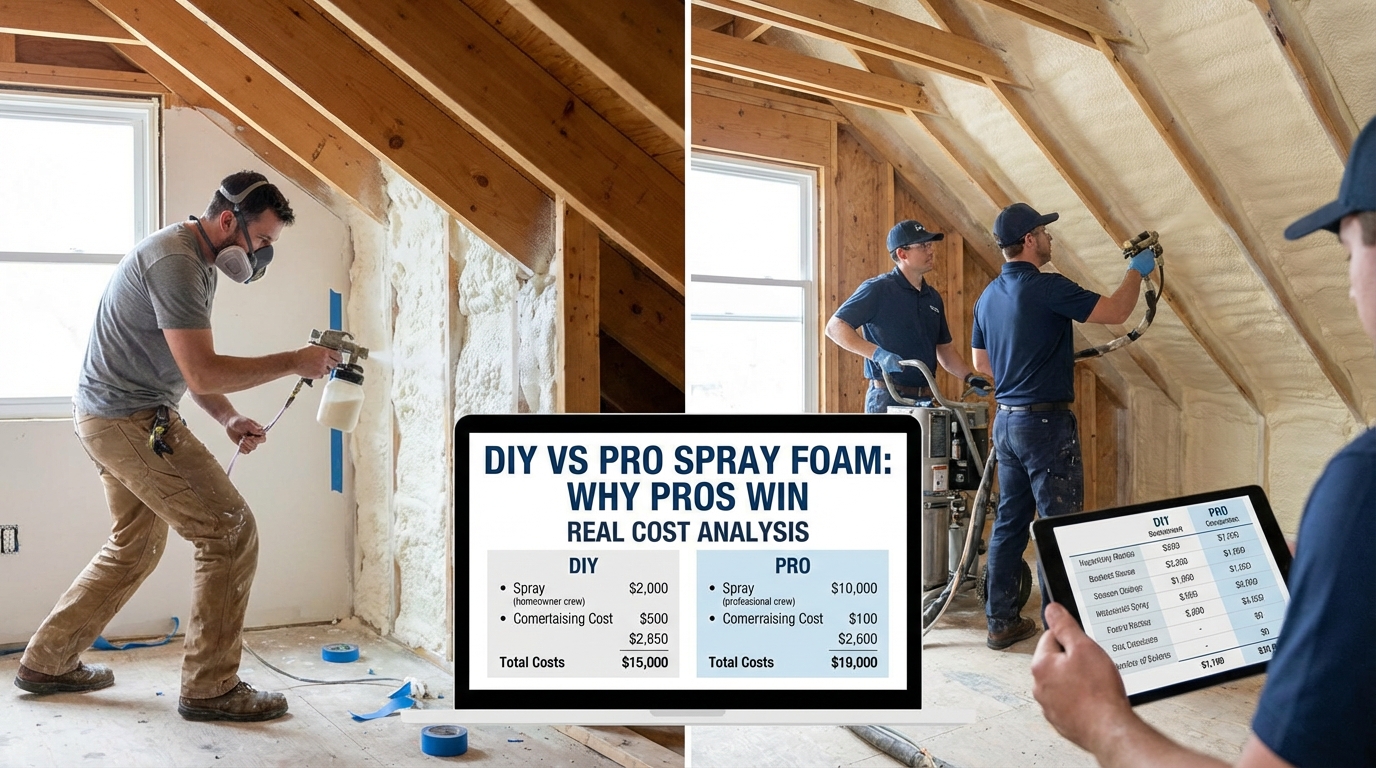
DIY vs. Pro Spray Foam: The Unvarnished Truth (Real Cost Analysis & Why Professionals Always Win)
So you're thinking about tackling that spray foam insulation project yourself?
Hold up.
Look — look — while the internet makes everything look easy (looking at you, YouTube), spray foam is one home improvement task you absolutely shouldn't DIY. I'm serious. We're talking chemical reactions, structural integrity, and your family's health here. This isn't painting a wall. It's a highly technical application with zero room for error.
The savings you think you're getting? They evaporate faster than you can say "vapor barrier." Usually turn into expensive nightmares down the road.
Professional spray foam installation isn't just a convenience — it's a strategic investment in your home's longevity, energy efficiency, and — crucially — your well-being. At BizzFactor, we've seen it all: the good, the bad, and the spectacularly ugly DIY attempts. Our mission here? Equip you with the cold, hard facts, a cost analysis, and the technical understanding you need to make an informed decision. Because protecting your home and the people in it — that's what matters.
Unpacking the DIY Dream: Why It Usually Becomes a Nightmare
The Allure of DIY: A Deceptive Siren Song
It's tempting, isn't it?
Those small DIY spray foam kits you see at the hardware store, promising easy application and significant energy savings. The marketing makes it seem foolproof for air sealing and insulation. And for a tiny, non-critical gap in a shed that no one ever enters? Maybe.
For anything significant in your home? Forget about it.
Here's the thing: here's the thing: spray foam insulation involves a complex exothermic chemical reaction that's incredibly sensitive to environmental factors and application technique. It's not like caulking a window. It's a precise science, and even minor missteps can have catastrophic, costly consequences. I've watched homeowners learn this the hard way, and it's never pretty.
The Alarmingly High Failure Rate
Let's get straight to it: studies and industry data show that DIY spray foam projects have an alarming failure rate, often exceeding 80%.
Yeah, you read that right — eighty percent.
That's not just a little glitch. That's a near certainty of failure. Why so high? Three main reasons, and they're all deal-breakers.
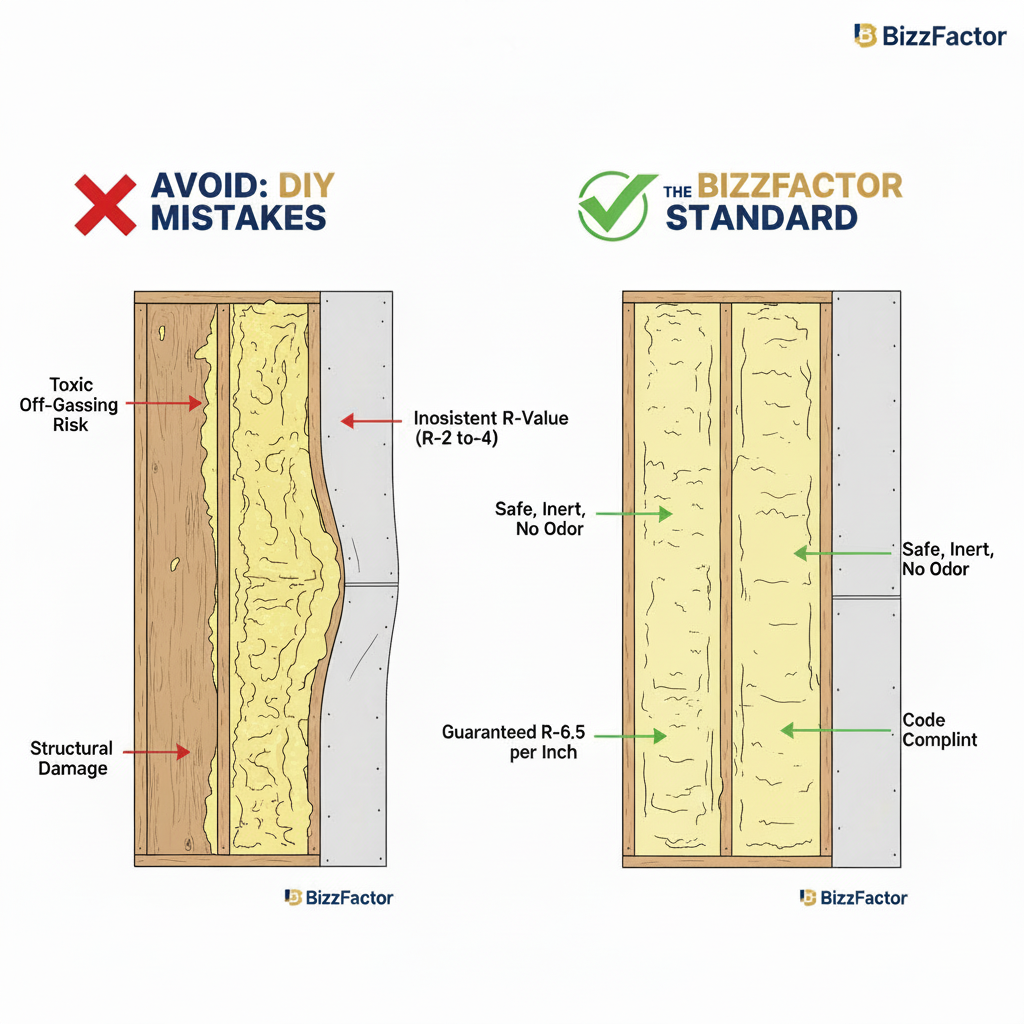
**Chemical Complexity:** Spray foam (polyurethane foam) is typically a two-part chemical mixture (isocyanate and polyol resin). These parts must be mixed in exact ratios, at precise temperatures, and applied with specific pressure. Deviate even slightly? You don't get insulating foam. You get a sticky mess, a toxic byproduct, or a material that fails to perform. A contractor in Marietta told me he's seen foam that never fully cured — stayed tacky for months and had to be completely removed.
**Environmental Sensitivity:** Temperature and humidity in the application area are critical. If it's too cold, the foam won't expand properly. Too hot? It might over-expand and become brittle. Too humid, and moisture can get trapped, leading to mold growth within the wall cavity – a real health hazard. Professional installers use specialized equipment to monitor and sometimes even adjust these conditions. You with your $400 kit? You're guessing.
**Application Technique:** Achieving an even, consistent layer requires skill and practice. Too thin, and you don't get the R-value. Too thick? You risk structural damage (especially with closed-cell foam) or wasted material. Professionals have spent years honing this craft. You've watched three YouTube videos.
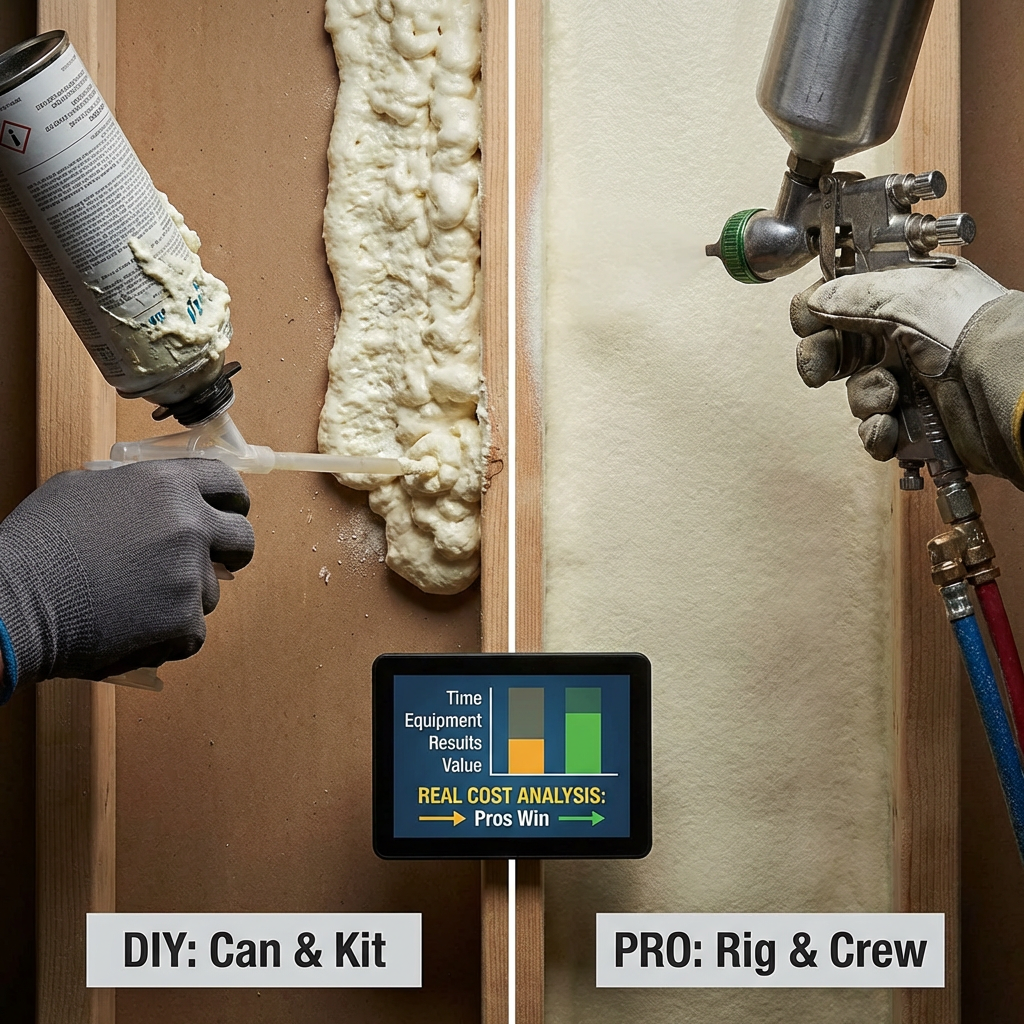
The Real Cost of DIY Spray Foam: Beyond the Kit Price
That $400 DIY kit is just the tip of a very expensive iceberg.
When you factor in everything, a DIY project almost invariably costs more than professional installation. And here's the kicker: usually, it costs *a lot* more because you end up paying a professional to fix your mistakes anyway. I'd bet money on it.
Hidden & Unexpected Expenses
#### 1. Essential Safety Gear (Non-Negotiable)
Look, these aren't your typical dusty DIY masks. We're talking serious personal protective equipment (PPE) because the chemicals are hazardous, particularly the isocyanates.
**Full-Face Respirator:** A high-quality, professional-grade respirator with appropriate cartridges for organic vapors and particulates is a must. We're not talking about a cheap paper mask here. Expect to shell out **$200-$350**. No compromises. Your lungs aren't regenerative.
**Chemical-Resistant Suit:** You'll need disposable, full-body chemical suits, often multiple, since they can get ruined or contaminated. Think **$60-$90 per suit**. And honestly? You'll probably need at least three.
**Gloves & Eye Protection:** Heavy-duty chemical gloves and sealed safety goggles are non-negotiable. Another **$50-$100**.
**Ventilation:** This is HUGE. You *can't* apply spray foam without robust, industrial-strength ventilation systems that actively extract fumes from the workspace. This isn't just opening a window. We're talking powerful fans and ducting, potentially costing **$400-$600** for adequate temporary rental or purchase. Skip this, and you're risking serious respiratory damage.
#### 2. Specialized Application Tools & Monitoring
Those DIY kits often come with rudimentary nozzles. But to do it right, you'll need more:
**Applicator Guns & Hoses:** While kits include some, professional-grade equipment offers better control and reliability. Specialized tools can run **$250-$450**.
**Temperature & Humidity Monitors:** Crucial for ensuring proper cure. A good set will be **$120-$250**. Without these, you're flying blind.
**Surface Preparation Tools:** Cleaning, scraping, and potentially priming surfaces adds to the cost. And the time. Don't forget the time.
#### 3. Building Permits & Code Compliance
Now, many jurisdictions require permits for insulation projects, especially those involving spray foam. Failing to obtain one could lead to fines, stop-work orders, or forced removal.
Permitting costs typically range from **$200-$500**.
On top of that, understanding and meeting local building codes (e.g., fire ratings, thermal barriers) is complex. Think you've got time to read through 200 pages of building code? Professionals handle all of this. They know the inspector by name.
#### 4. The **BIG** One: Rectification & Remediation
This is where DIY goes from "saving money" to "bleeding money."
**Removing Failed Foam:** An improperly installed foam job is usually a complete loss. It often needs to be physically removed, a labor-intensive, nasty, and expensive process. Imagine trying to scrape hardened, sticky, potentially off-gassing foam from every joist and stud.
It's a nightmare.
Costs for professional cleanup and hazardous waste disposal can easily soar to **$2,000-$4,000**, sometimes far more for larger areas. A contractor I know in Phoenix had a homeowner try to DIY their whole attic — maybe 1,200 square feet. The foam didn't cure right, it smelled awful, and they had to pay nearly $10,000 to have a crew come in, scrape it all out, and then re-insulate. The homeowner spent three months living with relatives while the house aired out.
Ouch.
**Re-insulation:** After removal, you still need to insulate again, which means paying for new materials and, hopefully, a professional installation this time. So you've now paid twice for the same job.
**Health Hazards:** Improperly mixed foam can off-gas toxic chemicals (like formaldehyde, amines, or unreacted isocyanates) for years, leading to respiratory issues, skin irritation, and other severe health problems. Remediation in such cases often involves specialized air quality testing and sometimes even temporary relocation. Talk about unexpected costs – your health is priceless. I've seen families develop chronic coughs and headaches from bad foam jobs.
The Technical Deep Dive: Why Professional Expertise Matters
Spray foam isn't just about squirting goop.
It's about chemical engineering, thermodynamics, and building science. Real talk: if you weren't a chemistry major, this stuff is over your head.
Chemical Mixing & Curing: The Heart of the Matter
**Precise Ratios:** The two components (A and B) must be mixed in an exact 1:1 ratio by volume. Professional equipment uses sophisticated pumps and heated hoses to maintain this precision. DIY kits often rely on simple pressure differences, which are notoriously unreliable. If the ratio is off, even slightly, the foam won't cure properly. It might remain sticky, become brittle, or release noxious odors. And there's no fixing it once it's in your wall.
**Temperature Control:** Both chemicals need to be at specific temperatures (often 70-80°F or even higher, depending on the product) *before* and *during* mixing. Professional rigs have heated tanks and hoses to ensure optimal conditions. DIY kits? They're highly susceptible to ambient temperature. Makes consistent application almost impossible without dedicated climate control. Too cold and the foam is dense and doesn't expand well; too hot and it froths and doesn't adhere. One degree can make or break the whole job.
**Exothermic Reaction:** The curing process is exothermic, meaning it generates heat. If too much foam is applied too quickly, or if the temperature isn't managed, this heat can build up. Leads to charring or even combustion in extreme cases. Professional installers understand lift restrictions and proper application depths to prevent thermal runaway. You probably don't even know what "thermal runaway" means.
Application Technique & Uniformity
**Lift Thickness:** Open-cell and closed-cell foams have maximum "lift" or thickness per pass. Applying too much at once can lead to incomplete curing, delamination, or, for closed-cell, excessive expansion forces. There's a reason pros apply it in layers.
**Coverage & Air Sealing:** The goal of spray foam isn't just R-value, but superior air sealing. This means completely filling cavities and sealing all cracks and gaps. Professionals are trained to achieve this uniformly, ensuring a continuous thermal envelope without voids or thin spots that compromise performance. Miss one gap? Your energy bills stay high.
**Overspray & Cleanup:** Spray foam is incredibly adhesive. Overspray is a huge headache to clean up, often requiring solvents or mechanical removal.
Professionals use masking and controlled application to minimize this. You'll probably end up with foam on your shoes, your ladder, and somehow on your truck.
Structural Impact of Closed-Cell Foam
Look — this is a big one.
Perhaps the biggest.
So — closed-cell spray foam expands with immense force – over 2,000 pounds per square foot. It's like applying concrete inside your walls. If you apply it incorrectly or too thickly, it can literally buckle studs, bow walls, crack foundations, and warp door and window frames.
I once saw a homeowner in Boulder who tried to insulate a new addition with closed-cell DIY.
Ended up bowing out a freshly installed wall by over an inch and had to completely tear it down and rebuild it. The cost was astronomical — somewhere north of $15,000 just for the structural repairs, not counting the lost insulation materials. And this was a guy who'd built decks before, so he wasn't totally inexperienced.
A professional understands these forces and applies the foam in controlled layers to prevent structural damage. They know when to stop. You don't.
Fire Safety & Thermal Barriers
All exposed spray foam (not covered by drywall or other building materials) must be protected by a 15-minute thermal barrier or ignition barrier to meet building codes. This is typically drywall, but sometimes it's a special fire-resistant coating.
Professionals incorporate this into their installation plans.
Fail to do this, and you've got a fire hazard on your hands. And your home won't pass inspection. Ever tried to sell a house that can't pass code? It's not fun.
Flash-and-Batt: The Smart Hybrid Approach (Expert Insight)
What's flash-and-batt, you ask?
It's a method that combines the best characteristics of spray foam with traditional insulation, offering a fantastic balance of performance and economy. Here's the deal:
Flash-and-batt involves applying a thin layer (typically 1-2 inches) of closed-cell spray foam directly to the sheathing in wall cavities. This thin layer creates an incredibly effective air and vapor barrier, preventing air leakage and moisture transfer. Once this initial flash of foam cures, the remaining cavity depth is filled with a more cost-effective traditional insulation material, like fiberglass batts or mineral wool.
Benefits of Flash-and-Batt:
**Superior Air Sealing:** The spray foam layer is the ultimate air barrier, preventing drafts and heat transfer through air movement. That's the real killer in most homes — air leaks, not just insulation value.
**Reduced Cost:** You use significantly less expensive spray foam, bringing down overall material costs compared to a full-cavity spray foam application. We're talking maybe 40-50% savings on materials.
**Moisture Management:** Closed-cell foam is an excellent vapor retarder, protecting your wall cavity from moisture intrusion and condensation risks, crucial in humid climates. If you're in Atlanta or Houston? This matters big time.
**High R-value:** The combined system delivers excellent thermal performance. You're getting the air sealing of spray foam plus the thermal mass of batts.
In my experience, flash-and-batt is one of the smartest choices for homeowners who want professional-level performance without breaking the bank. Nine times out of ten, it's what I'd recommend for a typical retrofit. But here's the catch — it still requires professional installation. That thin layer of spray foam? It needs to be applied perfectly, or you've defeated the whole purpose.
Think you can DIY the foam layer and then add batts yourself? You can't. The foam layer is the foundation of the whole system, and if it's got gaps, voids, or inconsistent thickness, the batts won't fix it.
In-Depth Look
Detailed illustration of key concepts
Visual Guide
Infographic illustration for this topic

Side-by-Side Comparison
Visual comparison of options and alternatives
Sources & References
- DIY Spray Foam Insulation VS. Pros – Was it worth it ... - YouTube
- DIY vs Pro: The High Stakes of Spray Foam Insulation—What You ...
- Cost Comparison: DIY Spray Foam vs Hiring a Professional
- Professional Spray Foam vs. DIY Kits: What Homeowners Need to ...
- Building Codes, Standards, and Regulations: Frequently Asked ...
- [PDF] Building Codes Toolkit for Homeowners and Occupants - FEMA
- Building Codes and Standards - 101 Guide | ROCKWOOL Blog
- 5 Reasons Building Codes Should Matter to You
- [PDF] Introduction to Model Codes
Frequently Asked Questions
Need Professional Help?
Find top-rated insulation experts in your area