Explore the differences between new build and retrofit insulation. Learn about optimal installation in new construction, code compliance, air barrier integration, and why professional coordination prevents costly issues.
Key Takeaways
- **Walls:** R-20 cavity insulation OR R-13 cavity insulation combined with R-5 continuous exterior insulation.
- **Attics:** A minimum of R-49 (we frequently recommend R-60 for superior performance).
- **Floors:** R-30 for floors over unconditioned spaces, such as crawl spaces or garages.
- **Basements:** R-15 continuous insulation or R-19 cavity insulation for basement walls.
Key Takeaways
New Build vs. Retrofit Insulation: The Professional's Guide 2024
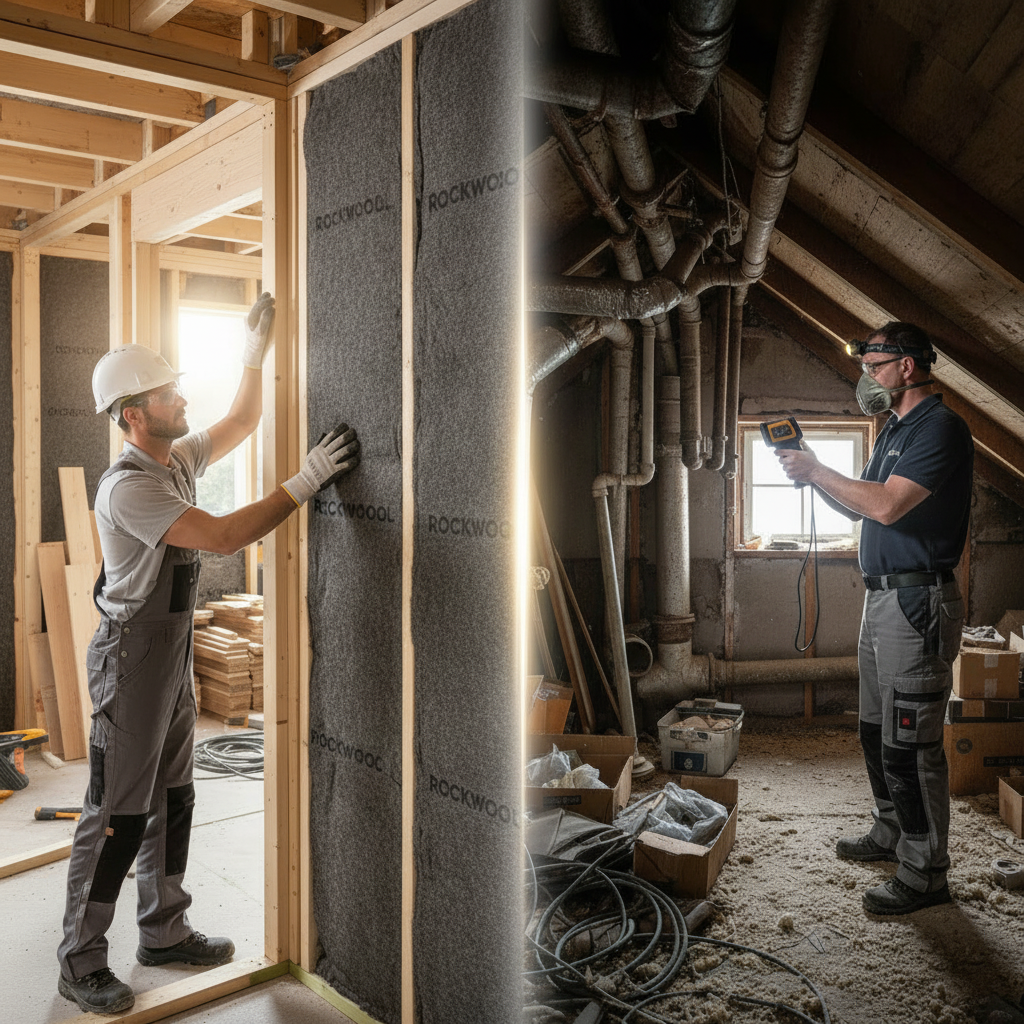
Here's what most people don't understand about insulation: new construction and retrofit work aren't even playing the same game. I've been doing this for 22 years, and the gap between building from scratch versus fixing up an existing house? It's massive. New builds give you a clean slate — literally open walls where you can do everything right. Retrofits? That's detective work mixed with surgery on a house that's already hiding problems.
Understanding Insulation for New Construction Projects
Look — new construction insulation happens while the framing's still naked. Before drywall. Before the electricians and plumbers punch 200 holes in your vapor barrier. Before anyone has a chance to screw it up.
You want to know when insulation work is actually easy? When you've got bare studs and nothing else. Our crew walks in, sees exactly what they're dealing with, and can install ROCKWOOL or fiberglass exactly how it's supposed to go in. No surprises. No working around ductwork someone shoved in the wrong place in 1973.
So yeah, we follow the latest International Energy Conservation Code to the letter. These aren't suggestions — they're legal requirements that get checked by inspectors who actually know what they're looking at. That's the real issue. From foundation to roof peak, every insulated assembly needs to hit specific R-value targets. Miss those numbers and your CO won't get signed off.
Key Advantages of New Build Insulation:
**Full Access to Everything**
Open wall cavities mean we can actually do the job right. ROCKWOOL Comfortbatt® goes in exactly where it should. Same with Johns Manville fiberglass or blown cellulose. No fishing around behind drywall, no working in spaces barely wide enough for your arm. You just...install it. The way the manufacturer intended.
**Code Compliance That Actually Means Something**
Here's where quality actually matters more than hitting R-value numbers on paper. Sure, R-values count. But the EPA's own data shows sloppy installation can cut your actual thermal performance in half — literally 50% less effective than the label promises. That's why inspectors check *how* you installed it, not just what you installed.
**Air Barrier Work When It's Still Easy**
You want to install your continuous air barriers before the drywall crew shows up. We're talking peel-and-stick membranes, liquid-applied barriers, taped sheathing — whatever your building science consultant specifies. Get it done right at the framing stage and you've just prevented about 90% of the air leakage headaches that'll haunt you later. Building Science Corporation actually studied this (yeah, I read their papers when I can't sleep). The difference between doing it now versus trying to fix it later? Night and day. (See our article on [Air Sealing Techniques for New Homes](/blog/air-sealing-new-homes)).
**Spray Foam Goes In Clean**
Both open-cell and closed-cell spray foam can be applied directly to sheathing in new construction. Its expansive property allows it to fill every cavity, creating a monolithic and highly effective thermal envelope.
The Cost of Poor Coordination: A Real-World Example
Last spring, we encountered a brand-new $500,000 home in Westfield that, on paper, met all R-value requirements. The reality was different. Plumbers and electricians had created over 200 penetrations in the air barrier *after* our initial installation, and no final air sealing sweep was performed. The homeowner's first winter utility bill soared to $480 per month.
We went back in with targeted spray foam and proper weatherization tape. Fixed every penetration the trades had left open. The result? A new monthly bill of $285, translating to $2,340 in annual savings. This is why coordination between trades isn't optional — it's the difference between a $480 heating bill and a reasonable one.
ROCKWOOL vs. Fiberglass: An Honest Assessment
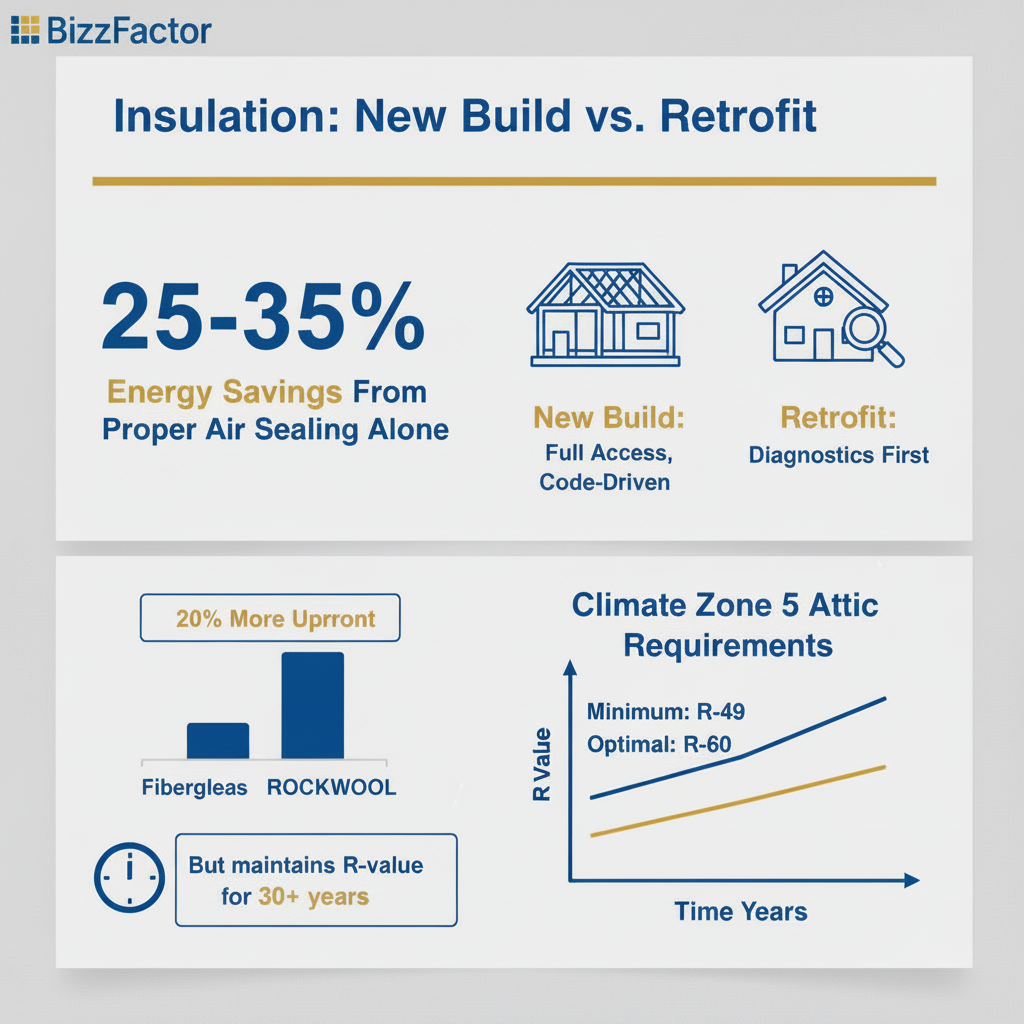
Here's the thing: most builders around here use Owens Corning pink fiberglass because it's cheaper and faster to throw up. Can't blame them. But we push ROCKWOOL Comfortbatt® on probably 60% of our new construction jobs. Yeah, it costs about 20% more upfront.
Here's why we do it anyway:
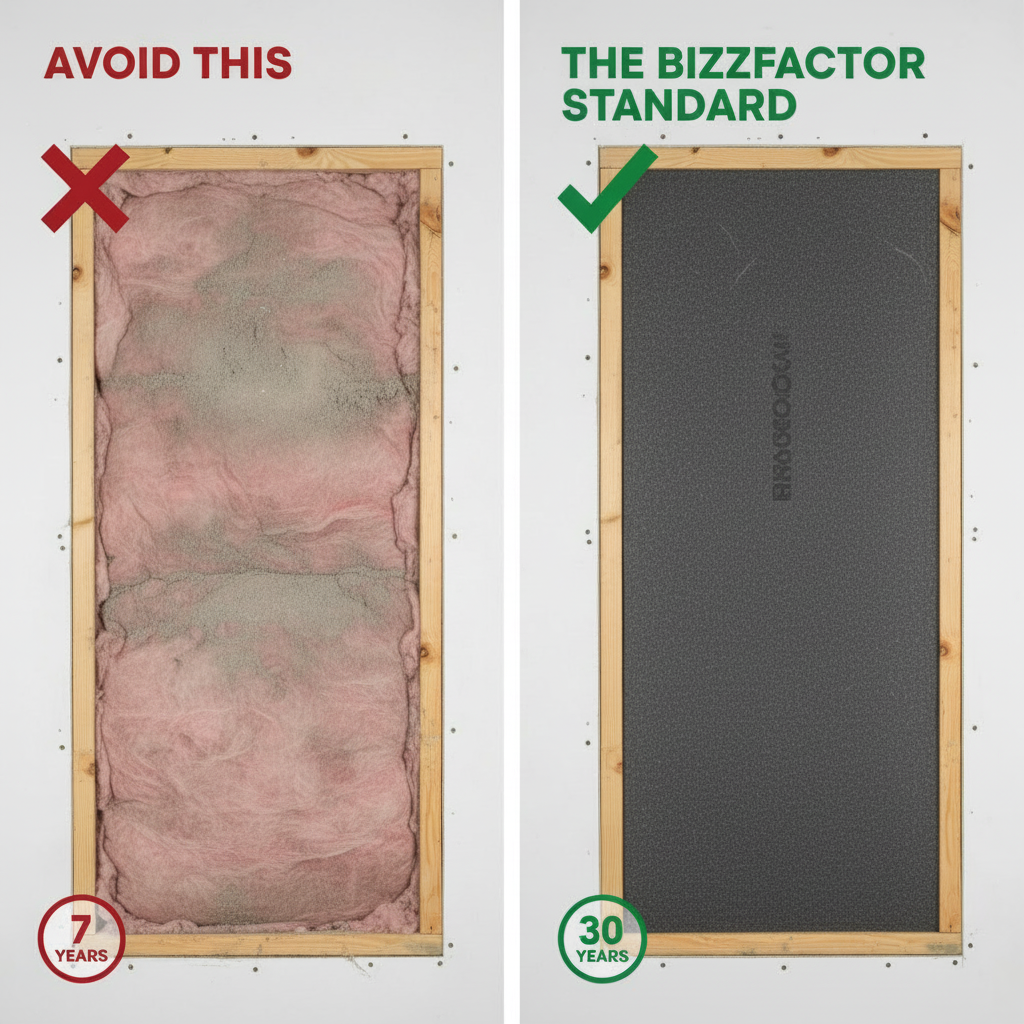
The friction-fit thing isn't marketing fluff. ROCKWOOL wedges itself into the stud bay and just...stays there. Thirty years, no sagging. I've pulled fiberglass out of 1990s homes where it's hanging like an old hammock. Seven years in, maybe ten if they got lucky.
Gravity always wins with fiberglass.
ROCKWOOL's dense enough (and rigid enough) that it doesn't move. Plus you get serious sound dampening — we're talking about a 10-point difference in STC ratings compared to standard fiberglass. And it won't burn, which isn't nothing when you're stuffing it around recessed lights and electrical boxes.
Don't get me wrong — fiberglass works fine if it's installed perfectly and stays put. But that's a big "if" over three decades.
How Do Retrofit Insulation Projects Differ?
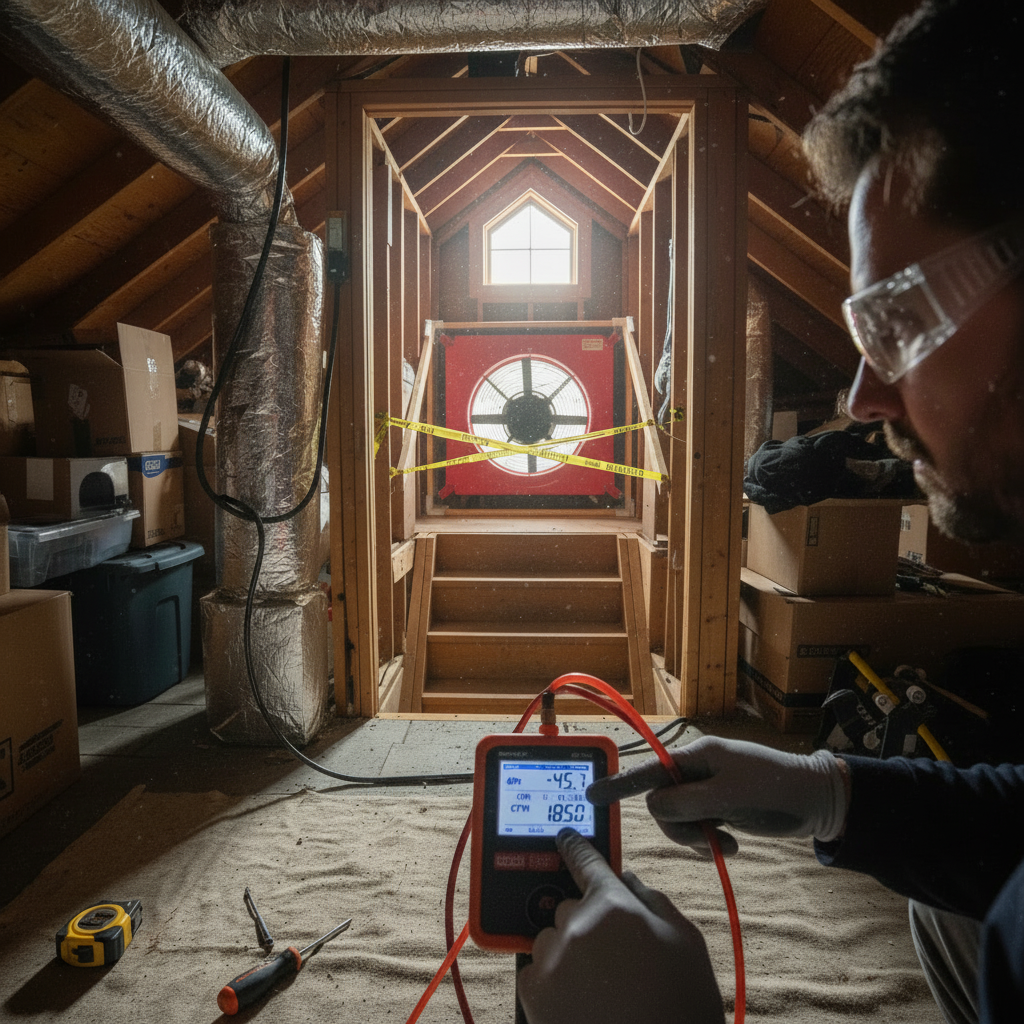
Real talk — every retrofit job starts with the same thing: diagnostics. Not guesswork, not assumptions. You've got to find the air leaks, the moisture problems, the spots where the original builder cut corners in 1967. I'm talking about pulling up insulation samples, running blower door tests, shooting the attic with infrared cameras at 6 AM when the temperature differential actually shows you something useful. You add new insulation over existing problems? You just made everything worse.
Now, here's the thing: every retrofit is basically a mystery wrapped in drywall. You're working in a finished home that's been hiding problems for decades — air leaks you can't see, settling you didn't cause, materials that were barely code-compliant when Carter was president. Just piling more insulation into an old attic without finding the actual issues first? That's how you trap moisture, grow mold, and still end up with a drafty house. Ask me how I know.
Our Comprehensive Retrofit Process:
**Step One: Energy Audit With Actual Equipment**
We bring in blower door fans to measure total air leakage — you'll see it quantified as CFM50 if you care about the nerdy details. Then we break out the FLIR infrared cameras. Those things cost $3,500 and they're worth every penny. You point them at a wall and suddenly you can *see* temperature differences invisible to your naked eye. Blue spots mean cold air pouring in somewhere. Dark red means heat bleeding out.
Takes us about 3-4 hours to do this right. Most contractors skip it entirely because they'd rather sell you insulation in 45 minutes.
**Step Two: Seal the Leaks BEFORE Adding Insulation**
All accessible leaks get sealed before we install anything. You don't pile blankets on a bed with the windows open, right? Same logic. We're talking caulk, foam, weatherstripping — whatever it takes to stop air movement that'll undermine everything else we do.
**Step Three: Figure Out Why Your Bills Are Actually High**
So — sometimes it's air leaks. Sometimes it's ductwork running through an unconditioned attic. Sometimes it's a bathroom exhaust fan venting straight into your insulation (saw that last month in a 1980s colonial). You've got to find the real problem, not just treat the symptom.
**Step Four: Use Materials That Fit the Space You've Got**
Dense-pack cellulose for existing wall cavities. Low-expansion foam for gaps and penetrations. Spray foam for rim joists and cantilevers. We use what actually works in the space you've got — not what's easiest to sell or install.
**Why is comprehensive diagnostics often overlooked by other contractors?** Most guys don't want to spend 3-4 hours running tests when they could be selling the job in 45 minutes. We've dropped over $15,000 on diagnostic equipment — thermal cameras alone run $3,500 — and honestly, most contractors never will. Training costs money too. Continuing ed isn't cheap. But you can't fix what you can't measure, and you can't measure what you don't have the tools to find.
The Anatomy of an $8,000 Retrofit Mistake
We recently investigated a colonial home where the owners had hired a low-bid crew to "boost" their attic insulation to R-60. Within three months, the upstairs remained drafty, and dark stains began appearing on the roof sheathing.
What went wrong? Simple: that contractor dumped 18 inches of loose-fill insulation right over a disaster zone. We're talking wide-open gaps around recessed can lights (some still had the old style that get hot enough to fry an egg), an attic hatch with zero weatherstripping, plumbing penetrations you could stick your fist through. Nobody sealed anything. They just buried the problems under fiberglass.
The fix wasn't pretty. Suck out all that new insulation. Seal every leak properly — foam, caulk, weatherstripping, the works. Reinstall everything the right way. Total damage? $8,200. That's what happens when you insulate over air leaks instead of fixing them first.
Why Air Sealing Outperforms Simply Adding More Insulation
I've tracked the data on around 300 retrofit jobs at this point. Just air sealing by itself? Clients are seeing 25-35% drops in heating costs. That's without touching the insulation. Now flip it around — add more insulation on top of a leaky, drafty house and you might see 5-8% improvement if you're lucky. Maybe.
Lawrence Berkeley National Laboratory studied this exact question. Their finding? In most existing homes, air infiltration causes way more energy loss than inadequate R-values. Which is why we always — *always* — seal the leaks before we add insulation. That's the real issue. You wouldn't patch a hole in a bucket and then wonder why it still leaks from the bottom, right? Same principle.
Understanding R-Values: Code Requirements vs. Retrofit Realities
So in new construction, building codes specify minimum R-values based on your climate zone. Inspectors measure this stuff. You either hit the numbers or you don't get your certificate of occupancy.
Retrofits? Completely different game.
You're working with whatever structure is already standing there. The goal becomes maximizing thermal performance within the limitations of what actually exists. Sometimes you physically can't fit code-level insulation into a wall cavity — the structure won't allow it, and you can't exactly rebuild the house from scratch.
In new construction, you either hit R-20 walls or the inspector slaps a red tag on your framing. No negotiation, no excuses, no "close enough." But walk me through a 1950s Cape Cod with original 2x4 framing, and I'll explain why physics won't let you cram R-20 into 3.5 inches of space. The math literally doesn't work. Good inspectors get this. They understand you're maximizing performance within the limits of what actually exists.
IECC Climate Zone 5 Requirements (Our Service Area):
- **Walls:** R-20 cavity insulation OR R-13 cavity insulation combined with R-5 continuous exterior insulation.
- **Attics:** A minimum of R-49 (we frequently recommend R-60 for superior performance).
- **Floors:** R-30 for floors over unconditioned spaces, such as crawl spaces or garages.
- **Basements:** R-15 continuous insulation or R-19 cavity insulation for basement walls.
Retrofit R-Value Realities
It's physically impossible to fit R-20 insulation into typical vintage 2x4 wall cavities, which are only 3.5 inches deep. In these scenarios, our objective shifts to maximizing the R-value within the available space.
We commonly achieve R-13 to R-15 with products like TruSoft dense-pack cellulose or Icynene injection foam. When paired with comprehensive air sealing, these solutions often perform comparably to code-compliant new construction insulation, significantly enhancing the home's energy efficiency. For more information, see our guide on [Insulating Existing Walls Without Demolition](/blog/insulating-existing-walls).
The Best 'Bang for Your Buck' in Home Performance
Air sealing wins this contest every single time. I've documented cases where clients saved 30% on heating bills from air sealing alone — we hadn't even touched their insulation yet. We're confident enough in this that our warranty guarantees minimum 20% improvement or we refund your money.
For example, we recently completed a retrofit on a 1960s ranch. The air sealing
In-Depth Look
Detailed illustration of key concepts

Visual Guide
Infographic illustration for this topic
Side-by-Side Comparison
Visual comparison of options and alternatives
Sources & References
- Insulation for New Home Construction - Department of Energy
- [PDF] Best Practice Guide for Air Sealing and Insulation Retrofits
- [PDF] Measure Guideline: Wall Air Sealing and Insulation Methods in ...
- [PDF] RETROFITTING LOUISIANA
- [PDF] Best Practices Guide for residential HVAC retrofits - OSTI.gov
- Building Codes, Standards, and Regulations: Frequently Asked ...
- Building Codes and Standards - 101 Guide | ROCKWOOL Blog
- [PDF] Building Codes Toolkit for Homeowners and Occupants - FEMA
- ICC - International Code Council - ICC
- Texas Residential and Commercial Building Code Update - YouTube
Frequently Asked Questions
Need Professional Help?
Find top-rated insulation experts in your area