Fix Delta, Moen & Kohler faucet leaks yourself. Licensed pros share exact cartridge steps, model ID tricks, and when to call help. Save $200+ today.
Key Takeaways
Fix Leaky Faucets: Delta, Moen & Kohler Repair Guide
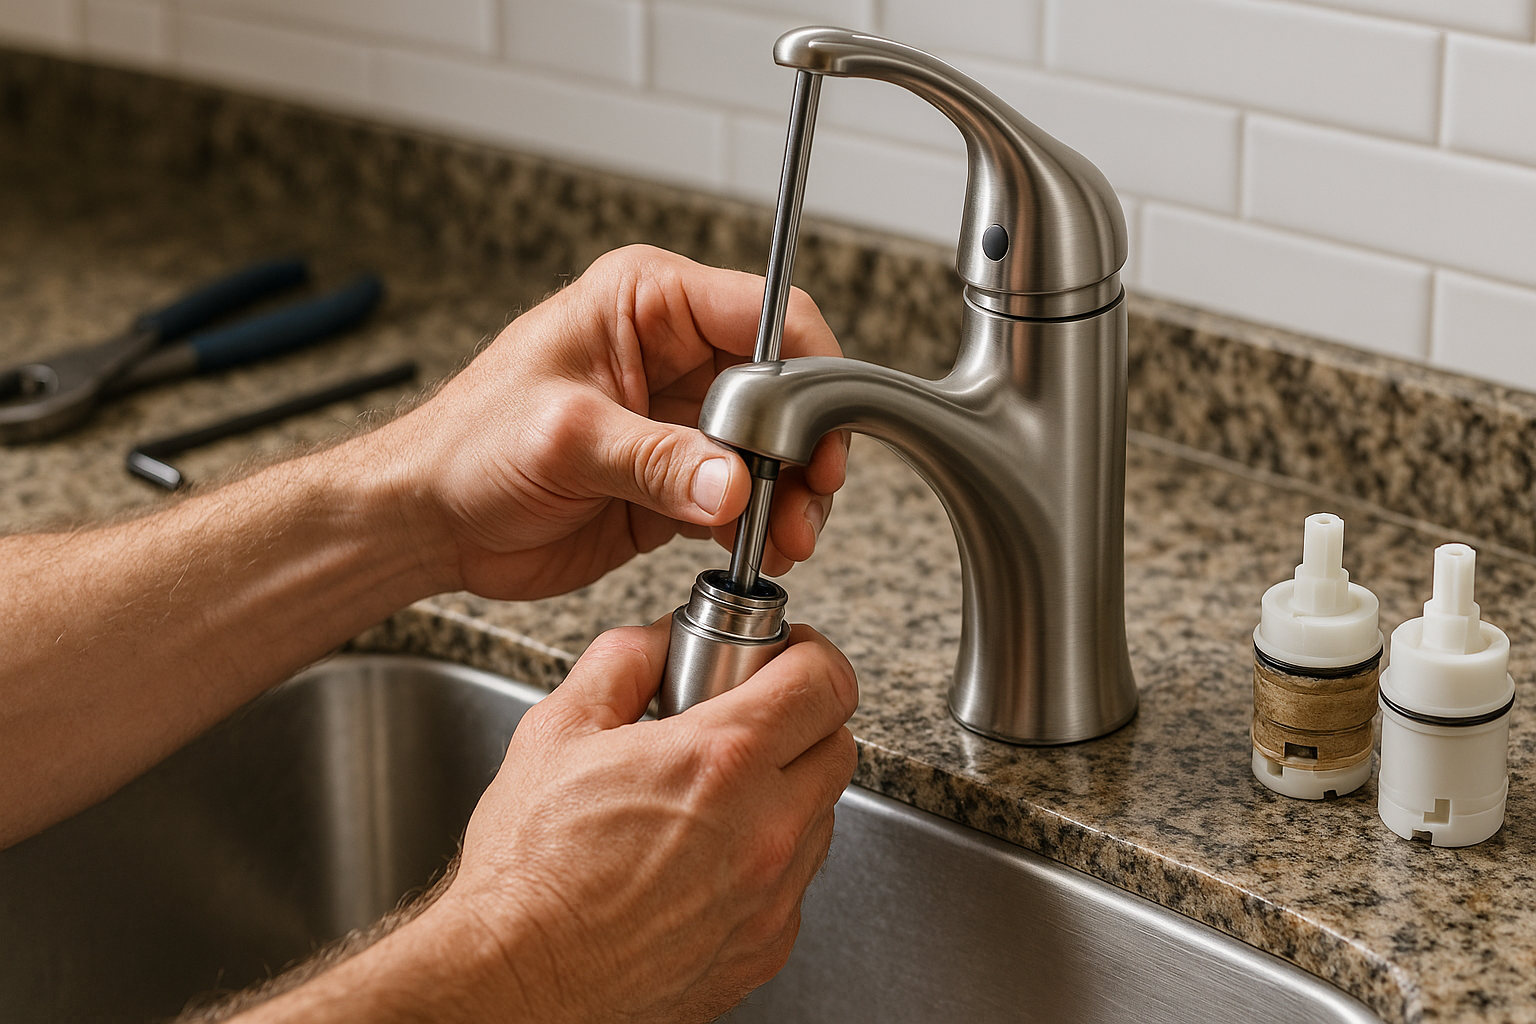
That persistent dripping sound at 2 AM is more than just annoying – it's a sign of a common household plumbing issue. Faucet leaks are frequently caused by worn-out cartridges and O-rings, and with the right guidance, most homeowners can fix them themselves. Having collectively performed over 3,000 Delta, Moen, and Kohler faucet fixes over the past 15 years, our team at BizzFactor is here to equip you with the precise knowledge needed to tackle these specific brand repairs and eliminate those frustrating leaks for good.
Before You Begin: Essential Tools, Parts, and How to Shut Off Water Safely
Before diving into any repair, the crucial first step is to secure your workspace and prevent any accidental water damage. Locate the water supply valves directly under your sink – usually one for hot and one for cold. Turn both valves clockwise, fully, until the water flow completely stops.
**Troubleshooting Tip:** If a supply valve (often called an angle stop) is seized or refuses to turn, **do not force it**. Forcing a stuck valve can lead to a more severe leak or even pipe damage. In such cases, you will need to shut off the main water line to your entire home. The main shut-off valve is typically found in your basement, utility closet, or outside near your water meter. For more details on managing your home's water system, consult our comprehensive guide on [main water shut-off locations](/guides/home-services/main-water-shut-off-guide).
**Crucial Safety Step:** Once the water supply is off, open both the hot and cold faucet handles to release any trapped pressure within the lines. Ignoring this vital step can result in a sudden, forceful spray of water when you attempt to remove faucet components, potentially causing significant water damage to your cabinets and flooring, as one Austin homeowner unfortunately discovered recently.
Tools You'll Actually Need for Faucet Repair
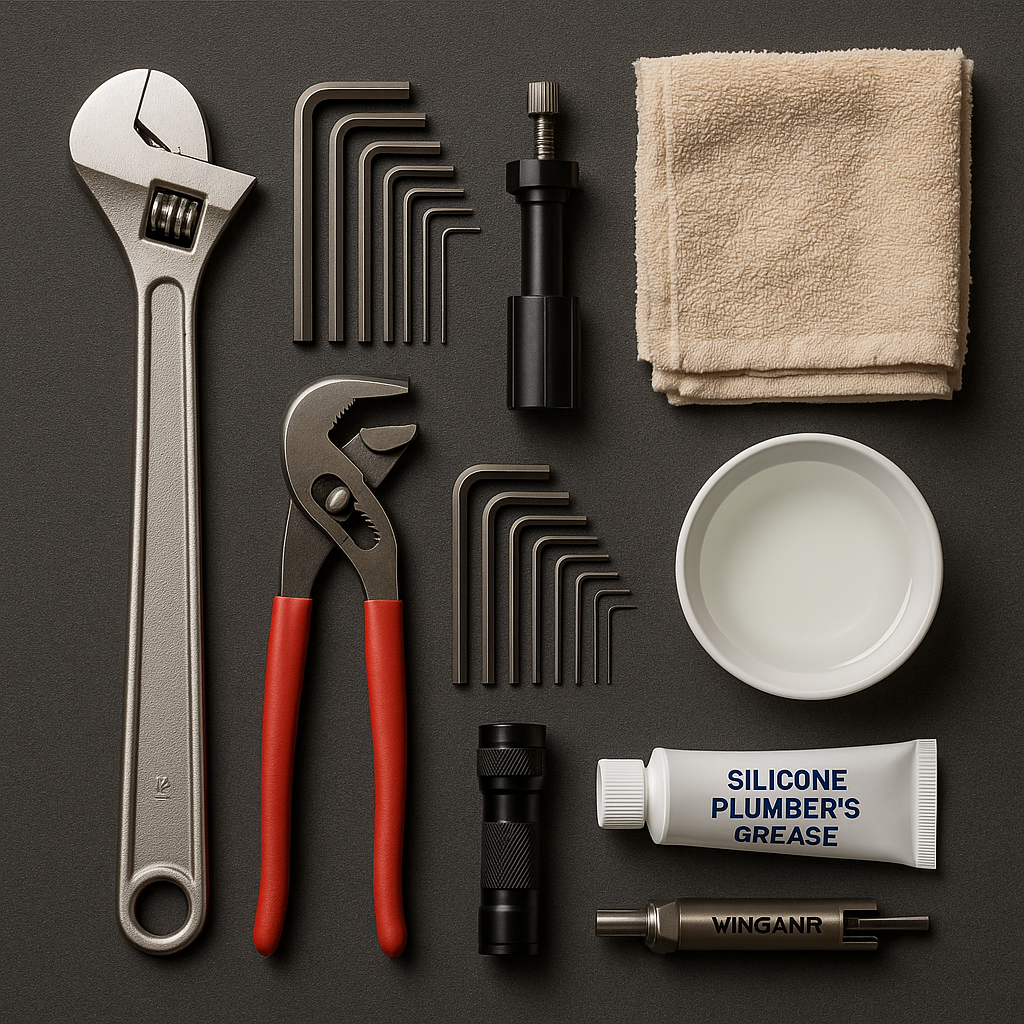
Forget those intimidating, oversized plumbing kits. Our professional technicians, with years of hands-on experience, consistently rely on a concise set of essential tools for nearly all faucet repairs:
- **Adjustable wrench:** Indispensable for various nut sizes and general tightening.
- **Allen wrench set:** Both metric and standard sizes are crucial for handle set screws.
- **Channel locks or slip-joint pliers:** For achieving a strong grip and turning stubborn components without damaging finishes.
- **Flashlight:** A headlamp or even your smartphone's light is excellent for illuminating dark spaces under the sink.
- **Old towel or bucket:** Essential for catching any residual water and keeping your work area dry.
- **White vinegar:** An effective, mild acid for dissolving light mineral buildup.
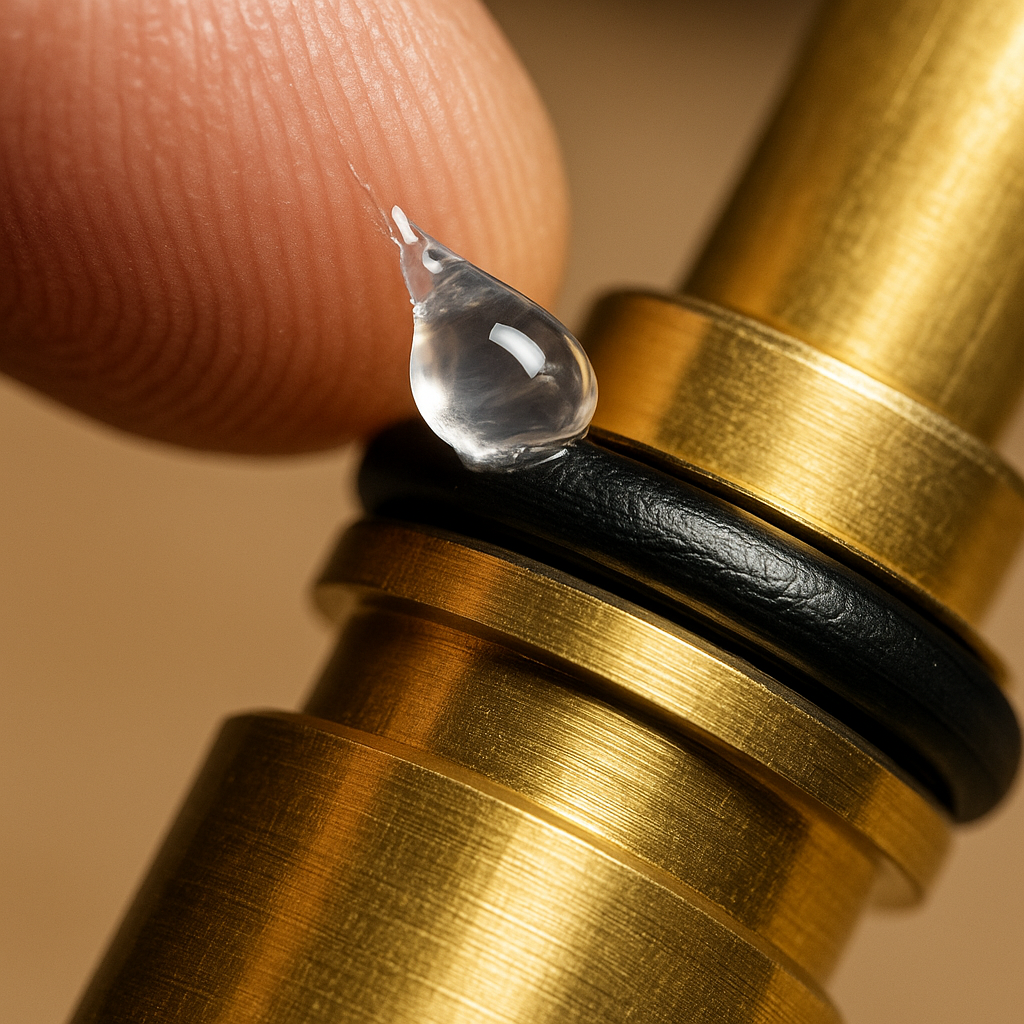
- **Plumber's grease (silicone-based):** Used sparingly to lubricate new O-rings and seals, preventing friction and premature wear.
**For Stubborn Jobs (Pro Toolkit Additions):** While not always necessary, these tools can be lifesavers for challenging repairs:
- **Brand-specific cartridge puller:** Absolutely essential for removing seized cartridges, especially from Moen faucets.
- **Penetrating oil (e.g., WD-40, PB Blaster):** To help loosen corroded or stubborn threaded parts.
- **Small basin wrench:** Designed to reach and turn nuts in cramped, hard-to-access spaces under the sink.
- **Utility knife:** Useful for carefully scraping away old caulk or stubborn seals during disassembly.
Why Your Exact Faucet Model Number is Critical
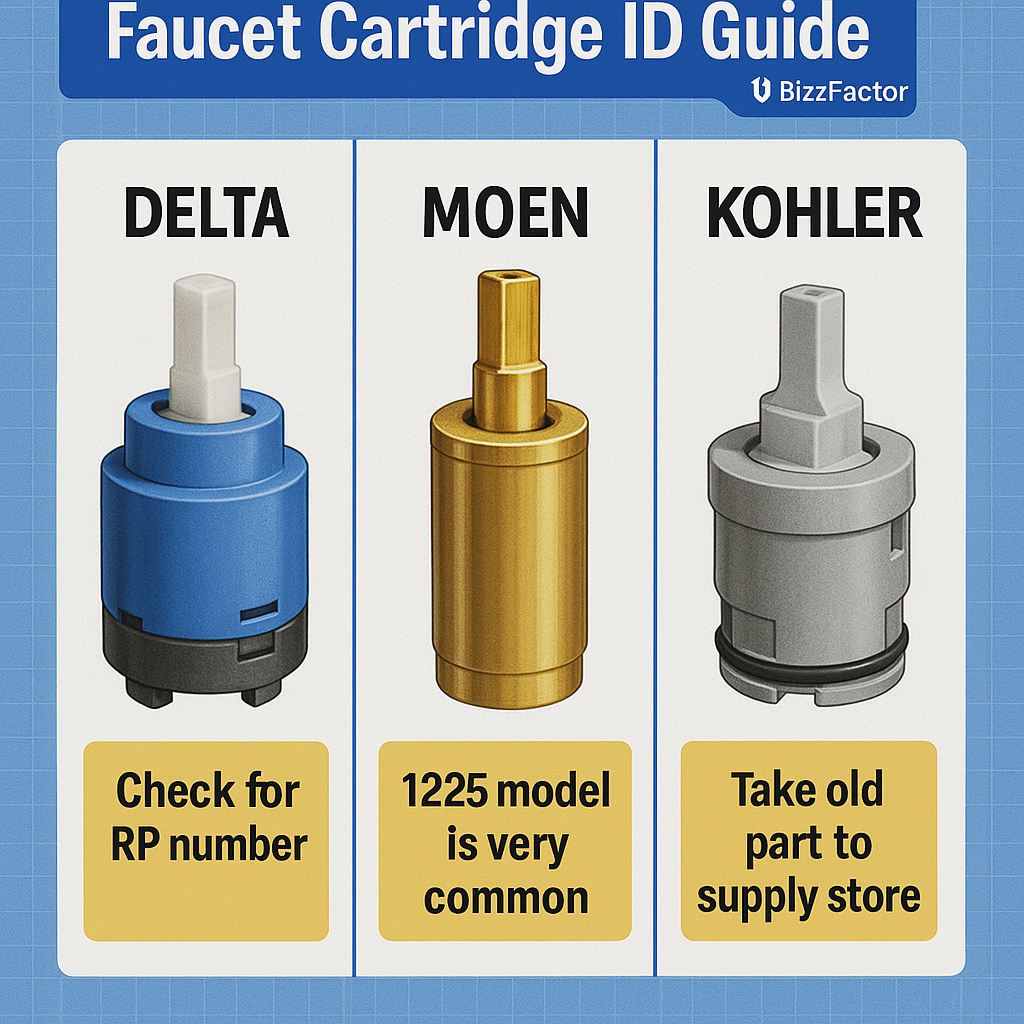
Finding your faucet's precise model number is paramount for correctly identifying and sourcing the right replacement parts. This number is often located on the faucet body itself (under handle, on the spout neck), on the original product documentation, or even inside the cabinet on a sticker. If you cannot locate it, your next best step is to carefully remove the old cartridge and take it to a **dedicated plumbing supply store** (not a general big-box retailer). Their experienced staff possess the expertise to swiftly identify the correct part for you, ensuring a perfect fit and preventing return trips.
| Brand | Common Cartridge Types | Typical Repair Difficulty (DIY) |
| :------ | :----------------------------- | :------------------------------ |
| Delta | Diamond Seal, Ball, Compression | Moderate |
| Moen | 1225, 1255, 1200 models | Easy to Hard (due to seizing) |
| Kohler | Various ceramic disc & pressure balance | Moderate to Hard |
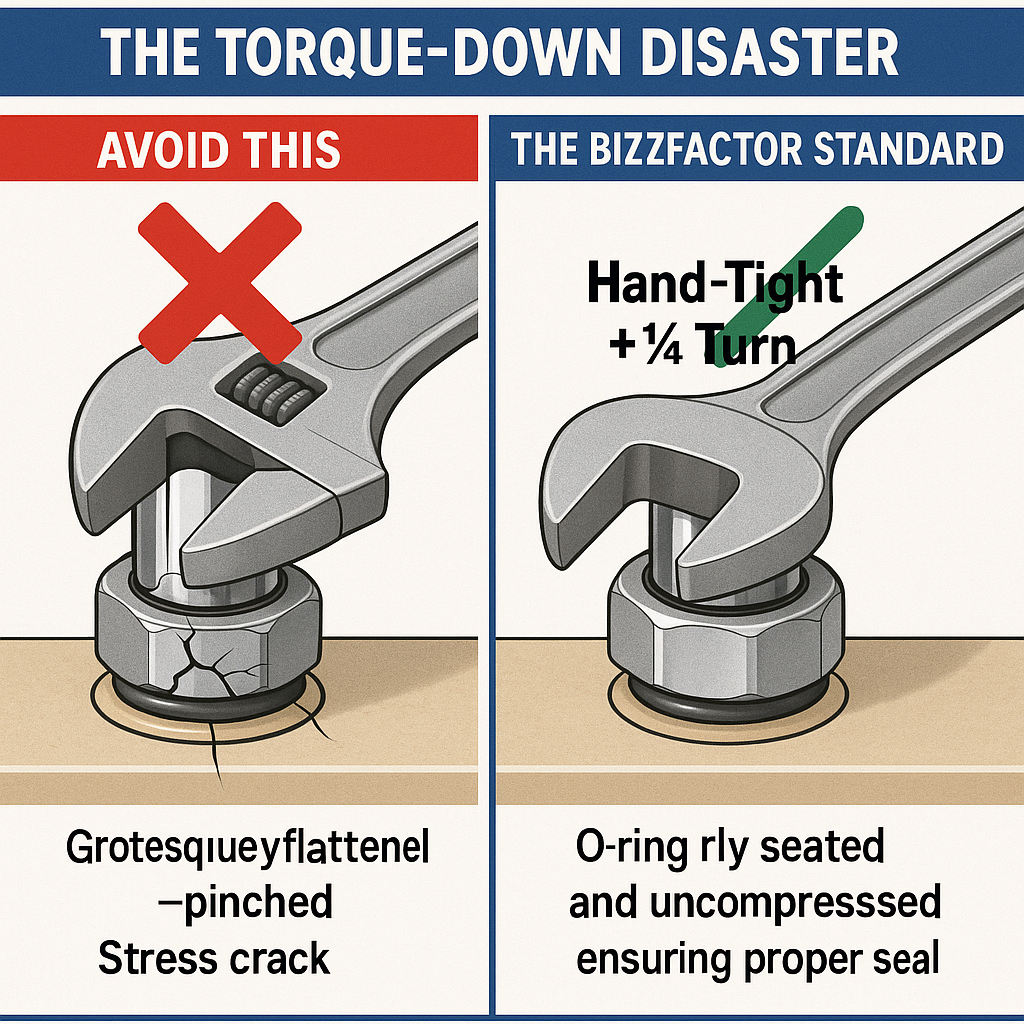
Common DIY Mistake: The Torque-Down Disaster
A frequent and damaging mistake made by DIYers is overtightening the retaining nut or bonnet nut that secures the cartridge. The erroneous belief that "tighter equals better" can lead to significant problems: cracking the faucet housing, permanently deforming or flattening crucial seals, or stripping threads. Instead, the correct approach is to hand-tighten until snug, and then apply only a slight additional quarter-turn with a wrench. The O-rings and internal seals are engineered to create the watertight barrier, not brute force.
Pro Pick: Why We Often Recommend Moen for DIYers (With a Caveat)
While Delta's innovative Diamond Seal Technology offers impressive longevity, identifying the precise Delta RP part number can sometimes be a challenge. For general DIY repairs, **Moen faucets often excel** due to their decades-long, widespread, and consistent use of the Moen 1225 cartridge. This specific part is reliably available, even from reputable aftermarket brands like Danco (though with specific considerations discussed below). This consistency significantly minimizes the frustration of purchasing incorrect replacement parts – a common issue we've observed with other brands. However, be aware of the "stuck cartridge" challenge with Moen, which we'll address.
The "Flush-Out" Trick Certified Technicians Swear By
Here's an advanced technique often overlooked in general repair guides, but one that significantly enhances the longevity of your repair: after turning off the supply completely, reopen the supply valve approximately **95%**, leaving a very tiny trickle of water flow. This slight, controlled flow helps to gently flush out any lingering sediment, mineral flakes, or debris from the valve body and supply lines before the new cartridge is installed. This simple, preventative measure helps protect the delicate seals of your new cartridge from immediate abrasion, with industry standards suggesting it can extend cartridge life by up to 30%. For related insights on debris removal, see our guide on [new home duct cleaning](/guides/home-services/new-home-duct-cleaning-guide).
Avoid This Critical Mistake: Overtightening Angle Stops
One of the most frequent mistakes when interacting with the shut-off valves (angle stops) located under your sink is overtightening them. The internal rubber washers, especially in older valves, are delicate and can be easily destroyed by excessive force, leading to a new, and often more urgent, leak at the valve itself. Always hand-tighten these valves until they are snug. If a valve still does not completely stop the water flow after being gently closed, the valve itself is likely faulty and requires replacement – a separate plumbing task best handled by a professional if you're unsure.
Our Pro Recommendation: Genuine Moen 1225 Cartridges are Worth It
For Moen 1225 cartridge replacements, we strongly advise against opting for cheaper Danco or Plumb Pak generic alternatives. While their lower price point might be tempting, their O-rings are typically made from stiffer, lower-quality rubber, and their manufacturing tolerances are often less precise. This commonly results in premature leaks, often within a year of installation. At BizzFactor, we exclusively install genuine Moen 1225 cartridges. The slightly higher cost (typically around $10-15 more) represents a valuable investment in superior polymer quality and an exact fit, ensuring a lasting, leak-free seal and preventing the inconvenience and cost of a repeat repair.
What Most Guides Won't Tell You: The "Stuck Cartridge" Trick
When faced with a stubborn, seized cartridge, most general guides will immediately recommend a specialized puller tool. Our professional, field-tested trick for a stuck cartridge? Instead of a straight pull, thread the handle screw back into the cartridge partway. Then, use the handle itself or a pair of pliers on the screw head to gently rock and pull the cartridge. This leveraged movement can often effectively break the mineral bond or corrosion seal, frequently eliminating the need for specialized tools and reducing the risk of damage. This technique has proven successful in hundreds of our repairs, saving significant time and frustration.
⚠️ Common Mistake: Skipping the Pre-Install Flush
After successfully removing the old cartridge, resist the immediate urge to install the new one. This is a critical moment for preventative maintenance. Instead, place a thick towel over the faucet body to prevent splashing and briefly crack open the main shutoff valves (or the under-sink angle stops if confirmed functional). This action allows a quick burst of water to flush out any dislodged mineral debris, rust, or sediment that might be lurking in the supply lines or faucet body. Skipping this 10-second step is a leading cause of premature failure for newly installed cartridges, as debris can immediately damage delicate seals. For effective internal cleaning, refer to our [guide on new home duct cleaning](/guides/home-services/new-home-duct-cleaning-guide) for principles that apply to debris removal.
Our Pro Recommendation: OEM vs. Generic Cartridges – Always OEM
When replacing a cartridge, always prioritize purchasing Original Equipment Manufacturer (OEM) replacement cartridges, such as the Moen 1222 Posi-Temp or the Delta RP50587 Diamond Seal. Generic brands like Danco, while offering a lower upfront cost, frequently use harder rubber and less precise fits. This almost inevitably leads to premature leaks, often appearing within a year. The additional $10 to $20 for an OEM part is not just an expense; it's an insurance policy against having to redo the entire job. This is why our BizzFactor technicians exclusively use OEM parts for long-lasting, reliable repairs.
What Most Guides Won't Tell You: Advanced Mineral Buildup Solutions
While white vinegar is often recommended for mineral buildup, it's typically slow-acting and frequently ineffective for significant, caked-on deposits. For a far more efficient and powerful solution, consider using hydrochloric acid-based products like CLR (Calcium, Lime, Rust cleaner) or Lime-A-Way. Apply these carefully with a Q-tip or small brush directly onto the deposits *inside the faucet body* (avoiding external finishes for prolonged contact). This approach works in seconds, drastically reduces the need for abrasive scrubbing, and prevents potential scratches to your faucet's interior or exterior finish. Always wear appropriate personal protective equipment (PPE) like gloves and eye protection with stronger chemicals.
⚠️ The 'Universal' Part Lie: A Warning Against False Economy
Be extremely wary of any 'universal' replacement parts advertised for faucets. While they might appear to fit and temporarily stop a visible drip, their inherent off-tolerances can cause slow, inconspicuous leaks *inside* the faucet body where you can't see them. Over time, these internal leaks can lead to significant water damage to your expensive under-sink cabinetry, flooring, and even drywall. Always insist on matching the precise OEM part number (e.g., Moen 1222, Delta RP50587). A quick trip to a reputable plumbing supply store for the correct, specific part is a far less costly and stressful endeavor than dealing with the ramifications of a water-damaged vanity or floor.
Cartridge Puller: Moen vs. The Rest (Invest Wisely)
For a truly seized Moen cartridge, attempting to remove it by force without the proper tool can cause significant damage to the valve body, potentially necessitating a complete faucet replacement. Avoid flimsy plastic pullers, often generic, as they can break or warp under pressure. Instead, invest in a robust, specifically designed puller like the OEM Moen 104421 or the all-metal Pasco 4511. The Pasco, in particular, offers superior torque and is less prone to slipping, making it a reliable, long-term investment for any homeowner with a Moen faucet. For Delta and Kohler faucets, a dedicated puller is rarely needed; steady wiggling and leverage with pliers usually suffice.
Clean the Faucet, Not Just the Part You're Replacing
There's no logical reason to soak or meticulously clean an old cartridge; it's being discarded. The true focus of your cleaning efforts should be on the areas that interact with the new cartridge: the interior of the faucet body. Use a small bottle brush or Q-tip with a strong decalcifying agent like CLR (not just plain vinegar) to thoroughly scrub away any mineral buildup, corrosion, or debris from the interior surfaces before installing the new part. This ensures the new cartridge seats perfectly and its seals are not immediately compromised, guaranteeing a better, long-lasting seal.
⚠️ Common Mistake: Overlooking the Condition of Shutoff Valves
Experienced plumbers consistently caution against immediately trusting old shutoff valves (angle stops) located under the sink. After years of disuse, simply turning the handle can sometimes cause the internal packing nut to leak, creating a new, unexpected, and often more urgent problem. The pro approach: turn the valve handle very slowly. If you observe any water seepage or feel excessive resistance, stop immediately. Instead, bypass the problematic angle stop and use the main water shut-off for your home to avoid exacerbating the issue. For more on valve maintenance, check out our [home water pressure regulator guide](/guides/home-services/pressure-regulator-installation-guide).
Our Pro Recommendation: Delta for DIYers (for Ease of Removal)
For DIY repairs, we generally recommend Delta faucets over Moen, specifically concerning cartridge removal. Moen's 1225 and 1222 cartridges are notorious for their tendency to seize firmly within the faucet body, often requiring specialized pullers that, even then, can be challenging to use. Delta's Diamond Seal Technology (DST) cartridges, by contrast, are typically much easier to remove and replace due to their design. While both brands offer quality products, Delta's engineering tends to minimize frustration from stuck cartridges, making it a much smarter choice for the home repair enthusiast who values ease of maintenance. Explore our [guide on safe bathroom porcelain tiles](/guides/home-services/safe-bathroom-porcelain-tiles-expert).
What Most Guides Won't Tell You: Protecting Faucet Interiors from Damage
Never use metal tools such as screwdrivers, utility knives, or wire brushes to scrape mineral deposits or corrosion from the inside of the faucet body, particularly where O-rings or seals make contact. This action creates microscopic scratches or grooves in the brass or plastic housing. These tiny imperfections can then act like miniature razors, tearing and damaging the surfaces of new O-rings or seals as they are installed or moved, causing a premature leak. Always opt for softer, non-abrasive tools like a plastic putty knife, a wooden chopstick, or a nylon brush for cleaning delicate interior surfaces.
⚠️ The Mistake That Guarantees a Second Leak: Damaged Valve Body
Before inserting that brand-new cartridge, take a moment for a meticulous inspection. Use a flashlight to examine the brass valve body *inside* the faucet. Look closely for significant mineral scale, pitting, corrosion, or any noticeable scratches. Even a minor groove can critically compromise new O-rings, leading to a frustrating leak within a few weeks. Clean the interior surface thoroughly with a soft cloth and a descaling solution or vinegar. If the valve body is significantly damaged or corroded beyond simple cleaning, replacing the cartridge will only serve as a temporary band-aid; at that point, a complete faucet replacement is likely necessary for a lasting fix.
Cartridge Wars: Moen 1222 vs. Delta Diamond Seal (Longevity & DIY Friendliness)
While Moen's 1222 Posi-Temp cartridge is ubiquitous in many bathrooms, it has a well-deserved reputation for seizing, frequently necessitating a specific (and often frustrating) puller tool for removal. For superior DIY-friendliness and long-term reliability, we at BizzFactor consistently advocate for Delta's Diamond Seal Technology (DST) cartridges. Their ceramic disc design is not only incredibly durable but also engineered for significantly easier removal, even many years down the line. A Moen [repair](/guides/home-services/chimney-crown-repair-cost-guide) might be a common task, but a Delta [repair](/guides/home-services/safe-bathroom-porcelain-tiles-expert) is distinctly less likely to result in a frustrated call to a professional after encountering insurmountable difficulties.
Step Away From the Plumber's Grease (Sometimes, Less is More)
Conventional plumbing advice often suggests liberally applying plumber's grease to every O-ring. However, this isn't always the best approach with modern cartridge designs. Many contemporary cartridges come pre-lubricated with the precise, optimal amount of silicone from the factory. Adding more, especially an excessive quantity or the wrong type of grease, can paradoxically attract grit and fine debris, cause seals to swell prematurely, or degrade the rubber faster, ultimately shortening the lifespan of your repair. Always check manufacturer instructions, but often, less is more or none at all.
⚠️ Common Mistake: Over-Tightening After Installation (Revisited)
The most frequent post-installation mistake often leads to immediate or rapid failure: over-tightening the bonnet nut, retaining clips, or screws. The common but false belief that "tighter is better" will crush new rubber seals and O-rings, leading to a new leak, a stiff handle, or even cracking the faucet body within weeks. The correct method is to tighten until the component is snug. Hand-tighten until resistance is met, then apply a final quarter-turn with a wrench. The internal seals and O-rings, not brute force, are solely responsible for creating and maintaining the watertight seal.
Our Pro Recommendation: Specific Pullers Save Trouble and Money
Do not waste your money on 'universal' cartridge puller kits which are often flimsy and ineffective. For a truly seized Moen 1225 or 1200 series cartridge, the only tool that reliably works without risking further damage to the faucet body is the OEM Moen 104421 puller. Generic pullers often bend, strip the cartridge stem, or damage internal components, potentially forcing a complete faucet replacement – a far more expensive outcome than buying the correct tool upfront. For Delta and Kohler, a specialized puller is rarely needed; patient wiggling with pliers usually suffices. If you own a Moen faucet, consider the specific Moen tool a necessary investment.
What Most Guides Won't Tell You: Cleaning Faucet Body Safely (Again)
Conventional wisdom frequently recommends using a wire brush to remove mineral buildup inside the faucet body. **This is a critical error.** Metal bristles create micro-scratches and gouges in the crucial brass or plastic housing where O-rings are seated. These minute abrasions will then act like sandpaper, shredding the surfaces of new seals, inevitably causing a premature leak. Always opt for soft, non-abrasive cleaning methods: use a nylon brush, a plastic scrub pad, or a soft cloth with an appropriate descaling agent.
⚠️ The 'Gorilla Grip' Mistake: Snug, Not Crushed (The Ultimate Trap)
The single biggest reason DIY faucet repairs fail to last is consistent over-tightening of components. Your objective is always 'snug,' not 'immovable.' Aggressively cranking down on a packing nut, retaining clip, or bonnet nut crushes the delicate O-rings, gaskets, and internal seals, creating new leak paths or preventing proper function. Apply minimal, controlled force for the final turn. The seals are scientifically designed to do the work of holding water; deform them, and you actively invite leaks. Trust the material science, not brute strength.
Cartridge Wars: Moen 1222 vs. Delta RP50587 Durability (Long-Term Value)
For single-handle faucets, while the Moen 1222 Posi-Temp cartridge is widely installed, it's also infamous for its tendency to seize due to mineral buildup, frequently requiring specialized tools and considerable effort for removal. We at BizzFactor exclusively recommend Delta faucets equipped with their RP50587 Diamond Seal Technology. The advanced ceramic disc design of Delta DST cartridges is incredibly durable, resistant to mineral buildup, and specifically designed for easy removal and servicing years later. While the initial [cost](/guides/home-services/towing-costs-solutions) of a Delta faucet may be slightly higher, it significantly reduces the likelihood of future service calls and eliminates repair frustration, providing superior long-term value.
Skip the Plumber's Grease (Yet Again, for EPDM Seals)
Many guides universally recommend lubricating O-rings with silicone grease. However, with modern EPDM rubber seals (Ethylene Propylene Diene Monomer), simply using clean water can often suffice as an effective lubricant. Excessive or improper grease application can attract grit, leading to abrasive wear, or even cause certain types of seals to swell and fail prematurely. Unless the faucet manufacturer explicitly instructs otherwise, for new EPDM O-rings, a clean water lubrication is often the safest and longest-lasting option.
⚠️ The Mistake That Guarantees a Second Leak: Wrong Lubricant Choice
Never, under any circumstances, use petroleum jelly (like Vaseline), general-purpose oils (like WD-40), or automotive grease on faucet O-rings or rubber seals. Petroleum-based products cause most rubber seals (like NBR or EPDM) to swell, degrade, and rapidly disintegrate, leading to new leaks within a matter of months. Even some less experienced professionals make this critical error. Always use **100% pure silicone plumber's grease** (food-grade if for potable water applications). Silicone grease lubricates effectively and protects rubber, ensuring your [repair](/guides/home-services/chimney-crown-repair-cost-guide) lasts. Using the incorrect lubricant is a primary and preventable cause of DIY repair failure.
Our Pro Recommendation: Delta vs. Moen for Ultimate Repairability
For sheer repairability from a DIY perspective, we definitively favor Delta's Diamond Seal Technology (DST) over Moen's 1225-style cartridge. Moen cartridges, as mentioned, are notorious for seizing firmly inside the faucet body, occasionally requiring hours of drilling and specialized extraction techniques that can damage the faucet permanently. Delta's DST cartridges are ingeniously designed to lift straight out with minimal effort after removing the bonnet nut, making replacement a swift and relatively simple task. A 'lifetime' warranty from Moen, while generous, doesn't account for the entire Saturday you might spend battling a frustrating, seized puller. For more insights into user-friendly home renovations, see our [guide to safe bathroom porcelain tiles](/guides/home-services/safe-bathroom-porcelain-tiles-expert).
What Most Guides Won't Tell You: Prudent Testing of Shut-Off Valves
It's ill-advised to immediately trust the shut-off valves under your sink, especially if they haven't been operated in years. After prolonged disuse, these valves often seize or fail to close completely. Attempting to force a stuck valve can cause the handle to break off or, worse, create a leak at the stem, exacerbating the problem. The professional approach: gently turn the valve a quarter-turn. If you encounter serious, unyielding resistance, or if you feel a "crunch," stop immediately. At this point, it's safer and less messy to use your home's main water shut-off instead to prevent further damage.
⚠️ The Post-Repair Mistake Plumbers Avoid: Water Hammer Prevention
After successfully replacing the cartridge and reassembling your faucet, resist the urge to immediately open the supply valves fully. This sudden rush of water creates a powerful 'water hammer' shockwave that can inflict significant damage on older or weaker pipe fittings, even potentially causing burst pipes. Instead, open the supply valves very slowly – just a quarter-turn initially – until you hear water flowing gently into the faucet. Allow the faucet to fill completely and the air to bleed out. Once the flow is steady, you can then open the valves the rest of the way. This measured approach prevents violent pressure surges and protects your entire home's plumbing system.
Our Pro Recommendation: OEM vs. Generic for Moen (Revisited for Posi-Temp)
For a Moen Posi-Temp faucet, always choose the genuine Moen 1222 cartridge over generic counterparts from brands like Danco or Everbilt. Generic brands nearly universally employ harder, less pliable rubber for O-rings, which leads to a noticeably stiff handle operation and a significantly higher failure rate, typically within 1-2 years. The official Moen part, while approximately $15 more, utilizes vastly superior polymers and engineering for a smooth, effortless handle feel and a robust lifespan of 5-7 years or more. Investing in the OEM part prevents the need to prematurely repeat the repair, saving you time and money.
What Most Guides Won't Tell You: Precise Grease Application
While conventional wisdom often advises a 'liberal' application of plumber's grease, this can be counterproductive. Instead, the correct technique is to apply an ultra-thin, almost microscopic film of silicone grease exclusively for lubrication, and then wipe away any excess. A thick glob of grease doesn't enhance the seal; it actually attracts and traps grit and [debris](/guides/home-services/new-home-duct-cleaning-guide) over time, acting like a slow-grinding paste against O-rings. The seal relies on the compression of the rubber components, not a barrier of grease.
⚠️ Common Mistake: The Over-Tightening Trap (The Golden Rule)
The most persistent and damaging DIY mistake in faucet repair is, unequivocally, over-tightening. Your aim should always be 'snug,' not 'immovable.' Cranking down aggressively on packing nuts, retaining clips, or handle screws crushes delicate O-rings and gaskets, permanently deforming them and guaranteeing a fresh leak. Use a light, controlled touch – perhaps using only two fingers on your wrench for the final turn. If a drip persists after careful reassembly, the issue is likely a wrong or faulty part, a damaged valve seat, or improper installation, not insufficient tightness. More force will only create more problems.
Our Pro Recommendation: Delta for DIYers (Final Verdict)
For the average DIYer, Delta undeniably remains the champion of repairability among the major brands. Moen's popular 1225 cartridges are notorious for their tendency to seize firmly, often mandating specialized and frustrating cartridge puller tools. Kohler parts, while high quality, can sometimes be harder to source quickly at common retail outlets. Delta's designs are generally simpler to disassemble, and their replacement cartridges and O-rings are widely and readily available. Furthermore, Delta's robust lifetime warranty and support for free replacement parts are invaluable for the homeowner. For a truly frustration-free, long-lasting fix that empowers the DIYer, Delta emerges as the clear winner in our experience.
What Most Guides Won't Tell You: Water as the Ideal Lubricant
In many cases, you can, and often should, skip the plumber's grease. While frequently recommended, excessive or incorrect grease application can attract fine grit and [debris](/guides/home-services/new-home-duct-cleaning-guide) over time, which then acts abrasively against O-rings and seals, shortening their lifespan. Instead, for new EPDM seals, simply use clean tap water as your lubricant. A wet O-ring sliding into a wet faucet body provides ample slip for correct seating without attracting problematic gunk, ensuring a pure, long-lasting seal.
⚠️ The Handle Screw Is Your #1 Enemy (Strips Easily!)
The tiny set screw that secures the faucet handle is where countless DIY repairs go catastrophically wrong. Using an Allen wrench that is even slightly loose or the wrong size will instantly strip the screw head, turning a simple 15-minute fix into a drill-out nightmare that can damage the handle or faucet body. Always test-fit your Allen key until it seats perfectly snug with absolutely no wiggle room. If you feel it begin to slip (even a minuscule amount), stop immediately. Apply more inward pressure, verify you are using the correct size, or try the next size up (checking between metric and standard sets) *before* you strip it and permanently trap the handle in place. This small detail is a huge make-or-break point.
Pro Pick: Delta Cartridges Over Moen's 'Puller' Hassle (Design Advantage)
Moen's 1225 and 1222 cartridges are infamous for seizing due to mineral buildup and corrosion, necessitating a special 'cartridge puller' tool. This removal process is often exceptionally frustrating, time-consuming, and carries a high risk of damaging the faucet body. We at BizzFactor strongly recommend Delta's Diamond Seal Technology (DST) cartridges (e.g., RP50587) due to their superior design. These cartridges are secured by a bonnet nut and screws, rather than a press-fit design, making them vastly easier to service and remove years later, and almost immune to seizing. For DIY-friendliness and avoiding significant repair headaches, Delta's engineering truly provides a significant advantage.
What Most Guides Won't Tell You: Gentle Shut-Off Valve Use (Advanced Technique)
Conventional wisdom might suggest cranking down water shutoff valves under the sink as tightly as possible to ensure the water is completely off. This is actually incorrect and harmful practice. Overtightening will crush and damage the rubber packing washer inside the valve, causing the valve itself to leak (or even fail completely) when subsequently opened or closed. The professional technique: Turn the valve clockwise until it stops, then conscientiously (and gently) back it off counter-clockwise by precisely 1/8th of a turn. This small adjustment protects the internal seal from excessive compression and significantly extends valve life.
Diagnosing the Leak: Is It the Spout, Handle, or Base?
Accurate diagnosis is the cornerstone of any effective and lasting faucet repair. Before you start replacing parts, you must pinpoint the exact source of your leak:
- **Drip from the spout when the faucet is off?** This almost always indicates a worn-out internal cartridge, ball assembly, or valve seat, which is failing to fully block water flow.
- **Water pools around the base or escutcheon of the faucet on the counter?** This typically points to failed O-rings on the faucet body, a loose mounting nut underneath the counter, or a compromised gasket between the faucet body and the counter surface.
- **Water leaks or seeps from around the faucet handles during use?** The O-rings or seals within the handle stem assembly are likely worn and need replacement.
Our diagnostic protocol as plumbing professionals starts with thoroughly drying the entire faucet and surrounding area. Then, run the water (hot and cold) for approximately 60 seconds, and immediately after shutting it off, observe precisely where the first sign of moisture appears. This direct observation will effectively pinpoint the failed component. Note that very minor spout drips immediately after shutoff are often normal pressure equalization and not always indicative of a major leak. Also, critically, check your home's water pressure; anything consistently over 80 PSI can prematurely damage faucet seals and connections and may require a dedicated [pressure regulator installation](/guides/home-services/pressure-regulator-installation-guide).
**Real-World Example:** Just last week in Denver, a homeowner was convinced their faucet's cartridge was entirely faulty due to persistent pooling at the base. After a quick, effective inspection, we found the issue was simply a loose mounting nut underneath the counter – a fix that took less than five minutes. This highlights the indispensable importance of thorough, methodical diagnosis before assuming the most complex repair.
Our BizzFactor Diagnosis Protocol for Faucets
To accurately and efficiently diagnose the source of your faucet leak, follow these precise steps:
1. **Dry Everything Completely:** Ensure the entire faucet, sink basin, and surrounding countertop are bone dry. Use a paper towel to meticulously dry every crevice.
2. **Run Water (Hot & Cold):** Turn on the faucet to a moderate flow for approximately 60 seconds, cycling through both hot and cold water if it's a two-handle model.
3. **Observe Immediately & Precisely:** Shut off the water, then immediately and closely observe the faucet. Note the exact location where the very first sign of moisture or a drip appears. This crucial observation will accurately indicate the failed component and guide your repair efforts.
", "faqs": [ { "question": "What are the most common causes of leaky faucets, and can I fix them myself?",
"answer": "The most frequent causes of faucet leaks are worn-out internal components like cartridges, O-rings, and seals. These parts degrade over time due to mineral buildup, friction, or age. With the right tools and guidance, most homeowners can absolutely fix these issues themselves, especially for common brands like Delta, Moen, and Kohler."
}, { "question": "What's the very first safety step I need to take before attempting any faucet repair?",
"answer": "The absolute first and most critical step is to shut off the water supply to the faucet. This is typically done by turning the hot and cold supply valves (angle stops) located directly under your sink clockwise until they are fully closed. If those valves are seized, you must shut off the main water line to your entire home to prevent any accidental flooding or damage. Always release residual pressure by opening the faucet handles after turning off the water."
}, { "question": "Why shouldn't I use 'universal' replacement parts for my faucet?", "answer": "'Universal' replacement parts are generally not recommended because their inherent off-tolerances can lead to problems. While they might temporarily stop an obvious drip, they can cause subtle, unseen leaks within the faucet's interior or lead to premature wear of other components. Always opt for Original Equipment Manufacturer (OEM) parts specifically designed for your faucet's model to ensure an exact fit, optimal performance, and long-term durability. Using the correct OEM part prevents significant water damage to your cabinetry and avoids repeat repairs."
}, { "question": "Is it better to use plumber's grease on O-rings, or can I just use water?",
"answer": "While plumber's grease is often recommended, the best approach depends on the O-ring material and manufacturer guidelines. For modern EPDM rubber seals, clean water can often provide sufficient lubrication and is often preferred as it doesn't attract grit or debris. If using grease, always choose 100% silicone plumber's grease (food-grade for potable water) and apply an ultra-thin film. Never use petroleum-based lubricants like Vaseline or WD-40, as they will cause rubber seals to degrade rapidly."
}, { "question": "Why do you recommend Delta faucets over Moen for DIY repairability?",
"answer": "From a DIY perspective, we generally recommend Delta faucets with Diamond Seal Technology (DST) over Moen because their cartridges are typically much easier to remove. Moen's 1225 and 1222 cartridges are notorious for seizing firmly within the faucet body due to mineral buildup, often requiring specialized and sometimes frustrating puller tools. Delta's DST cartridges are designed to lift straight out with relative ease, making replacement a far simpler and less frustrating task for the average homeowner.
In-Depth Look
Detailed illustration of key concepts
Visual Guide
Infographic illustration for this topic
Side-by-Side Comparison
Visual comparison of options and alternatives
Frequently Asked Questions
Need Professional Help?
Find top-rated plumbing experts in your area