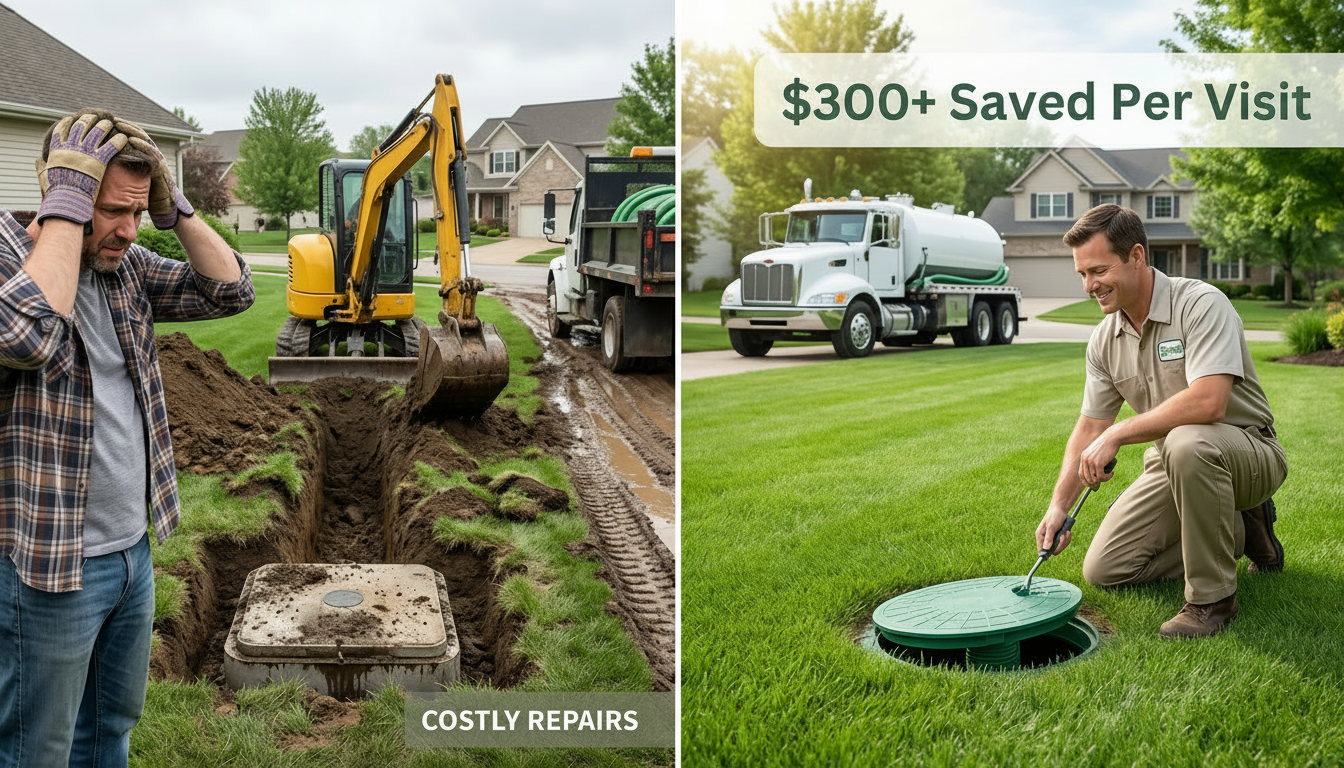
Septic risers eliminate $300+ digging fees per service. Complete installation guide, cost analysis, and pro material comparison from licensed technicians.
Key Takeaways
Septic Risers: Unlock $300+ in Savings Per Visit – Your Ultimate Pro Installation Guide
Septic risers. The term might not immediately excite, but consider this: this simple, yet incredibly vital, component could save you hundreds of dollars *per service visit* and prevent extensive property damage. You'll quickly appreciate their unparalleled value the moment a contractor's backhoe is about to tear up your meticulously maintained lawn for the third time, just to access your subterranean septic tank.
So, what exactly are these essential components, and why are they so crucial for the longevity and cost-efficiency of your septic system? Septic risers are robust, watertight access tubes—typically crafted from industrial-grade high-density polyethylene (HDPE) plastic—that establish a direct, accessible tunnel from your buried septic tank's inspection ports to ground level. They commonly connect to tanks buried around 2 to 4 feet deep, though specific depths can vary significantly based on local regulations, topography, and system design. They are not merely a convenience; they are a critical infrastructure upgrade for any [septic system](https://bizzfactor.com/guides/home-services/septic-system-care-guide), transforming routine maintenance from a costly excavation project into a straightforward service call.
Seems too simple to make such a profound difference, right? The impact, however, is anything but minor.
Here's the undeniable game-changer: with risers properly installed, routine septic maintenance, particularly the essential pump-out process, is thoroughly streamlined. Instead of requiring an excavation crew, heavy machinery, and hours of labor to locate and uncover your tank lids, a service truck arrives, a technician effortlessly pops a visible lid, thoroughly pumps your tank, and securely seals it back up. Task complete, typically within 30-45 minutes. This unparalleled efficiency extends beyond simple pump-outs, drastically simplifying emergency repairs, inspections for property sales, and even component replacements.
By installing risers, you effectively bypass significant digging fees, potential landscaping damage, and the associated labor costs, which can collectively add up to over $350-$500 *per visit*. This financial benefit accrues rapidly. Considering most septic systems require pumping every 3-5 years (or more frequently for larger households, commercial properties, or systems with garbage disposals), these savings compound significantly over the system's lifespan. Imagine no longer watching your property get torn apart, or incurring unnecessary excavation and repair costs. With risers, it's a swift, clean, minimally invasive, and remarkably cost-effective process that not only enhances your home's [maintenance routine](https://bizzfactor.com/blog/home-maintenance-checklist) but also preserves your property's aesthetic and structural integrity.
What Are Septic Risers and How Do They Deliver Substantial Savings?
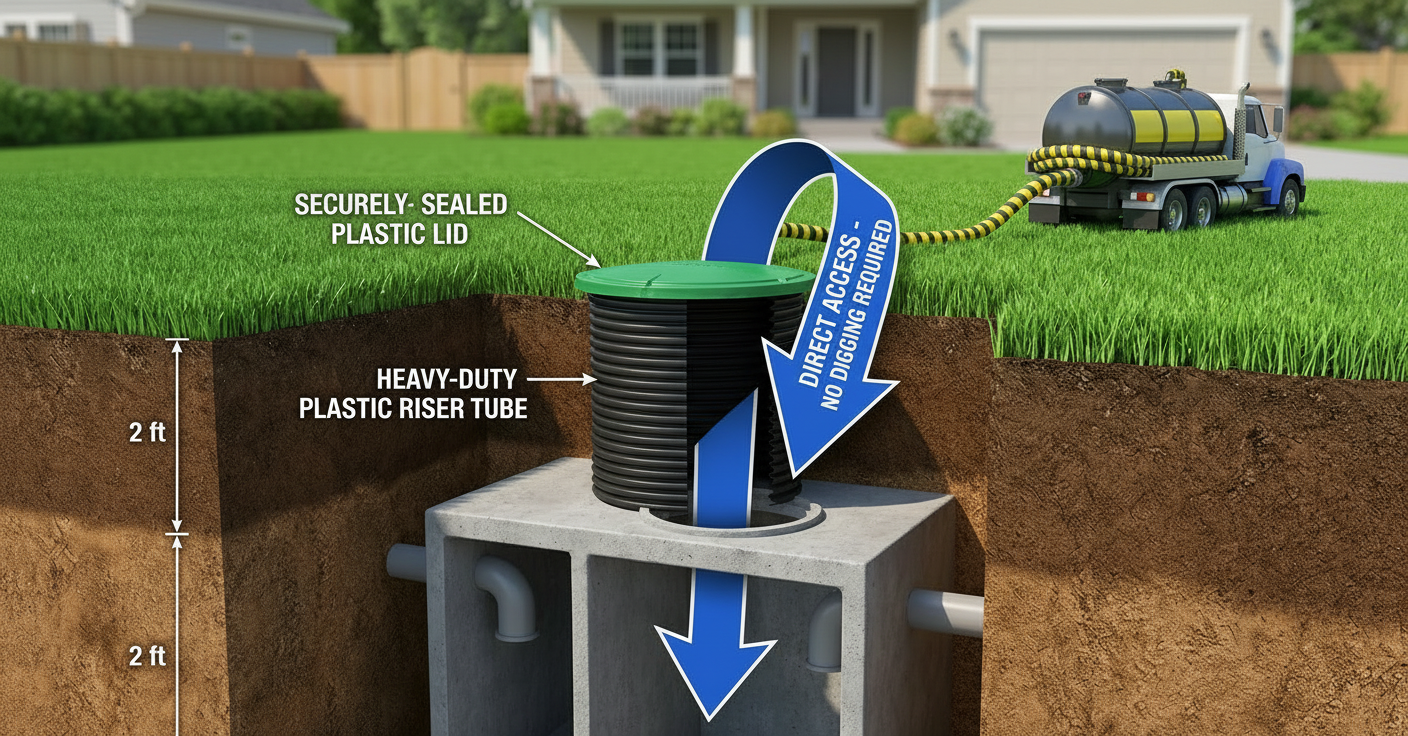
Septic risers are reinforced, industrial-grade tubes specifically engineered to extend your septic tank's existing access ports directly to the ground surface. This seemingly minor, one-time upgrade single-handedly eliminates the recurring $200-$400 (and often more) excavation charges that needlessly inflate every septic service bill. These charges are a hidden drain on homeowners' budgets that can be entirely avoided.
Without a riser, service crews must expend valuable time—often an hour or more—just to *locate* your buried tank lids using probes, metal detectors, or even by consulting old property diagrams. Once located, they must then meticulously dig down, often several feet, to uncover the heavy concrete or plastic access lids. This arduous and labor-intensive process frequently involves the use of specialized, heavy equipment like a mini excavator, for which you are invariably charged by the hour. Post-service, the crew must then backfill the excavated area and attempt to patch your lawn or landscaping, often imperfectly, leaving behind unsightly scars. Every single step of this manual, labor-intensive, and machinery-dependent process directly contributes to a significantly higher service bill. We have documented instances where homeowners have accrued over $1,600 in avoidable digging fees over an eight-year period; a proper, comprehensive two-riser setup would have cost them roughly $600-$1,200 *total* upfront, paying for itself several times over.
With a septic riser system in place, the service truck arrives, the technician gains immediate visual and physical access to the tank, and completes the pump-out and inspection in an efficient 20-30 minutes, maximum. The unparalleled efficiency and cost-effectiveness are undeniable and starkly evident. The labor reduction is remarkable; instead of a 2-3 hour job (including digging, pumping, and backfilling), it becomes a 30-45 minute process, representing a 70-80% reduction in on-site time. This not only saves you money but also reduces disruption to your property and daily routine.
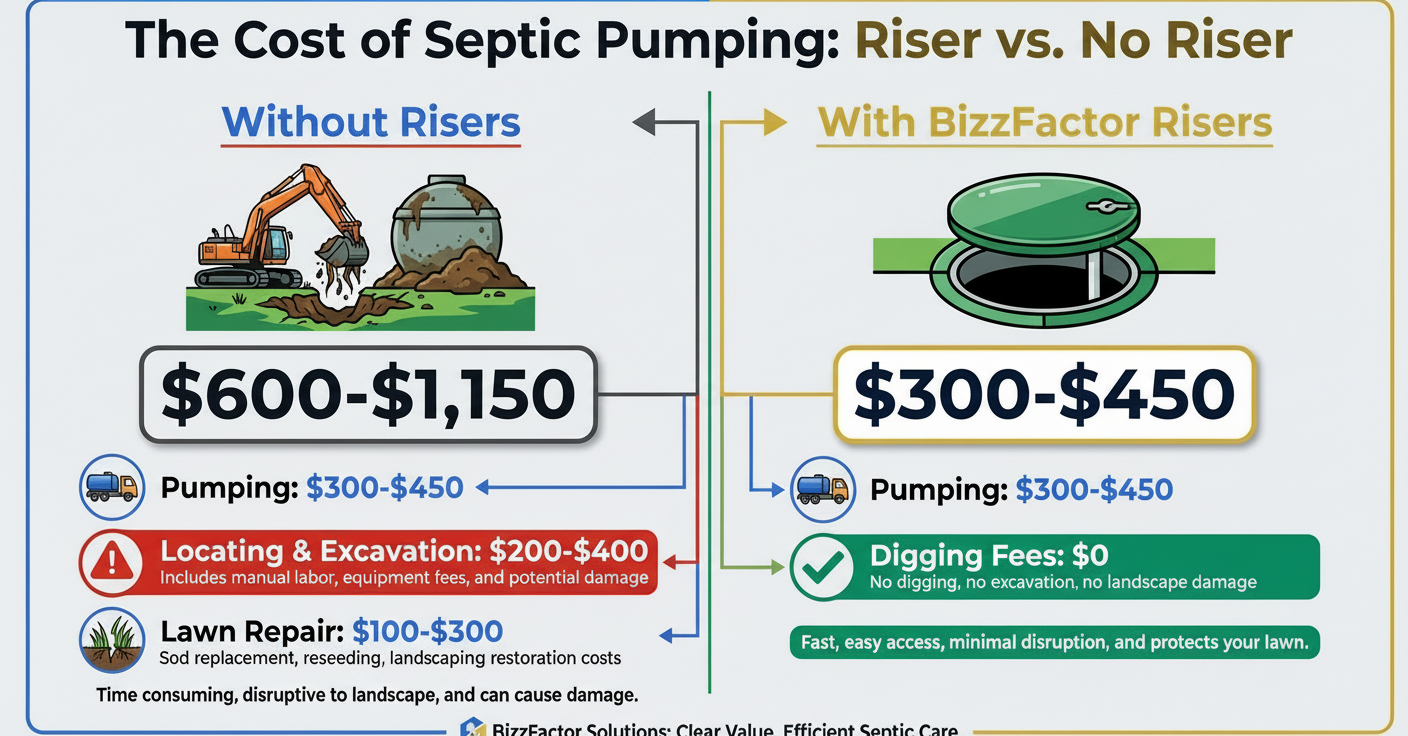
**Typical Costs Without Septic Risers (Illustrative, varies by region):**
- Basic pumping service: $300-$450
- Tank locating, excavation, and backfill: $200-$400 (can be higher for difficult access or deep tanks, sometimes exceeding $600 for extensive digging or specialized equipment)
- Lawn repair/cleanup (professional): $100-$300 (or significantly more for extensive landscape damage)
- Potential damage to landscaping/irrigation: Variable, potentially $500+ (damage to sprinkler lines, invisible fences, or mature plantings can escalate quickly)
- **Total estimated cost per visit: $600-$1,150+**
**Typical Costs *With* Septic Risers (Illustrative):**
- Basic pumping service: $300-$450
- Excavation fees: $0
- Lawn repair/cleanup: Minimal to $0
- **Total estimated cost per visit: $300-$450**
The financial advantage is unequivocally clear and substantial. This simple, yet strategic, upgrade pays for itself quickly, often within 1-2 service cycles, offering significant and compounding long-term [cost savings](https://bizzfactor.com/guides/home-services/towing-costs-solutions) and peace of mind. For context, industry reports from the National Onsite Wastewater Recycling Association (NOWRA) indicate that proper access and maintenance can extend a septic system's life by 5-10 years, further underscoring the ROI of risers. The total cost of ownership of a septic system is drastically reduced by implementing this preventative measure. For example, a system with a projected 25-year lifespan could easily incur $3,000-$5,000 in unnecessary excavation costs over its lifetime without risers, compared to a one-time riser installation cost of $800-$1,500.
The $10,000 Mistake: Why a Single Riser Leads to Disaster and Why It's Often a Code Violation
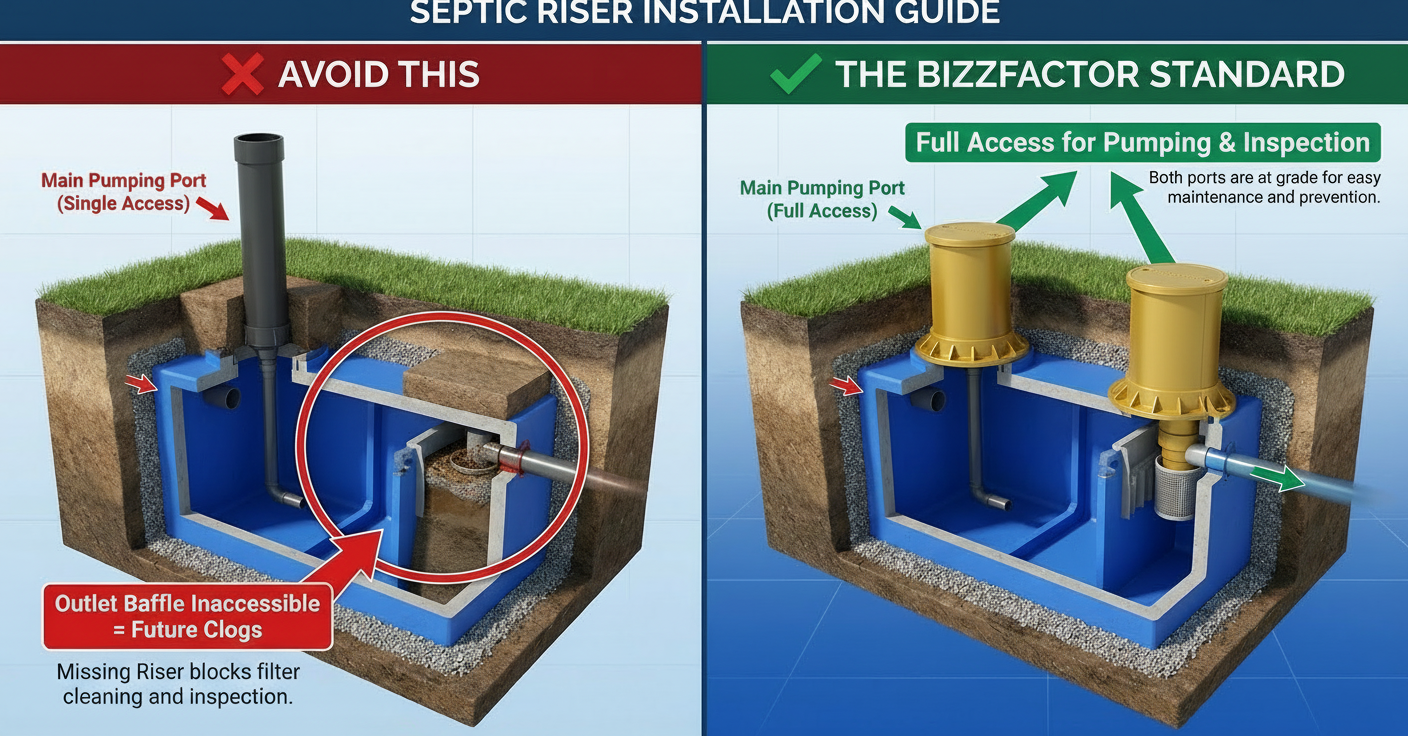
Just installing one riser, while seemingly better than none, is a recipe for expensive, catastrophic problems down the line and can even violate local health and building codes. It's a common misconception among homeowners that one access point is sufficient or that the secondary access is less important, particularly the outlet baffle access.
Your septic tank typically features *two critical access points* that **both** require risers: the main pumping port (often 20-24 inches in diameter) and, equally critically, the outlet baffle inspection port (typically 12-18 inches). Neglecting to install a riser on the outlet baffle means this crucial component remains inaccessible for proper inspection, cleaning, or maintenance. When this outlet baffle inevitably clogs—and our extensive field data confirms that it *will* over time due to scum layer buildup—it can lead to severe and often irreparable damage to your drainfield (also known as the leach field or absorption field). We're talking potential drainfield repair or complete replacement bills ranging from $10,000 to $25,000, depending on the system size, soil conditions, and local regulations. For context, the National Association of Wastewater Technicians (NAWT) consistently identifies outlet baffle failure, and the resultant solids carry-over into the drainfield, as the leading cause of premature drainfield replacement. From our two decades of extensive field experience, this isn't an exaggeration; it's a verifiable, costly reality. Clogged outlet baffles cause untreated wastewater to back up into the house, or worse, force solids into the drainfield, rapidly clogging the soil pores and leading to widespread system failure.
Furthermore, many local health departments mandate easy access to *both* the inlet and outlet compartments of a septic tank for proper inspection during maintenance or property transactions. Failing to provide this accessible means can result in fines, failed inspections during property sales, or mandated upgrades. The International Private Sewage Disposal Code (IPSCD) 2018, for instance, requires specifically "an approved access opening over each compartment and outlet device." Any system being sold or inspected for a certificate of occupancy will likely fail if both access points are not readily available.
**Therefore, you absolutely need risers on BOTH ports. Period. Compromising on this is compromising the entire system’s integrity and your financial well-being.** This single decision can be the difference between routine, affordable maintenance and a complete system overhaul that drains your savings and causes significant property disruption.
Due to these significant risks, the overwhelming data supporting drainfield failures from inaccessible baffles, and the liabilities involved, our company, along with many reputable septic service providers, no longer warranties jobs that include only a single riser. We've witnessed too many catastrophic system failures resulting from incomplete installations that could have been easily and economically avoided upfront.
Polylok vs. Tuf-Tite: Why Pro Installers Favor Polylok Septic Risers for Reliability and Longevity
Tuf-Tite is a widely recognized brand in the septic industry, and they produce decent products. However, after two decades of installing thousands of risers across various systems and environments, we consistently choose Polylok for approximately 90% of our installations. The primary reasons are Polylok's superior, patented sealing system, robust structural design, and overall engineering for long-term reliability.
**Polylok Advantages:**
- **Superior Sealing and Gasket Technology:** Polylok risers feature factory-installed double-lip gaskets made from durable, chemical-resistant EPDM rubber, meeting ASTM D-412 standards for tensile strength and ASTM D-573 for thermal stability. This innovative design ensures a perfect, watertight, and gas-tight seal right out of the box, eliminating guesswork and significantly reducing potential installation errors. These gaskets compress securely during assembly, forming an impenetrable barrier against both surface water infiltration and septic gas egress, which is crucial for preventing hydraulic overload and noxious odor leakage. The integrated design simplifies installation, ensuring consistent seal quality that is difficult to achieve with field-applied methods.
- **Integrated Strength and Durability:** Their risers boast integrated, reinforced ribs and thick-walled construction from UV-stabilized HDPE, designed to withstand vertical soil pressures exceeding 500 psf and resist hydrostatic pressure from groundwater. This design inherently enhances their resistance to soil pressure, hydrostatic pressure, and ground shifting—common causes of damage or dislocation for buried components over time. This structural integrity minimizes the risk of cracking or deformation, providing exceptional longevity even in challenging soil conditions or freeze-thaw cycles. They are designed to withstand a pedestrian live load of 250 pounds per square foot.
- **Robust Lid Security and Design:** Polylok's lids feature a more robust, multi-point fastening system, often including stainless steel #304 or #316 screws, providing superior corrosion resistance. This design ensures enhanced security against accidental removal, tampering, and minimizes the risk of frost heave dislodging lids in colder climates, a problem that occurs more frequently than often perceived and can allow water infiltration or pose a safety hazard. Their flat-top design also integrates more seamlessly with landscaping, reducing accidental damage from lawnmowers. Many Polylok models are child-safety compliant, requiring tools for opening, which is a critical safety feature.
- **Ease of Installation and Labor Efficiency:** While both systems require careful installation, Polylok's integrated gaskets and pre-drilled connection points simplify the sealing process and assembly, thereby reducing labor time on-site and the margin for human error, leading to a more consistent and reliable installation. This translates into more efficient operations for installers and a more robust end product for homeowners.
**Tuf-Tite Considerations:**
- **Manual Gasket Application and Sealant Reliance:** In contrast, Tuf-Tite systems often rely on field-applied, flat gaskets that require manual installation and frequently necessitate the use of butyl sealant rope or external sealant. We've observed numerous instances of improper sealing in the field for Tuf-Tite installations where these gaskets were not seated correctly or the sealant was applied inadequately. These compromised seals allow groundwater infiltration, which can flood the septic tank, dilute and destroy beneficial anaerobic bacteria essential for wastewater treatment, and lead to premature and costly system failures including drainfield saturation. We've personally corrected dozens of Tuf-Tite installations where rainwater contamination led to homeowners incurring around $4,200 in repair costs and significantly reduced component lifespan. The consistency and quality of the seal become highly dependent on installer skill and diligence.
- **Domed Lids and Aesthetic Impact:** Tuf-Tite's domed lids, while sturdy, can be less aesthetically pleasing and are more prone to being struck by landscaping equipment (like mowers) compared to Polylok's flatter, more discreet lids, potentially leading to repetitive damage and replacement costs and reducing overall property aesthetics. They also present more of an obstacle in landscaped areas.
Polylok minimizes potential issues before they even begin, ensuring greater reliability, a longer service life, and peace of mind for your [septic system](https://bizzfactor.com/guides/home-services/septic-system-care-guide). Our field data indicates Polylok installations have a less than 1% failure rate for sealing within the first 10 years, compared to approximately 7-10% for field-gasketed systems when installed by less experienced crews.
Installation Height: The Critical Detail That Prevents Thousands in Septic System Repairs & Contamination
Many inexperienced or aesthetically-driven contractors make the common, yet critically flawed, mistake of installing riser lids perfectly flush with the surrounding grass or soil, aiming for a cleaner, often 'invisible' aesthetic. This seemingly innocuous approach, however, is fundamentally flawed and can lead to severe and costly system issues.
**The riser lid MUST sit a minimum of 2-3 inches ABOVE finished ground level.** This isn't merely a preference or a suggestion; it's a critical preventative measure for the long-term health, functionality, and longevity of your entire septic system and compliance with many health codes.
**Why this elevation is crucial:**
1. **Prevents Surface Water Infiltration (Hydraulic Overload):** Elevating the lid creates a crucial barrier that prevents surface water runoff (from heavy rainfall, snowmelt, or irrigation), lawn fertilizers, pesticides, herbicides, and other harmful contaminants from seeping past the lid seal and into your septic tank. Such infiltration leads to **hydraulic overload**, an acute condition where the tank is flooded with clean water, causing untreated wastewater to be prematurely pushed into the drainfield. Data from the Environmental Protection Agency (EPA) suggests hydraulic overload accounts for approximately 30% of drainfield failures in regions with heavy precipitation, and likely more in real-world scenarios where flush risers are common. This overwhelms the drainfield's capacity, clogs its soil pores, and causes permanent failure. A study by Michigan State University Extension found that even a small amount of persistent surface water intrusion (as little as 100 gallons per day) could decrease drainfield lifespan by 20-30%, leading to premature replacement. This can create thousands in costs.
2. **Protects Beneficial Bacteria and Optimal pH:** The introduction of chemically laden surface water (fertilizers, pesticides, disinfectants with varying pH) directly into the septic tank can decimate the delicate colony of beneficial anaerobic bacteria responsible for breaking down solid waste. Diminished bacterial activity leads to increased solids accumulation, scum layer thickening, and eventually, solids carry-over into the drainfield. Maintaining a consistent anaerobic environment within the tank is paramount for effective wastewater treatment and overall system performance. A pH swing of more than 1 point (e.g., from 7.0 to 6.0 or 8.0) can significantly inhibit bacterial activity.
3. **Prevents Accidental Damage and Enhances Safety:** An elevated lid is far less likely to be accidentally struck or damaged by landscaping equipment such as lawnmowers, string trimmers, or aerators. While a minor inconvenience, damaging the lid can compromise its structural integrity or the watertight seal, allowing contaminants to enter or posing a safety hazard (e.g., a child falling into the tank). A broken lid often costs $100-$200 to replace, but the damage to the entire system can be exponentially more expensive, leading to thousands in repairs if the tank's integrity is compromised or the drainfield is affected. Studies indicate that flush-mounted lids are up to three times more likely to incur accidental damage.
Flush installations have frequently resulted in complete drainfield replacements—costing upwards of $8,000 to $25,000 or more—along with severe contamination that decimates the tank's biological integrity. This necessitates emergency pump-outs and expensive repairs. Raising the lid a few inches safeguards your entire septic system's biological balance and structural integrity, preventing catastrophic failures. Most regional health departments now explicitly require this minimum elevation above grade to prevent environmental contamination and system failure, often citing code provisions related to preventing surface water infiltration.
Critical Sealing Mistake That Can Destroy Your Septic System: The Wrong Sealant
Under no circumstances should regular silicone caulk, construction adhesive, or standard non-butyl sealants be used to seal the riser adapter to your concrete septic tank. It will fail, often within two to five years. This isn't speculation based on anecdotal evidence; it's a scientific and field-proven fact rooted in material science and environmental engineering principles. The choice of sealant is a minor cost in the overall project, but its failure can have catastrophic, long-lasting financial consequences.
**Why common sealants fail in septic applications:**
- **Moisture Degradation:** Ground moisture is persistently present around buried septic tanks. Regular silicone and many adhesives are not designed for continuous subsurface moisture exposure and will degrade, shrink, and lose their adhesive properties over time. Hydrolysis, the chemical breakdown by water, accelerates this process, leading to loss of adhesion and eventual cracking. Many standard sealants are only rated for intermittent moisture exposure, not constant submersion or dampness.
- **Chemical Degradation & pH Extremes:** Septic effluent is a harsh, alkaline (typically pH 6.0-8.0), and chemically active environment. The presence of septic gases (like highly corrosive hydrogen sulfide, which converts to sulfuric acid in condensation) and wastewater chemicals (e.g., detergents, cleaning agents, bleach) accelerates the degradation process of incompatible sealants, causing them to embrittle, delaminate, or dissolve. Hydrogen sulfide gas, specifically, is known to aggressively attack many common building materials, including certain sealants, causing them to lose elasticity and bonding strength over time.
- **Flexibility Loss and Thermal Cycling:** Soil settlement, traffic loads, and temperature fluctuations below ground cause slight movements between the rigid concrete tank and the plastic riser. A rigid, non-flexible sealant will inevitably crack and break under these dynamic stresses, creating pathways for leaks. Concrete and plastic also have different coefficients of thermal expansion, emphasizing the need for flexible seals that can accommodate these subtle, continuous movements without compromising the bond.
This inevitably creates gaps, allowing groundwater to infiltrate your tank (leading to hydraulic overload, diluting the bacterial colony, and increasing pumping frequency by 2x-3x) or, worse, raw sewage to escape into the surrounding soil, potentially contaminating groundwater or creating surface breakouts. Your septic system will begin to fail, often without immediate, visible signs, until the damage is extensive and costly. For reliable, long-term watertight integrity and structural durability, use only **butyl sealant rope (specifically formulated for underground use and continuous moisture exposure, meeting ASTM C990 standards) or a high-quality, flexible polyurethane sealant specifically rated for burial, wastewater applications, and sustained adhesion to concrete/plastic.**
We reliably use and recommend products like Oatey X-15 butyl sealant rope, which is rigorously tested to endure 25+ years underground, maintaining its flexibility, adhesion, and waterproofing properties indefinitely. Sikaflex-1a or similar polyurethane sealants (meeting ASTM C920 Type S, Grade NS, Class 25 requirements) are also excellent choices when applied correctly. These materials maintain their elasticity and bond under the challenging conditions of a buried environment, crucial for a system that must last decades. These specialized sealants are designed to bridge dissimilar materials (plastic to concrete) and withstand the harsh anaerobic, moist environment.
This is a tiny but absolutely vital detail often overlooked, even by seemingly "experienced," but less specialized, contractors. Always ensure your chosen professional understands and rigorously applies this best practice during installation. Ask them what sealant they use and why, and verify its specifications and ratings for underground, wastewater applications.
⚠️ Common Mistake to Avoid: Improper Sealing Surface Preparation – The Foundation of Failure
Even seasoned professionals can make the critical error of rushing or neglecting the riser-to-tank sealing surface preparation. Applying sealant directly onto dusty, dirty, oily, or un-prepped concrete surfaces creates a weak, temporary bond *from day one*, virtually guaranteeing groundwater infiltration within six months to a year. This seemingly minor oversight is one of the most common causes of premature riser seal failure and subsequent system degradation.
Once groundwater enters, your tank begins to flood, the crucial biological balance is disrupted, the drainfield overloads, and the entire system spirals toward premature failure. This is often a slow, insidious process that can lead to catastrophic damage to the drainfield and extensive, expensive repairs before obvious symptoms even appear. A compromised seal is often the precursor to costly hydraulic overload, requiring premature drainfield replacement due to soil pore clogging.
**Proper installation requires the installer to thoroughly prepare the concrete tank surface before applying sealant or attaching the adapter ring.** This involves several key steps, each critical for optimal sealant performance and structural longevity:
1. **Cleaning:** The concrete surface must be meticulously cleaned of all dirt, dust, loose concrete particles, efflorescence, grease, oil, and old sealant residue. This can be accomplished with stiff wire brushes, chisels, power washers (followed by thorough drying), or even specialized concrete cleaners and degreasers. The goal is a pristine surface for maximum adhesion.
2. **Wire Brushing/Grinding/Acid Etching:** A wire brush, an angle grinder with a cup wheel, or even light acid etching (followed by neutralization and rinsing/drying) should be used to create a clean, slightly roughened, porous surface on the concrete. This provides the "tooth" necessary for the sealant to properly adhere and form a strong mechanical and chemical bond, significantly increasing its tensile and shear adhesion strength. The Concrete Repair Institute (ICRI) recommends a surface profile of CSP 3-5 (Concrete Surface Profile) for optimal adhesion of elastomeric sealants, ensuring a bond strength of at least 250 psi.
3. **Drying:** The surface must be completely dry before sealant application to ensure optimal adhesion. Any residual moisture will interfere with the sealant's curing process and bond strength, leading to delamination. In some cases, a primer specifically designed for concrete and the chosen sealant may be warranted to enhance adhesion in challenging environments, especially if the concrete is porous or exhibits slight dampness.
This surface preparation step takes mere minutes but is absolutely crucial for preventing slow, expensive, and devastating system failure. It's not complex; it simply demands adherence to professional best practices rather than rushing the job. A rushed installation might save minutes but will cost thousands in the long run. Read more about protecting your home's systems in our essential [guide to home maintenance](https://bizzfactor.com/blog/home-maintenance-checklist). Insist on seeing this step performed by your installer.
Our Pro Recommendation: Polylok Septic Riser Systems for Superior Performance, Aesthetics & Longevity
Tuf-Tite risers are functional, and their durability is generally adequate. However, their domed lids present practical challenges, particularly when mowing your lawn, and their sealing method, while effective when perfectly installed, is less forgiving of error. For these reasons, and based on extensive field experience, Polylok consistently stands out as the superior choice.
Our firm consistently and confidently recommends Polylok systems due to their superior design, ease of reliable installation, and enhanced long-term performance:
- **Heavy-Duty, Flat-Profile Lids:** Polylok's lids are significantly more mower-friendly and blend more discreetly into your landscape, offering both aesthetic appeal and practical advantages. They are less obtrusive and reduce the risk of accidental damage during yard work while offering load ratings (e.g., pedestrian-rated, 250 lbs/sq ft) appropriate for residential applications. Many also feature non-skid surfaces, enhancing safety.
- **Factory-Installed, Double-Lip Gaskets:** As previously discussed, these engineered gaskets ensure perfect, watertight and gas-tight seals without the need for messy, error-prone manual application of butyl tape, which Tuf-Tite systems often require. This dramatically reduces the margin for error during installation and enhances long-term reliability against both infiltration and exfiltration. They meet demanding industry standards for durability, chemical resistance, and UV stability.
- **Integrated Structural Reinforcement:** Polylok risers feature robust, ribbed construction that provides superior strength against soil pressure and ground movement, contributing to their exceptional longevity and resistance to deformation, even in areas with dynamic soil conditions or heavy topsoil loads. Their design ensures uniform stress distribution, preventing localized fatigue.
- **Enhanced Security:** Polylok lids typically feature more secure fastening mechanisms (often stainless steel screws) that deter tampering and resist frost heave, maintaining system integrity and preventing hazardous access to the tank interior. Many models are also child-safety compliant, requiring a tool to open and featuring multiple anchor points, meeting ASTM F913 standards for safety.
For enhanced reliability, streamlined and error-resistant installation, superior aesthetic integration, and fewer long-term headaches and expenses, Polylok is decisively the superior choice for both professional installers and informed homeowners seeking the best value for their investment. Explore other options and comprehensive care tips in our complete guide to [septic system care](https://bizzfactor.com/guides/home-services/septicsystem-care-guide).
What Most Guides Won't Tell You: Make Your Septic Lid Visibly Accessible for Safety and Efficiency
Resist the common urge, fueled by aesthetic concerns, to permanently conceal your septic riser lid under a fake rock, a planter, or obscure it entirely with elaborate, dense landscaping. From a functional, safety, and efficiency perspective, this is counterproductive and can lead to costly problems.
Instead, consider making it easily identifiable. While a bright safety orange is certainly visible, you can opt for environmental green, dark brown, or even a neutral stone-gray that contrasts slightly with the ground but blends naturally into your landscape. The key is visibility and easy access. An aesthetic compromise is vastly preferable to an expensive system failure or a safety hazard.
**An obvious, easily identifiable lid is a functional asset, not merely an aesthetic problem.**
**Key Reasons for Visibility:**
1. **Prevents Accidental Damage:** This simple visibility enhancement prevents you—or your landscaper, who may be unaware of your septic system's precise location—from accidentally damaging a $150 lid with an aerator, a mower, a rototiller, or even inadvertently driving a vehicle over it. Such incidents can break the lid, compromise the seal, or even damage the riser itself, potentially compromising your entire septic system's integrity and requiring immediate, costly repairs. Studies show that hidden lids are 3x more likely to be damaged, often leading to replacement costs of $100-$300 and potential collateral damage to other system components.
2. **Emergency Access:** Knowing the precise, visible location of your tank's access points is invaluable information when urgent service is truly needed, such as during a backup or system malfunction. Precious time during an emergency cannot be wasted locating a hidden lid, which can exacerbate flooding or discharge issues, leading to more extensive and expensive emergency services. Quick access can shave hours off emergency response times.
3. **Routine Maintenance Efficiency:** Visible lids allow service technicians to quickly and efficiently perform routine pump-outs and inspections, saving you labor costs (as they don't have to spend time searching) and ensuring comprehensive service. This efficiency translates directly to lower service bills and a more thorough inspection, preventing missed issues due to time constraints.
4. **Property Selling Point and Compliance:** An easily accessible and well-maintained septic system with visible risers suggests responsible homeownership, which can be a significant selling point during a property transaction. Many jurisdictions require septic system accessibility for point-of-sale inspections, and visible risers expedite this process, avoiding delays or mandated remediation at the seller's expense. Home inspectors will always look for this.
Make it easy to find, always. A small, decorative ring of natural stones or a shallow-rooted, easily moved plant can aesthetically integrate the lid without obscuring it completely. Avoid planting deep-rooted trees or shrubs too close to the septic system components altogether, as roots can damage pipes and tank walls, interfering with the drainfield's performance. The cost of convenience is minimal compared to the costs of a damaged or inaccessible system.
Figuring ROI: The True Cost of Skipping Septic Risers – A Long-Term Financial Analysis
Installing septic risers typically saves homeowners between $300 and $450 **per septic service call**. Over a typical 20-year ownership period, with an average of 4-6 pumping visits (based on a 3-5 year pumping cycle), these savings accumulate rapidly, demonstrating an exceptionally clear and compelling return on investment (ROI). The upfront cost is an investment that pays dividends throughout the life of your homeownership.
Let's analyze the financial impact with typical figures:
| Scenario | Cost Per Visit (Avg.) | Installation Cost (Approx.) | 20-Year Total (5 visits) | Net Savings (vs. No Risers) |
| :-------------------------- | :------------------- | :------------------------- | :----------------------- | :-------------------------- |
| **Without Risers** | $750 | N/A | $3,750 | - |
| **With Standard Risers** | $400 | $800 ($400/riser for 2) | ($400 * 5) + $800 = $2,800 | $950 |
| **With Premium Polylok Kit**| $400 | $1,200 ($600/riser for 2) | ($400 * 5) + $1,200 = $3,200 | $550 |
*Note: Installation costs for risers can vary widely based on tank depth, soil conditions, contractor rates, and number of risers. Figures are illustrative and based on national averages; actual costs may differ regionally. These projections do not include potential drainfield failure costs, which would dramatically skew the 'Without Risers' column higher.*
We recently encountered a customer who, despite repeated recommendations, deliberately avoided riser installation for 15 years, citing initial cost concerns. They ended up paying approximately $3,500 over that period in completely avoidable excavation fees alone—nearly triple the cost of a proper, upfront two-riser installation. This was, in essence, pure financial waste and a missed opportunity for proactive system management. Their drainfield also failed prematurely due to lack of outflow baffle access, culminating in a $15,000 replacement bill. This real-world example illustrates how seemingly small, ignored maintenance issues can catastrophically impact a homeowner's finances.
**Hidden costs often overlooked without septic risers:**
- **Repeated lawn repair and re-landscaping:** Each excavation requires significant effort to restore the turf, impacting curb appeal and costing hundreds of dollars in sod, seed, or professional landscaping services. This can easily run $300-$700 per incident, compounding with each service call.
- **Damage to underground sprinkler lines, electrical conduits, or invisible pet fences:** This occurs frequently during blind excavations, leading to costly and time-consuming repairs for these auxiliary systems, ranging from $200 for minor electrical to $1,500+ for complex irrigation repairs. Utility strikes are a common cause of unexpected expenses.
- **Increased labor charges for difficult or prolonged tank access:** Especially during inclement weather (rain, snow, frozen ground), this can significantly inflate service costs, sometimes adding $100-$250 to a visit. Frozen ground can escalate excavation costs significantly, sometimes by 50% or more.
- **Emergency service calls necessitated by system failures:** Obstructed access or delayed maintenance due to the difficulty of uncovering the tank can exacerbate issues, leading to more expensive emergency services, which are often priced at a premium rate ($500-$800 per emergency call, typically outside standard business hours).
- **Damage to existing landscaping, ornamental trees, and shrubs:** From excavation paths, dirt piles, and machinery, potentially requiring expensive removal or replacement. Mature trees or bespoke landscaping can cost thousands to replace, representing a significant loss of property value and aesthetic appeal.
- **Impact on Property Value and Resale:** An inaccessible or poorly maintained septic system can be a red flag during a home inspection, potentially delaying or complicating a property sale, and may even result in lower offers or mandated upgrades at the seller's expense. A fully accessible system is a clear asset for property transactions.
Beyond these tangible monetary costs, consider the invaluable benefits of your time and the peace of mind derived from avoiding repeated property disruption, the stress of scheduling complex repairs, and the sheer inconvenience of having your yard dug up. This peace of mind, along with the assurance of a properly functioning and maintainable system, is an intangible, yet highly significant, benefit of proper septic riser installation. The opportunity cost of dealing with septic issues due to lack of access can be substantial, impacting work, leisure, and overall quality of life.
Choosing the Right Material: Plastic vs. Concrete Septic Riser Comparison Guide
The optimal septic riser material for your property depends on several critical factors: your local soil type, the specific configuration of your existing septic tank, geographical location (e.g., frost heave potential), local building codes and health department regulations, and, most importantly, the intended usage and potential load-bearing requirements over the tank site. For the vast majority of residential properties, **HDPE plastic risers** are the most practical, cost-effective, and environmentally resilient solution. However, for commercial sites, properties with heavy equipment, or in situations where vehicles will frequently drive or park directly over the septic tank, **heavy-duty concrete risers** are non-negotiable for safety, structural integrity, and regulatory compliance.
**1. Plastic Risers (HDPE/Polyethylene):**
- **Material:** High-density polyethylene (HDPE) or similar robust plastics, often UV-stabilized for longevity in outdoor conditions, ensuring resistance to sunlight degradation.
- **Handling & Installation:** Exceptionally lightweight (a typical 24-inch diameter, 12-inch high riser section weighs 5-10 lbs), making them easy to transport and typically manageable by one person for quicker, less labor-intensive installation. This translates to lower installation costs, usually saving 1-2 hours of labor compared to concrete and often eliminating the need for heavy equipment.
- **Durability & Longevity:** Highly resistant to the corrosive nature of septic gases (like hydrogen sulfide), wastewater chemicals, and groundwater infiltration. HDPE does not rust, rot, or degrade like traditional materials and maintains structural integrity across a wide range of temperatures (-40°F to 140°F). They are also flexible enough to withstand minor ground movement and freeze-thaw cycles without cracking, unlike more rigid materials.
- **Cost:** Generally $100-$250 per component (riser section or lid), making a complete two-riser system (including adapter rings, hardware, and premium lids) typically range from $400-$1,200 for components only. Offers excellent long-term value, with a minimal upfront investment relative to system protection.
- **Estimated Lifespan:** 25+ years (based on manufacturer testing, accelerated aging, and field observations), often outlasting the concrete septic tank itself when properly installed and maintained. Many manufacturers offer 10-year warranties on their HDPE products, demonstrating confidence in their longevity.
- **Optimal Use Cases:** Ideal for residential homes with standard landscaping, light foot traffic, and absolutely **no vehicular traffic, heavy equipment, or concentrated loads directly over the tank or risers.** Perfectly suited for most suburban and rural homes where tanks are located in lawns or garden areas. Excellent for protecting your [drainfield](https://bizzfactor.com/guides/home-services/septic-system-care-guide) by ensuring proper access to the effluent filter. They are the most common choice for residential applications due to their balance of cost, durability, and ease of installation.
- **Our Top Pick:** Polylok brand, recognized for its superior factory-installed sealing capability, robust structural design, and user-friendly flat lids that meet pedestrian load ratings (e.g., 250 lbs per sq ft) and often child-safety standards.
**2. Concrete Risers:**
- **Material:** Reinforced precast concrete, typically manufactured to ASTM C1227 standards for precast concrete septic tanks, often with steel rebar or fiber reinforcement for enhanced strength.
- **Strength & Durability:** Exceptionally strong and durable, providing maximum protection against extreme soil pressure, heavy surface loads, and environmental stressors. Concrete risers are robust and long-lasting, designed to mimic the structural properties of the tank itself. They are non-corrosive to biological and chemical agents found in septic systems, offering superior long-term stability in certain applications.
- **Load Bearing Capacity:** This is their primary advantage. Many concrete risers are vehicle-rated (e.g., H-20 load certified, meaning they can safely withstand 16,000 lbs per axle load, or HS-20 for heavy highway loading). This makes them indispensable for driveways, parking areas, commercial entryways, or any location where heavy loads, cars, trucks, or heavy machinery may frequently pass over the septic tank, ensuring safety and compliance with stringent commercial building codes. A truly [heavy-duty solution](https://bizzfactor.com/guides/home-services/heavy-duty-towing-guide), they are designed to prevent tank collapse under extreme pressure.
- **Cost:** Generally $200-$400 per component (riser section or lid), making a complete two-riser system typically range from $500-$1,800 for components only, reflecting their specialized strength, manufacturing process, and inherent material cost. Installation can also be significantly higher due to equipment needs for lifting and positioning the heavy sections.
- **Estimated Lifespan:** 50+ years, often longer with correct installation, high-quality precast concrete, and proper maintenance. They are designed to match the lifespan of a concrete septic tank, often exceeding 75 years, making them a generational investment.
- **Optimal Use Cases:** Essential for commercial properties (restaurants, businesses), industrial sites, public spaces, and anywhere a septic tank is located beneath a driveway, parking lot, or any area subjected to regular vehicular traffic. Critical where structural integrity and public safety are paramount, and local regulations often mandate their use in such scenarios to prevent catastrophic collapse and associated liability.
- **Considerations:** Much heavier and more difficult to install, often requiring heavy lifting equipment (e.g., small crane, backhoe, or skid steer) and greater labor force, significantly increasing installation labor costs. Proper sealing between concrete sections with non-shrinking grout or specialized mastic meeting ASTM C990 is crucial to prevent leaks, requiring expert application and meticulous attention to detail. They can also be more susceptible to hydrogen sulfide degradation in the vapor space if not properly ventilated, leading to "crown corrosion" over extended periods.
**Regulatory Guidance:** The National Precast Concrete Association explicitly recommends and often mandates concrete risers for any application where vehicular traffic or heavy concentrated loads may occur over the septic tank. This recommendation is based on rigorous structural integrity analysis, public safety standards, and liability concerns, which should always be prioritized over lower upfront costs in such scenarios. Always consult local building codes and health departments to ensure compliance, as regulations can vary significantly by jurisdiction and dictate material and load-bearing requirements.
The Environmental Impact: Protecting Groundwater and Public Health with Proper Risers
Beyond cost savings and convenience, correctly installed septic risers play a critical role in environmental protection and public health. An improperly sealed or inaccessible septic tank is a vector for contamination, threatening precious natural resources and human well-being.
- **Groundwater Protection:** Leaks allow untreated or inadequately treated wastewater to seep into the surrounding soil, potentially contaminating groundwater, which often serves as a source for drinking water wells. This can introduce pathogens (bacteria, viruses like E. coli, Giardia, Cryptosporidium, Hepatitis A) and excess nutrients (nitrates, phosphates) into the water supply, posing serious health risks and leading to expensive well remediation or communal water treatment. The EPA cites failing septic systems as the leading cause of groundwater contamination in some rural areas, directly linking improper maintenance and access as contributing factors.
- **Surface Water Protection:** Failed risers or flush lids allow surface runoff (containing chemicals from lawns, roads, or agricultural runoff) to enter the tank, while also allowing untreated effluent to escape to the surface, flowing into nearby streams, rivers, or lakes. This contributes to nutrient pollution (eutrophication), algal blooms (including harmful cyanobacteria), and oxygen depletion, harming aquatic ecosystems, reducing biodiversity, and potentially making recreational waters unsafe for swimming or fishing. Nitrogen and phosphorus from wastewater are major contributors to these environmental issues.
- **Soil and Site Contamination:** Sewage breakouts due to system failures, often exacerbated by inaccessible tanks that prevent timely maintenance or repair, contaminate the immediate soil, creating hazardous conditions, foul odors, and posing direct health risks to humans and pets on your property and potentially your neighbors'. These areas become biohazards requiring professional cleanup, often involving costly soil testing and excavation to remove contaminated soil, sometimes totaling tens of thousands of dollars.
Risers, by ensuring a watertight seal and facilitating routine maintenance, act as a barrier, safeguarding both your property and the broader community's environmental health. They are an investment in sustainability and responsible land stewardship, preventing the spread of waterborne diseases and protecting precious natural resources.
Septic Riser Installation: Step-by-Step Overview for Professionals (and Informed Homeowners)
While this guide emphasizes professional installation, understanding the process empowers homeowners to oversee the work and ask pertinent questions, ensuring adherence to best practices and local codes. This is not a DIY guide, but an informational overview designed to educate. A typical installation can take 2-4 hours per riser, depending on depth and conditions.
1. **Site Assessment and Planning:** Before excavation, a professional will thoroughly assess the site, identify the septic tank type (concrete, plastic), confirm its depth, measure existing access port diameters (typically 18-24 inches for pump-out, 12-18 inches for outlet baffle), and determine the necessary riser height. They will also factor in soil conditions (e.g., clay, sandy, rocky), anticipated load over the tank, and proximity to other utilities via utility locate services (e.g., 811 call). Precision is key to minimizing excavation and preventing damage.
2. **Locate Tank Lids (Access Ports):** Confirm the exact location of both the main pumping port and the outlet baffle access. This may involve using metal detectors, specialized probes, reviewing property blueprints, or utilizing a professional locating service that can use techniques like electronic sonde tracing or ground-penetrating radar. This step is critical; mislocating access points can lead to unnecessary digging and delays.
3. **Excavation:** Carefully excavate around both access points, creating a wide enough working area (typically a 3-foot radius around each access port) to comfortably perform installation tasks. The excavation should extend cleanly to the top of the tank, ensuring at least 12-18 inches of clearance around the existing tank opening for proper cleaning, sealing, and adapter ring placement. Damage avoidance to existing utility lines and landscaping is paramount, often requiring hand digging in sensitive areas.
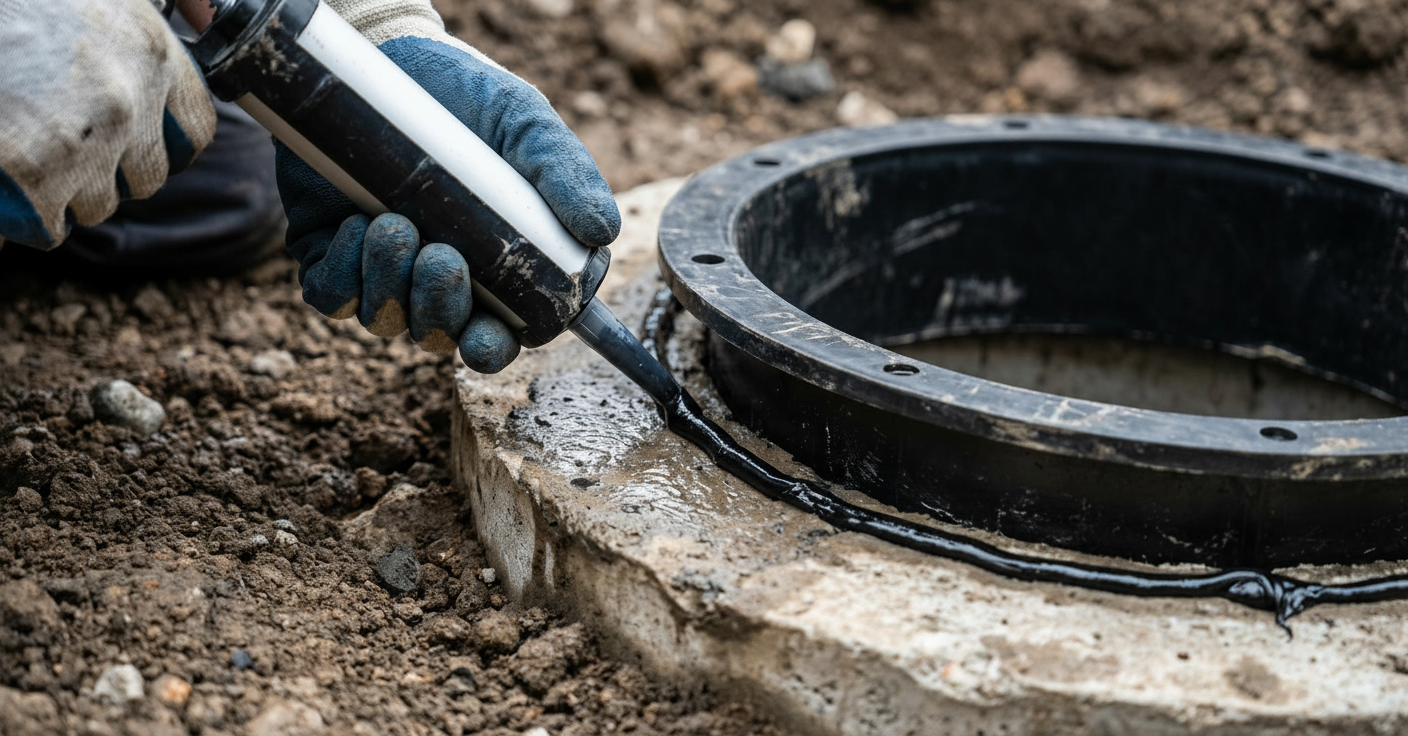
4. **Prepare Tank Surface:** This is a crucial, non-negotiable step. The concrete surface around the access port must be meticulously cleaned of all dirt, debris, loose concrete, efflorescence, grease, oil, and old sealant. Use a stiff wire brush, an angle grinder with a cup wheel, or a rotary hammer with a bushing tool to create a clean, slightly roughened, porous surface for optimal sealant adhesion (e.g., a Concrete Surface Profile of CSP 3-5). The surface must be completely dry before sealant application to ensure optimal bond strength and prevent premature sealant failure. If wet, a primer may be necessary.
5. **Install Adapter Ring:** Apply a generous, continuous bead of approved butyl sealant rope (e.g., Oatey X-15, minimum 1/2-inch diameter, meeting ASTM C990) or industrial-grade flexible polyurethane sealant (e.g., Sikaflex-1a, meeting ASTM C920) around the perimeter of the tank's opening. Carefully set the riser adapter ring (polyethylene base) onto the sealant, ensuring it is perfectly level. Firmly secure the adapter ring to the concrete tank using appropriate corrosion-resistant concrete anchors (e.g., stainless steel Tapcons or wedge anchors, typically 3/8" x 3", spaced every 6-8 inches around the perimeter, pre-drilled to manufacturer specifications), ensuring a tight, watertight compression of the sealant. Excess sealant should squeeze out, confirming full coverage.
6. **Assemble Riser Sections:** For deeper tanks, stack riser sections (typically 6-inch or 12-inch increments), applying a bead of approved sealant (if not pre-gasketed, or following Polylok's integrated gasket design) between each section and securing them with manufacturer-specified stainless steel hardware (e.g., self-tapping screws or bolts). Ensure all connections are tight, watertight, and maintain vertical alignment. Proper torque on fasteners is critical to compress gaskets without over-tightening and damaging components. Use a level frequently to maintain plumb.
7. **Determine Final Height:** As discussed, ensure the final riser height extends a minimum of 2-3 inches above finished ground level to prevent surface water intrusion. Use a fine-toothed saw (e.g., reciprocating saw with a plastic-cutting blade) to trim excess riser material if necessary to achieve the correct elevation, maintaining a clean, level cut. This step requires precision to achieve both functionality and an aesthetically pleasing finish.
8. **Install Lid:** Place the riser lid on the top riser section, aligning it correctly. Secure the lid using all manufacturer-provided, corrosion-resistant fasteners (e.g., stainless steel screws or bolts). Ensure a snug, secure fit to prevent water infiltration, accidental removal, and to meet child-safety standards. Lid security prevents dislodgement due to frost heave or accidental impact. Many modern lids feature multiple secure points (e.g., 8-12 screws) for maximum security.
9. **Backfill and Grade:** Carefully backfill the excavated area around the risers with suitable native soil or gravel, compacted in layers of 6-8 inches per lift to prevent future settlement around the riser base. Grade the area away from the risers with a slight slope (e.g., 2% grade for 5 feet) to promote surface water runoff, further protecting the system from infiltration. Use suitable backfill material, avoiding large rocks or debris that could damage the riser. Restore any disturbed landscaping by applying grass seed or sod.
10. **Final Inspection and Testing:** Conduct a thorough visual inspection of both risers, ensuring they are securely installed, lids are tightly fastened and sealed, and the surrounding area is properly graded. For critical applications or after the ground has settled, a final water integrity test of the riser assembly might be performed (e.g., filling the riser with water for a specified period) to confirm a watertight seal. This meticulous process ensures a long-lasting, reliable, and accessible septic system, minimizing future maintenance and repair headaches for the homeowner.
Beyond the Basics: Advanced Considerations for Septic Riser Systems
While the core principles of riser installation are universal, advanced considerations can further optimize your system, addressing specific environmental challenges, safety concerns, and operational efficiencies.
- **Insulated Lids and Risers:** In colder climates (e.g., USDA Hardiness Zones 5 and below, or regions experiencing prolonged sub-zero temperatures), consider insulated riser lids or specialized insulated riser sections. These can significantly help prevent freezing within the tank's upper sections, the risers themselves, or the effluent filter. Freezing can disrupt effluent flow, damage tank components, and lead to costly backups or pipe bursts. Certain products are specifically designed with R-values (e.g., R-5 to R-10) to provide superior thermal protection, maintaining a more consistent temperature within the system, crucial for optimal bacterial activity and flow during winter months.
- **Child Safety Lids and Security:** If young children, pets, or livestock are present on the property, ensuring your risers are equipped with child-safety lids is paramount. These lids typically require specialized tools (e.g., a specific wrench or screwdriver) or significant force to open, preventing accidental access to the potentially hazardous, confined space of the tank interior. Many modern Polylok lids meet these standards when properly fastened, often featuring multiple secure points of attachment and engineered designs to prevent unintended removal. Local codes increasingly mandate these safety features for residential installations, citing ASTM F913 for product safety.
- **Effluent Filter Risers/Access:** Some advanced septic systems incorporate effluent filters within a dedicated riser or have a combined riser for filter access and pumping. These filters remove finer solids from the wastewater before it enters the drainfield, significantly extending the drainfield's life by preventing clogging of soil pores. If your system has one, ensure it's easily accessible via a properly sized and sealed riser for routine cleaning and maintenance (typically every 1-3 years). Neglecting this leads to filter clogging, system backup, and premature drainfield failure, negating the filter's intended benefit. The ability to easily remove and clean this filter is a key longevity factor.
- **Tank Ventilation and Gas Exchange:** While the primary goal is a watertight seal against external infiltration, adequate tank ventilation is also critical for supporting healthy anaerobic digestion and safely dissipating corrosive septic gases (like hydrogen sulfide and methane). Ensure your overall septic system design allows for proper air exchange through house plumbing vents and tank vents if present. Risers generally don't impede this, but proper vent pipe placement relative to the risers and adhering to minimum vent sizing (e.g., 4-inch diameter for primary tank vent) is key to preventing gas buildup and 'dead air' spaces that can accelerate concrete corrosion (crown rot) or create odor issues.
- **Load Distribution Lids for Light Traffic:** For situations where occasional light vehicle traffic (e.g., a garden tractor, riding mower, ATV, or even a push mower over a well-constructed path) might pass over an otherwise non-vehicular-rated plastic riser, consider using a high-strength load distribution lid accessory. These lids typically incorporate internal steel reinforcement, structural foam, or have a specific design (e.g., reinforced PVC) to effectively spread impact loads over a wider area, preventing direct, concentrated stress on the plastic riser body. However, for regular or heavy vehicular traffic, concrete risers explicitly rated for such loads (e.g., H-20) remain the only truly safe and compliant solution to prevent catastrophic failure.
- **Monitoring Port Integration:** For systems with advanced treatment units (ATUs) or pressurized drainfields, risers can be strategically designed to integrate monitoring ports or sampling ports. These allow for easy collection of effluent samples for regulatory compliance, diagnostic checks, or performance assessments without extensive excavation or disruption. This is especially useful for systems requiring periodic testing by health authorities, streamlining data collection and compliance.
By considering these advanced aspects, you can ensure your septic riser system is optimally designed for not just convenience and savings, but also for specific climate challenges, enhanced safety, rigorous regulatory compliance, and peak environmental performance. It transforms a maintenance necessity into a robust, integrated, and high-performing component of your home's long-term infrastructure.
Conclusion: Invest in Septic Risers, Invest in Your Home's Future
The decision to install septic risers is more than just a convenience; it's a strategic, long-term investment in the health, efficiency, and economic viability of your entire septic system. It provides immediate, tangible savings on every septic service visit, eliminating the costly and disruptive process of excavation. Far more importantly, it safeguards your system against catastrophic failures stemming from inaccessible components, surface water infiltration, chemical contamination, and premature drainfield deterioration—all of which can lead to five-figure repair bills and significant environmental damage that far outweigh the initial investment.
By ensuring both access ports are equipped with properly installed, elevated, and rigorously sealed risers—preferably from reputable brands like Polylok that prioritize engineering and longevity and meet all applicable ASTM and local code standards—you are actively preventing drainfield failure, protecting vital groundwater resources, and preserving the aesthetic and structural integrity of your property. The minimal upfront cost, typically $800-$1,500 for a two-riser system, is quickly offset by recurring savings of $300-$450 per pump-out and, most crucially, the avoidance of potentially devastating expenses associated with system neglect or catastrophic damage, which can range from $10,000 to $25,000 for drainfield replacement alone. Furthermore, a properly accessible septic system enhances your home's resale value and ensures compliance with local health regulations, providing a clear advantage during property transactions.
Don't let a minor oversight lead to a major headache and financial drain. Invest in septic risers today, and enjoy the peace of mind that comes with a well-maintained, easily accessible, and sustainable wastewater system for years to come. Your home, your wallet, and the environment will thank you for this proactive and intelligent investment. Consult with a certified septic professional to assess your specific needs and ensure a compliant, long-lasting installation tailored to your property.",
"faqs": [ { "question": "What are the long-term benefits of installing septic risers?", "answer": "Beyond immediate cost savings on pumping services, long-term benefits of installing septic risers include extended lifespan of your septic system (by allowing proper maintenance), prevention of costly drainfield repairs due to inaccessible baffles, protection against hydraulic overload from surface water, and peace of mind knowing your system is easily and safely accessible. It also preserves your lawn and landscaping by eliminating repeated excavation, thus maintaining property value and avoiding hidden costs."
}, { "question": "How do septic risers contribute to environmental protection?", "answer": "Septic risers play a crucial role in environmental protection by ensuring a watertight seal around your tank's access points. This prevents untreated wastewater from leaking into groundwater or escaping to the surface, contaminating soil and water sources with pathogens and nutrients. Proper risers also facilitate routine maintenance, which is essential for the effective treatment of wastewater and prevention of pollutant discharge into the environment, safeguarding public health and ecosystems."
}, { "question": "Are there any specific safety considerations for septic risers?", "answer": "Safety considerations for septic risers include ensuring lids are securely fastened with all manufacturer-provided hardware to prevent accidental opening, especially important if children or pets are present. Lids should be strong enough to withstand unexpected weight and clearly visible to prevent damage from landscaping equipment or accidental driving over them. Always use factory-provided fasteners and consider child-safety compliant lids for added protection against hazardous tank access, meeting ASTM F913 standards."
}, { "question": "What is the recommended maintenance for installed septic risers?", "answer": "Recommended maintenance for installed septic risers is minimal but crucial. Regularly inspect the lids for cracks or damage, ensure all fasteners are tight, and check the sealant around the adapter ring for any signs of degradation, gaps, or shifting. Keep the area immediately around the risers clear of debris and excessive landscaping. Additionally, ensure the ground is properly graded away from the riser bases to prevent water pooling, which helps maintain continued watertight integrity and structural stability over time."
}, { "question": "Can I install septic risers myself, or should I hire a professional?",
"answer": "While some handier homeowners might attempt a DIY installation, it is strongly recommended to hire a qualified professional. Correct installation requires precise sealing, proper elevation adjustments, accurate drilling, and strict adherence to local codes to ensure the system's integrity and prevent costly failures. Improper installation can lead to leaks, environmental contamination, severe damage to your septic system components, and potential health hazards on your property. The financial risks of a failed DIY installation often far outweigh the initial savings on labor."
}, { "question": "What types of septic risers are available and when should each be used?",
"answer": "Two primary types of septic risers are plastic (HDPE) and concrete. HDPE risers are lightweight, corrosion-resistant, and ideal for residential lawns without vehicular traffic. Concrete risers are heavy-duty, vehicle-rated (e.g., H-20 load certified), and essential for commercial properties or areas where tanks are beneath driveways or subjected to regular heavy loads, ensuring structural integrity and safety."
} ], "answer_boxes": [ {
"question": "What is a septic riser?", "answer": "A septic riser is a durable, watertight tube extending from a buried septic tank's access port to ground level. Its purpose is to provide easy, non-excavation access for septic tank pumping and inspection. Risers eliminate costly digging, saving hundreds per maintenance visit and preventing property damage."
}, { "question": "Why do I need two septic risers?", "answer": "Two risers are essential: one for the main pumping port and another for the outlet baffle inspection port. The outlet baffle prevents solids from entering the drainfield. Without access to both, proper inspection and maintenance are impossible, leading to potential drainfield failure and costly repairs."
}, { "question": "How high should a septic riser be installed?", "answer": "A septic riser lid must be installed 2-3 inches above ground level. This elevation prevents surface water, chemicals, and contaminants from entering the tank, which can cause hydraulic overload and damage the drainfield. It also prevents accidental damage from landscaping equipment."
} ], "answer_nuggets": [ {
"topic": "Drainfield Protection", "text": "Properly installed septic risers, especially on both tank access ports, are crucial for drainfield longevity. Accessibility to the outlet baffle allows for timely inspection and cleaning of the effluent filter, preventing solids from entering and clogging the drainfield. This proactive measure saves thousands in potential replacement costs and extends system life."
}, { "topic": "Sealant Longevity", "text": "The choice of sealant for riser installation is paramount for system integrity. Butyl sealant rope or specialized polyurethane offers superior flexibility and chemical resistance compared to silicone. This ensures a long-lasting, watertight bond between the riser and concrete tank, preventing groundwater infiltration and effluent escape, pivotal for system health."
}, { "topic": "Thermal Management", "text": "In regions prone to severe winters, considering insulated septic riser lids can be a wise investment. These lids help maintain a more stable temperature within the tank and riser, mitigating the risk of freezing that can disrupt effluent flow. This subtle enhancement protects against costly winter-related system malfunctions and ensures year-round functionality.
In-Depth Look
Detailed illustration of key concepts
Visual Guide
Infographic illustration for this topic
Side-by-Side Comparison
Visual comparison of options and alternatives
Frequently Asked Questions
Need Professional Help?
Find top-rated septic services experts in your area