Quick Answer
Okay, so here's the quick version. Nine times out of ten, your garage door's acting up because the safety sensors are blocked or knocked out of line. Look for two little boxes near the floor on each side of the door – are the lights on 'em steady? If not, that's your problem. Could also be dead batteries in your remote. If the door is super heavy to lift by hand, you've got a broken spring, and that's a job for a pro. Don't even think about touching those. Simple fixes are free; a pro call for a spring is gonna be $200-$600.
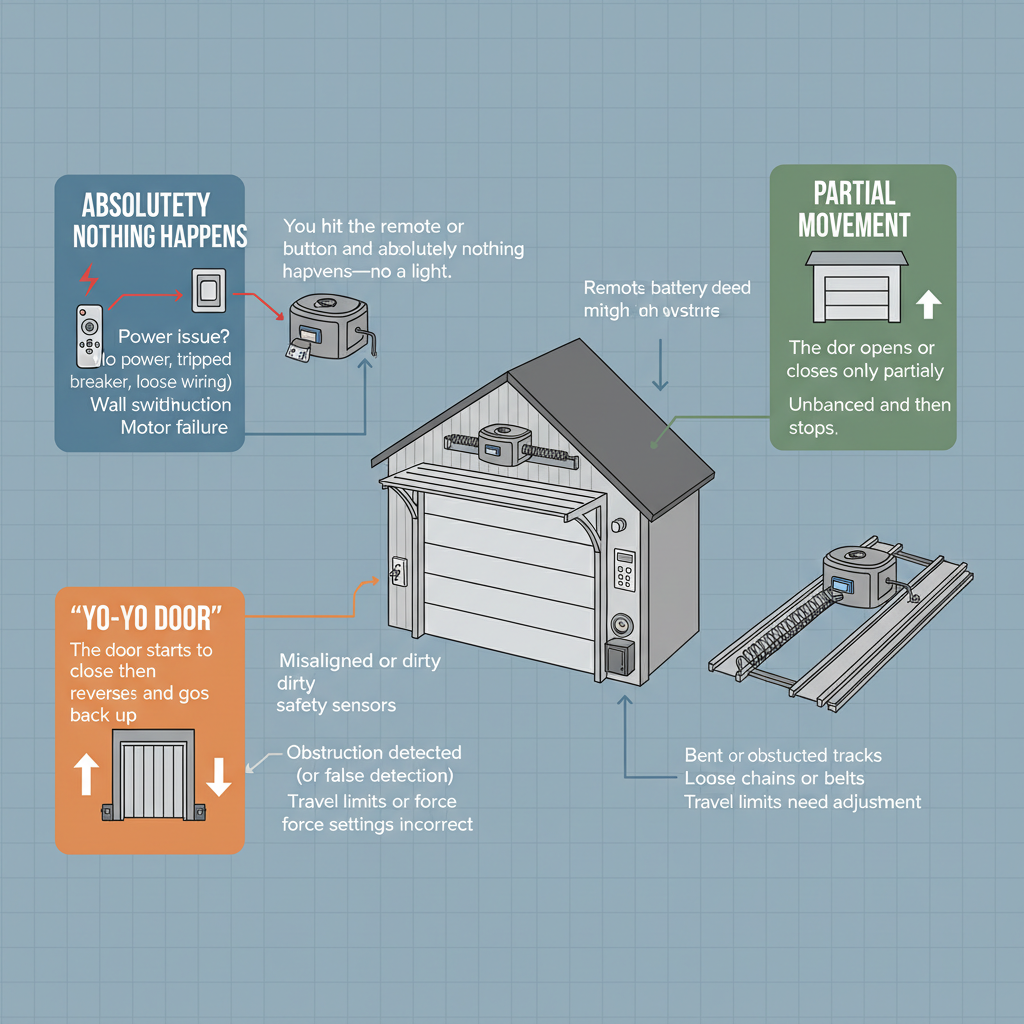
Common Symptoms
Possible Causes
Step-by-Step Diagnosis
Step 1
Check the Power. Make sure the opener is plugged into a working outlet and that the circuit breaker hasn't tripped. Test the outlet itself with a lamp.
Step 2
Inspect Safety Sensors. Look at the two sensors near the floor. Ensure their LED lights are on and solid (not blinking). Wipe the lenses clean and check for any obstructions in the beam's path.
Step 3
Test All Controls. Try the wall switch, the remote, and the keypad. If only one isn't working, the issue is likely with that specific device (e.g., dead batteries in the remote).
Step 4
Check the Manual Lock. Look for a sliding bar or T-handle lock on the inside of the garage door and make sure it's not engaged.
Step 5
Perform the Manual Lift Test. Pull the red emergency release cord to disconnect the opener. Try lifting the door by hand. If it is extremely heavy, jams, or won't stay open halfway, the spring system has failed. This is not a DIY repair.
Step 6
Examine the Physical Door Path. Look at the tracks for bends or debris. Check that all the rollers are in the tracks and that hinges aren't broken or loose.
Step 7
Visually Inspect Springs and Cables. **FROM A SAFE DISTANCE**, look for a gap in the torsion spring above the door or broken/loose extension springs on the sides. Look for any frayed or snapped cables near the bottom of the door. DO NOT TOUCH THEM.
Step 8
Listen to the Opener Motor. If the door doesn't move but the motor runs (especially with a grinding noise), the internal drive gear is likely stripped.
Step 9
Check Diagnostic Codes. If the opener's LED light is blinking, consult your owner's manual to diagnose the error code. It often points directly to the problem.
DIY vs Professional Costs
| Repair Type | DIY Cost | Professional Cost | Time Required |
|---|---|---|---|
Safety Sensor Re-alignment | $0 | $75-$150 | 10 minutes |
Full Spring Replacement (Torsion or Extension) | $50-$120 (NOT RECOMMENDED) | $250-$600 | 1-2 hours (Pro) |
Lift Cable Replacement | $20-$40 (NOT RECOMMENDED) | $150-$350 | 1-2 hours (Pro) |
Opener Gear and Sprocket Replacement | $30-$80 | $150-$350 | 2-3 hours |
Complete New Opener Installation | $200-$500 | $400-$800+ | 4-6 hours |
When to Call a Professional Handyman
- You see a visible break or gap in one of the springs. This is non-negotiable and extremely dangerous to handle yourself.
- The metal lift cables are frayed, snapped, or have come off their pulleys.
- The door is extremely heavy or impossible to lift after you've pulled the emergency release cord, indicating a failed spring system.
- The door has come off its tracks and is hanging crookedly.
- The opener motor runs but doesn't move the door, and you're not comfortable opening the unit to check for stripped gears.
- You've tried all the basic troubleshooting (checking sensors, power, remotes) and the door still won't work correctly.
- You suspect an electrical problem with the opener's circuit board or wiring.
- Honestly, anytime you feel unsafe or unsure. A service call is cheaper than a trip to the hospital.
Prevention Tips
- Twice a year, lubricate all moving parts (rollers, hinges, bearing plates) and the spring with a garage door-specific silicone or white lithium grease spray. Do NOT use WD-40.
- Monthly, test the safety reversal system by placing a cardboard box in the door's path. The door must reverse upon contact.
- Every six months, perform a balance test by disconnecting the opener and lifting the door manually to waist height. It should stay in place without drifting.
- Annually, check and tighten all nuts and bolts on the door hinges and track brackets, as they can loosen from vibration.
- Regularly wipe down the safety sensor lenses and keep the area around them clear of debris, dust, and spiderwebs.
- Change your remote control batteries once a year to prevent them from dying at an inconvenient time.
Frequently Asked Questions
Related Guides
Comprehensive home winterization to protect property and prevent damage, with a focus on pipes. Troubleshooting & Fixes
Unclogging a Toilet Without a Plunger (Troubleshooting & Fixes from the Field)
Toilet clogged and you don't have a plunger? Don't panic. A 25-year vet shows you how to clear that stubborn clog using stuff you already have.
Repairing Minor Grout Issues: Cracks, Stains & Missing Chunks (Troubleshooting & Fixes)
A veteran handyman's guide to fixing cracked, stained, or missing grout. Learn when to DIY and when to call a pro to keep your tile looking good.
Comprehensive childproofing of a home to ensure safety for infants and young children, covering all potential hazards room-by-room. Troubleshooting & Fixes
Safe and effective pressure washing for home exterior cleaning, balancing DIY benefits against potential dangers and professional advantages. Troubleshooting & Fixes (2024 Guide)
Thinking about pressure washing your house? A 25-year veteran handyman explains the right way to do it, the real costs, and when you should just call a pro.
Installing New Light Fixtures: Safety Tips & Step-by-Step Guide Troubleshooting & Fixes (2024 Guide)
A veteran handyman's no-nonsense guide to safely installing a new light fixture. Get real-world tips, costs, and learn when you need to call a pro.
Need Professional Help?
Find top-rated handyman experts in your area