Quick Answer
Okay, so here's the quick version. If your house smells musty, feels damp, or you're seeing mold, your vapor barrier is probably messed up. Nine times out of ten it's either torn, installed on the wrong side of the insulation for your climate, or just sealed poorly. A small patch in a crawlspace might just be a $20 roll of good tape. But if the whole thing is backward inside your walls or your crawlspace is a swamp, you're looking at a pro job costing anywhere from $2,000 to over $8,000. Don't ignore it.

Common Symptoms
Possible Causes
Step-by-Step Diagnosis
Step 1
Start with a sensory inspection. Use a powerful flashlight and your nose to check basements, crawl spaces, and attics for musty smells, visible water stains, or mold growth.
Step 2
Use a moisture meter to get objective readings. Test wood framing, subflooring, and drywall near suspected problem areas. Readings over 18% are a red flag indicating excess moisture.
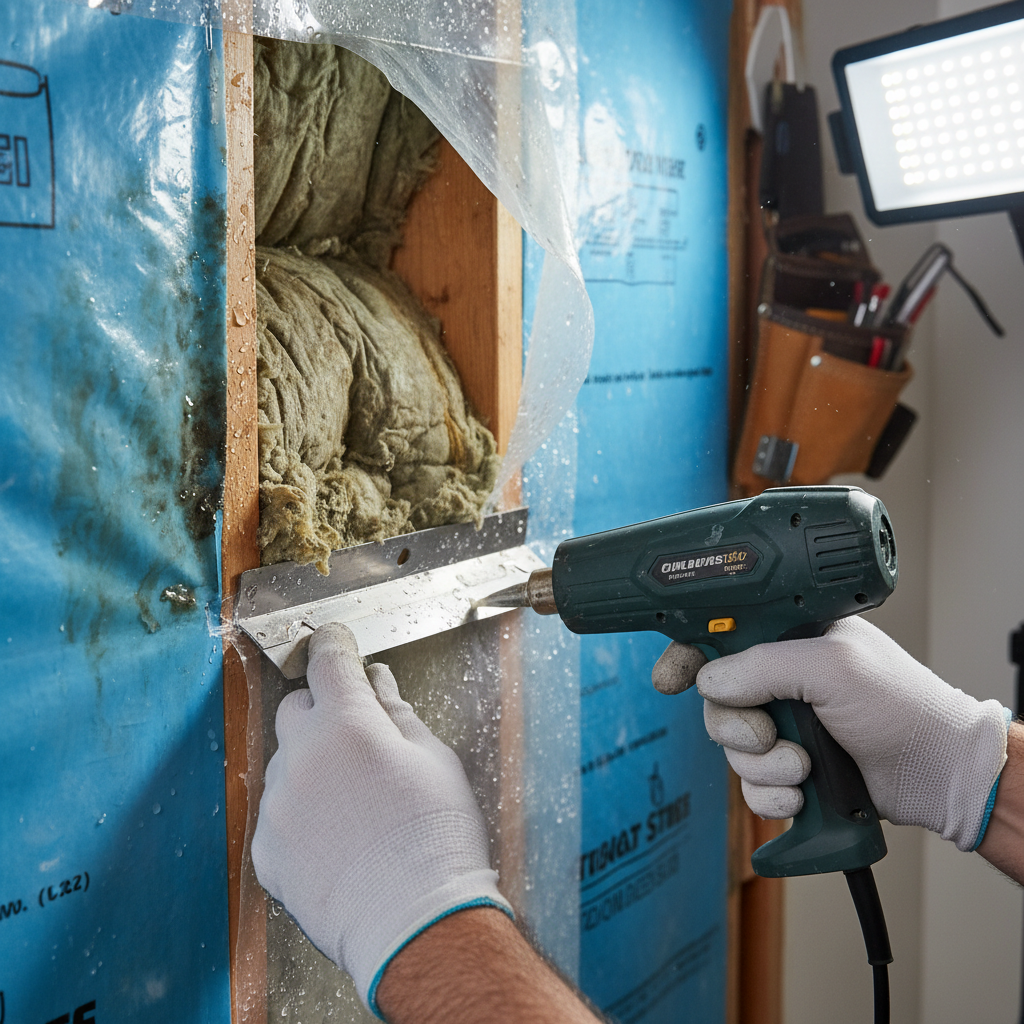
Step 3
Directly inspect the vapor barrier if it's accessible (like in a crawl space). Look for tears, un-taped seams, and gaps around pipes, wires, or support piers.
Step 4
Check the insulation. Carefully pull back a piece to see if it's damp, compressed, or stained. Wet insulation is a primary sign that the vapor barrier has failed to do its job.
Step 5
Determine the barrier's placement. Research your local building code to know which side of the insulation the barrier should be on for your climate zone, then check if your home matches.
Step 6
Rule out other water sources. Before blaming the vapor barrier, ensure there are no plumbing leaks, roofing issues, or foundation drainage problems contributing to the moisture.

DIY vs Professional Costs
| Repair Type | DIY Cost | Professional Cost | Time Required |
|---|---|---|---|
Patching accessible tears/gaps | $20 - $50 | $250 - $450 | 1-2 hours |
Full Crawl Space Encapsulation | $800 - $2,000 | $3,000 - $8,000+ | 2-4 days |
Correcting Barrier in a Wall | Not Recommended | $800 - $2,000 per wall | Varies |
Small Area Mold Remediation (<10 sq ft) | $50 | $500 - $1,500 | 2-4 hours |
When to Call a Professional Insulation
- When you discover extensive mold growth, especially if it covers more than 10 square feet.
- If you poke a floor joist or wall stud with a screwdriver and the wood is soft, crumbly, or spongy—a sign of structural rot.
- If the vapor barrier is installed on the wrong side of the insulation within finished walls, requiring demolition and reconstruction.
- When moisture problems and musty smells persist even after you've attempted simple DIY fixes.
- If you identify signs of a major installation flaw, like a 'double barrier' situation that's trapping moisture.
- When you're simply unsure about the source of the moisture or the right way to fix it for your specific home and climate.
Prevention Tips
- Understand your climate zone and ensure the vapor barrier is installed on the correct side of the insulation (warm-in-winter side). Question your builder if you're not sure.
- For crawl spaces, invest in a full encapsulation with a thick (10-mil or heavier) vapor barrier, running it up the walls and sealing all seams and penetrations with high-quality tape.
- Ensure your attic and crawl spaces have proper ventilation to allow moisture to escape and prevent it from becoming trapped.
- Control exterior water by maintaining your gutters, using downspout extenders, and ensuring the ground slopes away from your foundation.
- Use bathroom and kitchen exhaust fans to vent moisture from showering and cooking directly outside, reducing the overall humidity load inside your home.
Frequently Asked Questions
Related Guides
House Remains Cold After Insulation? Troubleshooting Drafts & Hidden Leaks (A Pro's Guide)
Still freezing after adding more insulation? Your problem isn't the insulation, it's hidden air leaks. A 25-year vet explains how to find and fix them.
Ineffective Insulation Troubleshooting & Fixes (2024 Guide)
Feeling cold drafts or seeing huge energy bills? Your home's insulation is probably failing. Here’s a vet tech's guide to finding and fixing the problem.
Ensuring proper attic ventilation after adding insulation to maintain indoor air quality, energy efficiency, and prevent moisture issues. Troubleshooting & Fixes (2024 Guide)
Just added insulation and now have issues? I'll show you how to fix attic ventilation problems, prevent mold, and lower your energy bills. A veteran tech's guide.
Crawl Space Issues Troubleshooting & Fixes (2024 Guide from a Pro)
A veteran tech explains crawl space moisture, mold, and damage. Learn the real causes of musty smells and high energy bills, and how to fix them for good.
Ineffective or insufficient home insulation leading to high energy bills, drafts, and uncomfortable indoor temperatures, often due to aging, improper installation, or inadequate R-value for the climate. Troubleshooting & Fixes
Feeling high energy bills & uncomfortable rooms? Your home insulation might be failing. A veteran tech's guide to diagnosing and fixing it for good.
Identifying insulation gaps and air leaks through a home energy audit to improve energy efficiency, leading to higher utility bills and reduced comfort. Troubleshooting & Fixes
Feeling drafts or seeing high energy bills? Learn to identify and fix insulation gaps and air leaks with our comprehensive home energy audit troubleshooting guide.
Need Professional Help?
Find top-rated insulation experts in your area