Quick Answer
Okay so here's the quick version on that nasty caulk. Nine times out of ten, it's just old, wet, and tired. You gotta get it all out before putting new stuff in. All of it. Grab a good utility knife and a caulk removal tool. It's tedious, not hard. You can DIY this for under $50 in basic tools and a tube of caulk, usually taking an afternoon for a typical area. But if you've got expensive countertops or see water damage, you might wanna call a pro. That'll run you a few hundred bucks, easy. Don't just caulk over the old stuff. Bad idea.
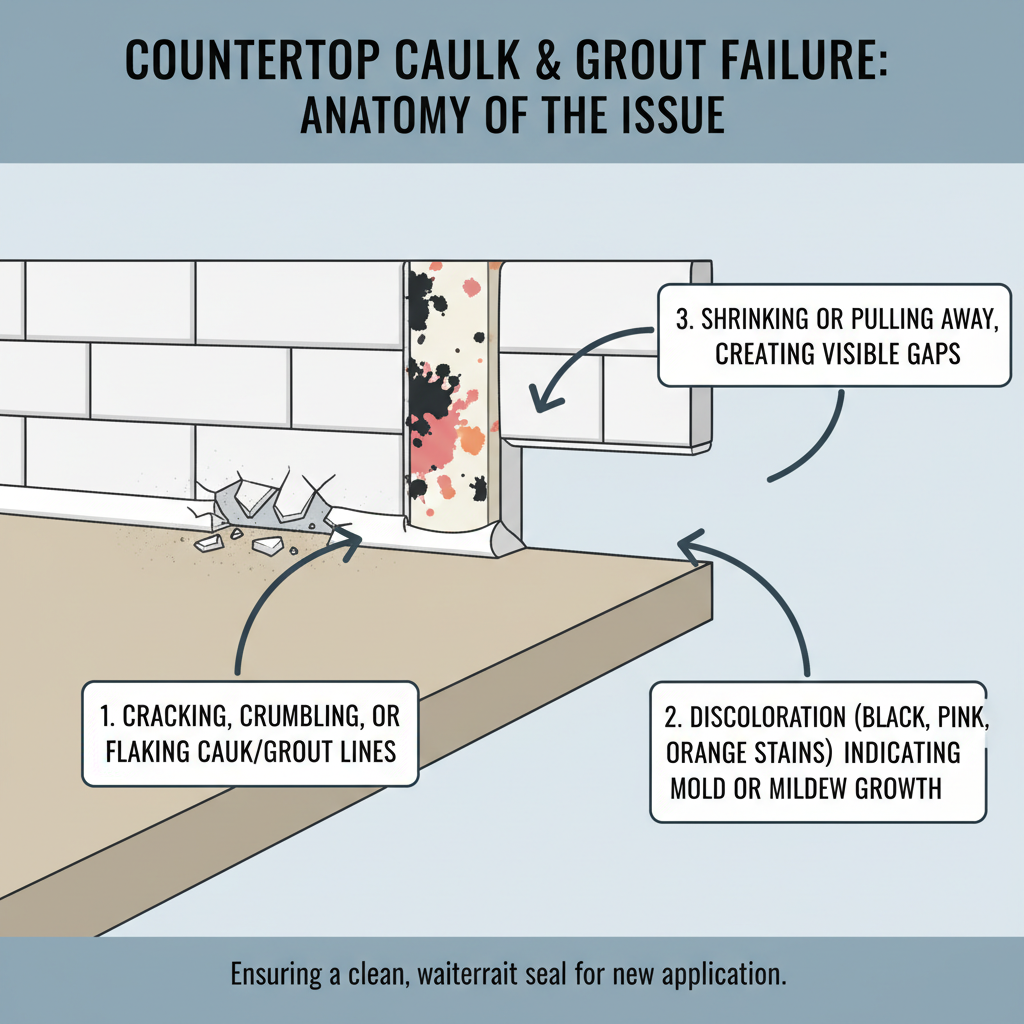
Common Symptoms
Possible Causes
Step-by-Step Diagnosis
Step 1
Visual Inspection: Systematically examine all caulk and grout lines for cracks, gaps, or discoloration, paying close attention to corners and the sink area.
Step 2
Touch and Pressure Test: Gently press on the caulk/grout. If it feels soft, spongy, or moves, it indicates a loss of adhesion or water intrusion.
Step 3
Gentle Pry Test: Use a plastic scraper or dedicated tool to gently prod at the material. If it lifts or crumbles easily, it's compromised and needs removal.
Step 4
Water Penetration Check: For suspected leaks, dry the area completely, apply a small amount of water to the seam, and watch to see if it soaks in rather than beading up.
DIY vs Professional Costs
| Repair Type | DIY Cost | Professional Cost | Time Required |
|---|---|---|---|
Manual Removal & Recaulk (Around a Sink) | $20-$40 | $250-$400 | 2-3 hours (DIY) |
Manual Removal & Recaulk (Standard Backsplash) | $30-$50 | $300-$500 | 4-6 hours (DIY) |
Chemical Softener + Removal (Stubborn Caulk) | $40-$70 | Included in Pro Fee | Adds 1-2 hours wait |
When to Call a Professional Countertops
- When the area is very large and would be too time-consuming for a DIY project.
- If you have delicate or expensive countertop materials like marble that you're afraid to damage.
- If the old caulk or grout is extremely hard and resistant to manual removal methods.
- When you discover signs of significant water damage, like soft drywall or rotting wood in the cabinets, which indicates a larger problem.
Prevention Tips
- Use High-Quality Materials: Always use 100% silicone caulk for flexible joints (counter-to-wall) and quality grout for tile-to-tile seams.
- Ensure Proper Application: Make sure surfaces are perfectly clean and bone-dry before applying new material for a strong, lasting bond.
- Regular, Gentle Cleaning: Clean caulk and grout lines regularly with mild, non-abrasive, pH-neutral cleaners to prevent buildup.
- Promptly Address Small Issues: Fix small cracks or peeling sections as soon as you see them to prevent a small problem from becoming a big one.
- Maintain Good Ventilation: Reduce humidity in kitchens and bathrooms to discourage mold and mildew growth.
- Wipe Down Surfaces: Don't let water pool against caulk lines for extended periods, especially around the sink.

Frequently Asked Questions
Related Guides
Sealing Porous Concrete Countertops (Troubleshooting & Fixes)
A veteran tech's guide to fixing porous concrete countertops. Learn how to diagnose a bad seal and apply a new one to prevent stains and etching.
Failure to adequately prepare the kitchen space and existing infrastructure before the arrival and installation of new countertops, leading to delays, complications, and potential additional costs. Troubleshooting & Fixes (2024 Guide)
New countertops coming? Don't let your installer walk out. Here's my 25-year guide on prepping your kitchen right to avoid delays, extra fees, and headaches.
Ripping Out Old Countertop Caulk & Grout (Troubleshooting & Fixes)
Tired of that ugly, cracked caulk around your countertops? A 25-year vet shows you how to rip that old stuff out the right way and stop water damage cold.
Need Professional Help?
Find top-rated countertops experts in your area