Quick Answer
Okay, so here's the quick version. Putting in a new kitchen backsplash is probably the one big-impact DIY job you can actually pull off without it looking like a disaster. Just don't cheap out on the adhesive or rush the layout. For a basic ceramic tile job, you're looking at maybe $200-$400 in materials. If you call me or another pro, expect to pay anywhere from $700 to $2000, easy. The key is prep work. Get that wall clean, flat, and planned out before a single piece of tile goes on it. You mess that part up, the rest is a waste of time and money.
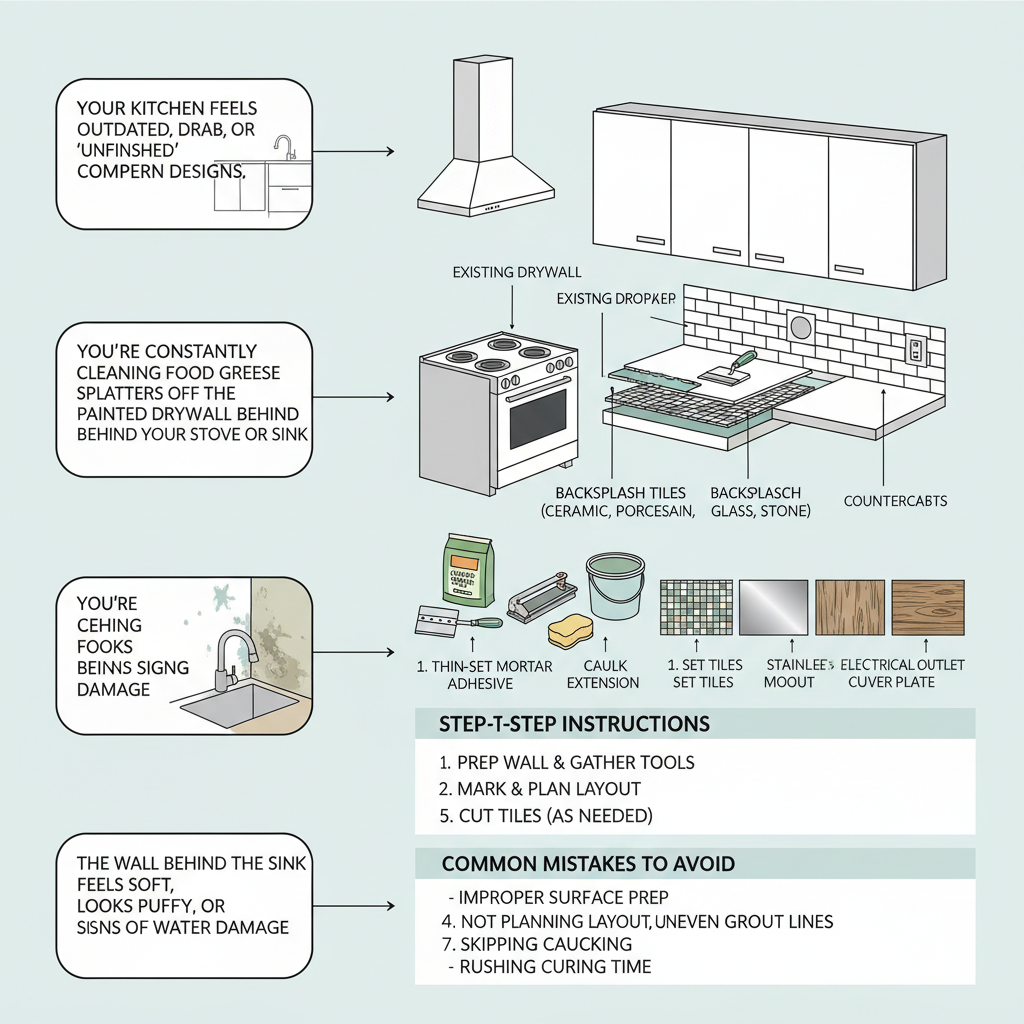
Common Symptoms
Possible Causes
Step-by-Step Diagnosis
Step 1
Assess and Measure: First, decide if your current backsplash is just ugly or actually failing. Measure the height and width of all areas you want to tile to calculate the total square footage. Then add 15% to that number for waste and extra pieces.
Step 2
Evaluate the Wall Surface: Run your hand over the wall. Is it flat? Are there major holes or greasy spots? You need a clean, flat, and dry surface. Any wallpaper must be completely removed, and greasy areas need to be cleaned with a degreaser like TSP.
Step 3
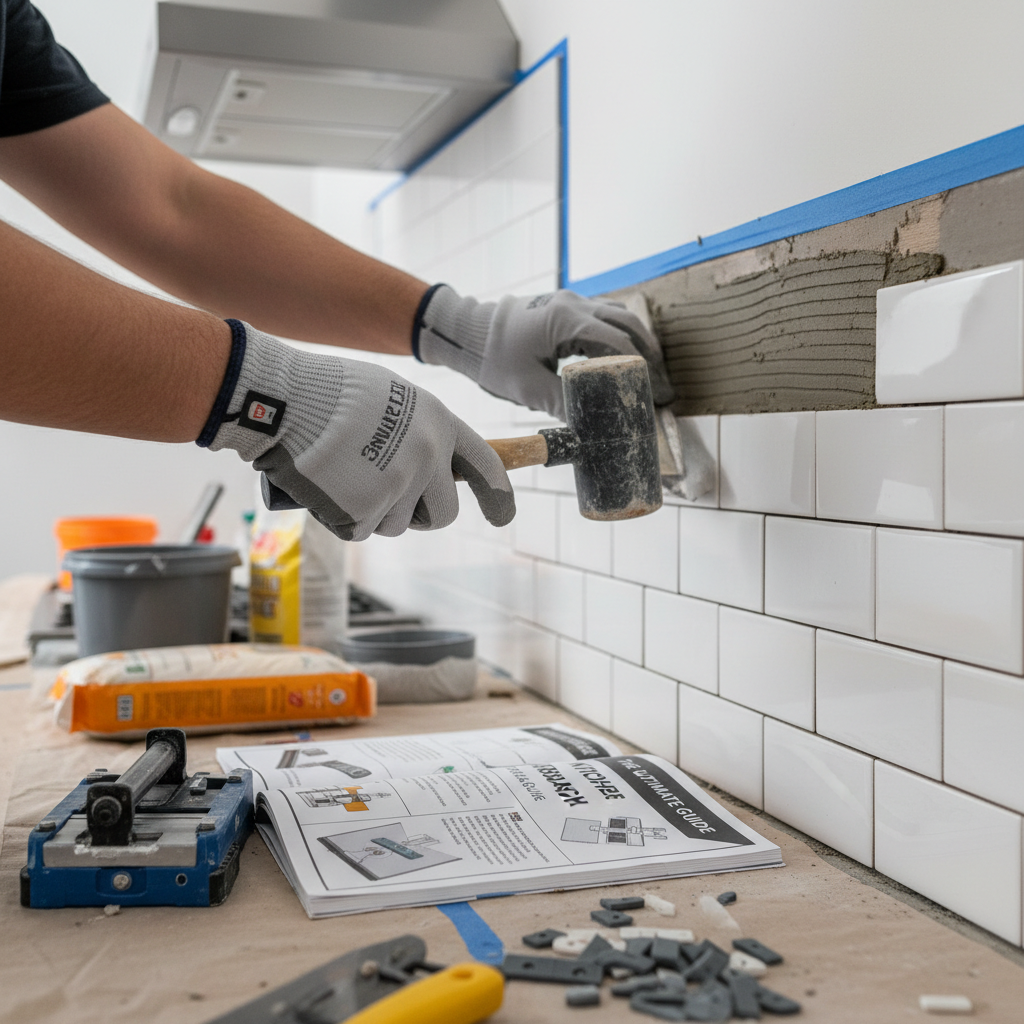
Plan Your Layout: Before you even think about mixing mortar, do a 'dry layout.' Lay a row of tiles with spacers on your countertop to see how they fit and where cuts will land. Find the center of your main wall and plan to start there to ensure balanced cuts on either end.
Step 4
Research and Select Materials: For beginners, I recommend ceramic or porcelain tile. It's forgiving. Choose your tile, the correct thin-set mortar for that tile (check the bag), a high-performance grout, and 100% silicone caulk that matches your grout for the countertop seam.
Step 5
Gather the Right Tools: Don't skimp here. Rent a wet saw. Buy a proper notched trowel (usually 1/4" x 1/4"), a rubber grout float, a couple of 5-gallon buckets, a good grout sponge, and a 2-foot level. The level is non-negotiable.
DIY vs Professional Costs
| Repair Type | DIY Cost | Professional Cost | Time Required |
|---|---|---|---|
Basic Ceramic/Porcelain Backsplash (30-40 sq ft) | $200 - $600 | $800 - $1,500 | 12-20 hours |
Peel-and-Stick Backsplash | $100 - $300 | N/A | 3-5 hours |
Natural Stone or High-End Glass Tile | $500 - $1,500+ | $1,500 - $3,500+ | 15-25 hours |
When to Call a Professional Kitchen Remodel
- If you're using expensive or delicate materials like marble mosaics or thin glass tile, where a bad cut costs you serious money.
- When you want a complex pattern like herringbone or a custom inlay. These require a level of precision that is extremely difficult for a beginner to achieve.
- If your walls are noticeably uneven, bowed, or out of square. A professional knows how to prep the wall surface so the tile lays flat, hiding the wall's imperfections.
- When you simply don't have a full, uninterrupted weekend to dedicate to the project. A rushed job is a bad job.
Prevention Tips
- Seal your grout and natural stone tiles annually. I can't stress this enough. A good sealer prevents stains from things like coffee, wine, and tomato sauce.
- Always use 100% silicone caulk—not grout—in the joint where the backsplash meets the countertop. This joint moves, and caulk flexes while grout cracks.
- Clean your backsplash with the right product. Use a pH-neutral cleaner for natural stone to avoid etching. For porcelain and ceramic, soap and water usually does the trick.
- Annually inspect your caulk lines for any signs of cracking or peeling. If you find a problem area, cut out the old caulk and apply a fresh bead to prevent water from getting behind the wall.
Frequently Asked Questions
Related Guides
Homeowners struggling to select a reliable and competent kitchen remodeling contractor, leading to potential project delays, budget overruns, poor quality work, or an unsatisfactory final result. Troubleshooting & Fixes (2024 Guide)
Having trouble picking a kitchen remodel contractor? A veteran tech shares his no-nonsense guide to vetting contractors and avoiding project disasters.
A Real-Talk Guide to Prepping for a Kitchen Remodel (From a Guy Who's Seen It All)
Thinking about a kitchen remodel? A 25+ year vet walks you through planning, budgeting, and avoiding the rookie mistakes that'll cost you. Get your reno right.
Designing an Accessible Aging-in-Place Kitchen (Troubleshooting & Fixes)
A veteran tech's guide to making a kitchen safe and functional for aging in place. Learn the fixes, costs, and when to call a pro for an accessible kitchen remodel.
Kitchen Clutter Driving You Crazy? Troubleshooting & Fixes for Bad Layouts & Storage (2024 Guide)
Tired of a cluttered, frustrating kitchen? A veteran tech explains why your layout isn't working and gives you real-world fixes for storage problems.
Kitchen Vent Hoods: Picking and Installing 'Em Right (Troubleshooting & Fixes)
A veteran tech's guide to kitchen vent hoods. If your kitchen is smoky or greasy, here's how to figure out what's wrong and how to fix it for good.
Temporary Kitchen Solutions During a Kitchen Remodel: Strategies and Setups for Homeowners to Maintain Functionality and Comfort While Their Primary Kitchen is Under Construction. Troubleshooting & Fixes
Need Professional Help?
Find top-rated kitchen remodel experts in your area