Quick Answer
Okay, so here's the quick version on fixing your brick or stone. Nine times out of ten, you're seeing cracked mortar or maybe a few crumbly bricks because water's getting in and wreaking havoc, especially with freeze-thaw cycles. For small hairline cracks or minor mortar deterioration, you can often tackle some DIY tuckpointing for under $150 in materials. However, for anything more significant like large cracks, widespread spalling, a bowing wall, or bricks that are actually falling apart, it's crucial to call a professional. Such repairs can range from a few hundred dollars for localized issues to several thousands or even tens of thousands for serious structural repairs or entire wall repointing/rebuilds.
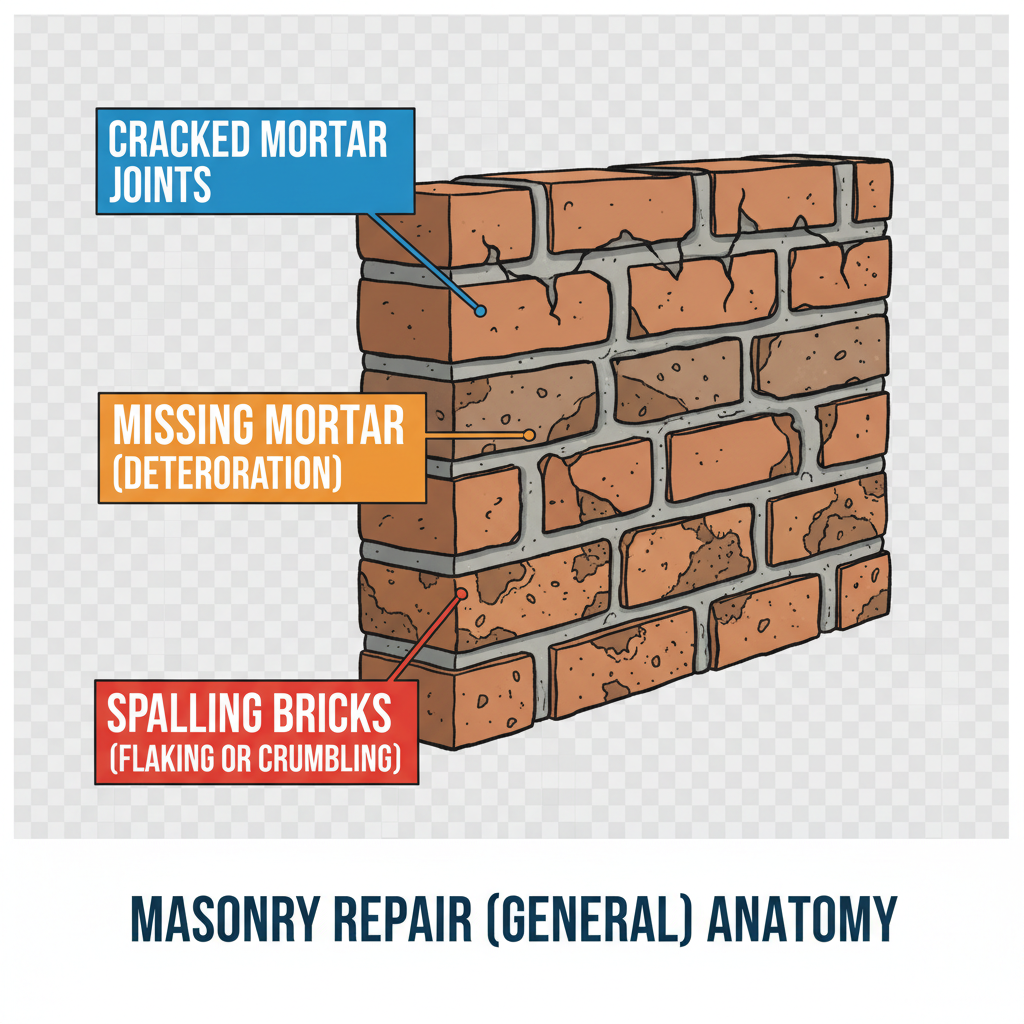
Common Symptoms
Possible Causes
Step-by-Step Diagnosis
Step 1
Visual Inspection: Carefully examine the entire masonry surface for visible cracks, spalling, missing mortar, or loose bricks. Note the location, size, and pattern of distress.
Step 2
Tap Test: Gently tap bricks with a rubber mallet or the handle of a trowel. A hollow sound can indicate a delaminated or detached brick.
Step 3
Mortar Joint Assessment: Scrape at mortar joints with a screwdriver or awl to check for softness, crumbling, or excessive powdering. Compare affected areas to seemingly sound areas.
Step 4
Water Test: On a dry day, spray a small section of wall with a hose for 15-30 minutes. Observe if water penetrates the wall or if new stains appear on interior surfaces.
Step 5
Level and Plumb Check: Use a level and plumb bob to check for any bowing, leaning, or bulging in walls.
Step 6
Foundation Inspection: Examine the foundation directly below and adjacent to compromised masonry for signs of settlement or cracking.
Step 7
Drainage Assessment: Check to ensure proper drainage away from the foundation and walls.
Step 8
Material Identification: If possible, identify the type of brick and mortar to ensure compatible repair materials.
DIY vs Professional Costs
| Repair Type | DIY Cost | Professional Cost | Time Required |
|---|---|---|---|
Minor Tuckpointing (small areas, <10 sq ft) | $50-150 | $350-750 | 4-8 hours |
Replacing 1-5 Loose/Spalled Bricks | $75-200 | $350-800 | 3-6 hours |
Major Repointing/Rebuild (entire wall/chimney) | N/A | $3,000 - $25,000+ | Days to Weeks |
Sealing/Waterproofing | $100-300 | $750 - $2,500 | 1 day |
When to Call a Professional Masonry
- When cracks are wider than 1/4 inch or you can fit a pencil inside.
- If you see any masonry walls that are bowing, bulging, or leaning.
- When you find stair-step or diagonal cracks in the brickwork, especially near foundation corners or windows.
- When more than just a handful of bricks need to be replaced.
- If you have a persistent water leak that keeps coming back, even after patching.
- When the problem is widespread across a large section of a wall or the entire house.
- If you don't own the right tools (angle grinder, diamond blade, pointing trowels) or don't feel safe working on a ladder or roof.
Prevention Tips
- Ensure proper drainage away from the foundation (maintain gutters, downspouts, and grading).
- Regularly inspect masonry for early signs of damage (cracks, missing mortar).
- Keep vegetation, especially vines and large shrubs, away from masonry walls.
- Seal new or repaired mortar joints to protect against moisture intrusion after consulting a pro.
- Use proper de-icing salts (chloride-free) on nearby pavements to prevent damage.
- Periodically clean masonry to remove dirt and algae that can hold moisture.
- Apply a breathable water repellent coating after repairs if recommended by a professional.
Frequently Asked Questions
Related Guides
Efflorescence on Brick Troubleshooting & Fixes (2024 Guide)
Got that ugly white powder on your brick? Here's a veteran mason's guide to what efflorescence is, how to get rid of it, and how to stop it for good.
Masonry Problems on Your House? (Troubleshooting & Fixes)
Seeing cracked bricks or crumbling mortar? A veteran tech shares 25+ years of experience on how to fix masonry issues and when to call a pro.
Masonry Repair (General) Troubleshooting & Fixes (2024 Guide)
Seeing cracked mortar or crumbling bricks? A 25-year vet explains the common causes of masonry fails and how to fix them before it gets expensive.
Masonry Repair for Crumbling Walls & Mortar Troubleshooting & Fixes (2024 Guide)
Seeing crumbling mortar or cracked bricks? A veteran tech of 25+ years shows you how to spot the real problem and when you can fix it yourself.
Masonry Damage: This refers to various forms of deterioration or structural compromises in building elements constructed from materials like brick, stone, or concrete blocks. This can include issues with the mortar, the individual units (bricks, stones), or the structural integrity of the masonry assembly. Troubleshooting & Fixes (2024 Guide)
Got crumbling brick or cracked mortar? A 25-year vet shows you how to spot serious masonry damage, what you can fix yourself, and when to call in a pro.
General Masonry Repair Troubleshooting & Fixes
Need Professional Help?
Find top-rated masonry experts in your area