Quick Answer
Okay, so here's the quick version. Your floor tiles are 'tenting' because they're under pressure. They're pushing against each other and have nowhere to go but up. Nine times out of ten, it's because the original installer didn't leave an expansion gap around the edges of the room. Things expand and contract with heat and moisture, you know? Your house isn't static. A small spot repair is maybe a $200-500 pro job, but if the whole floor is a mountain range, you're looking at a much bigger problem. Don't just ignore it.
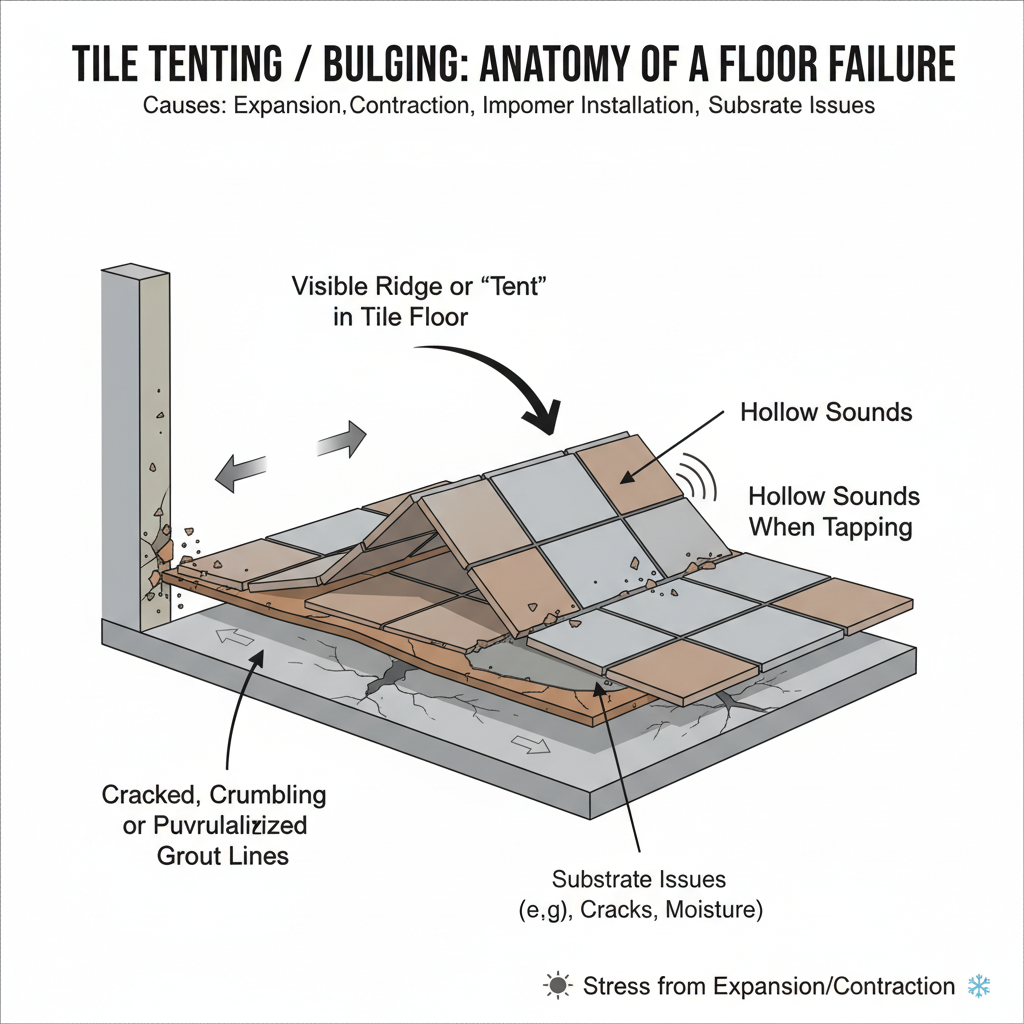
Common Symptoms
Possible Causes
Step-by-Step Diagnosis
Step 1
Visually inspect the floor for any raised areas, ridges, or tent-like bumps.
Step 2
Perform a 'tap test' by knocking on tiles with your knuckles or a rubber mallet to listen for hollow sounds, indicating a void underneath.
Step 3
Examine the perimeter of the room, looking for a flexible, caulked expansion gap between the tile and the wall/baseboards.
Step 4
Check for signs of stress, like cracked grout or tiles pushing against door casings or cabinets.
Step 5
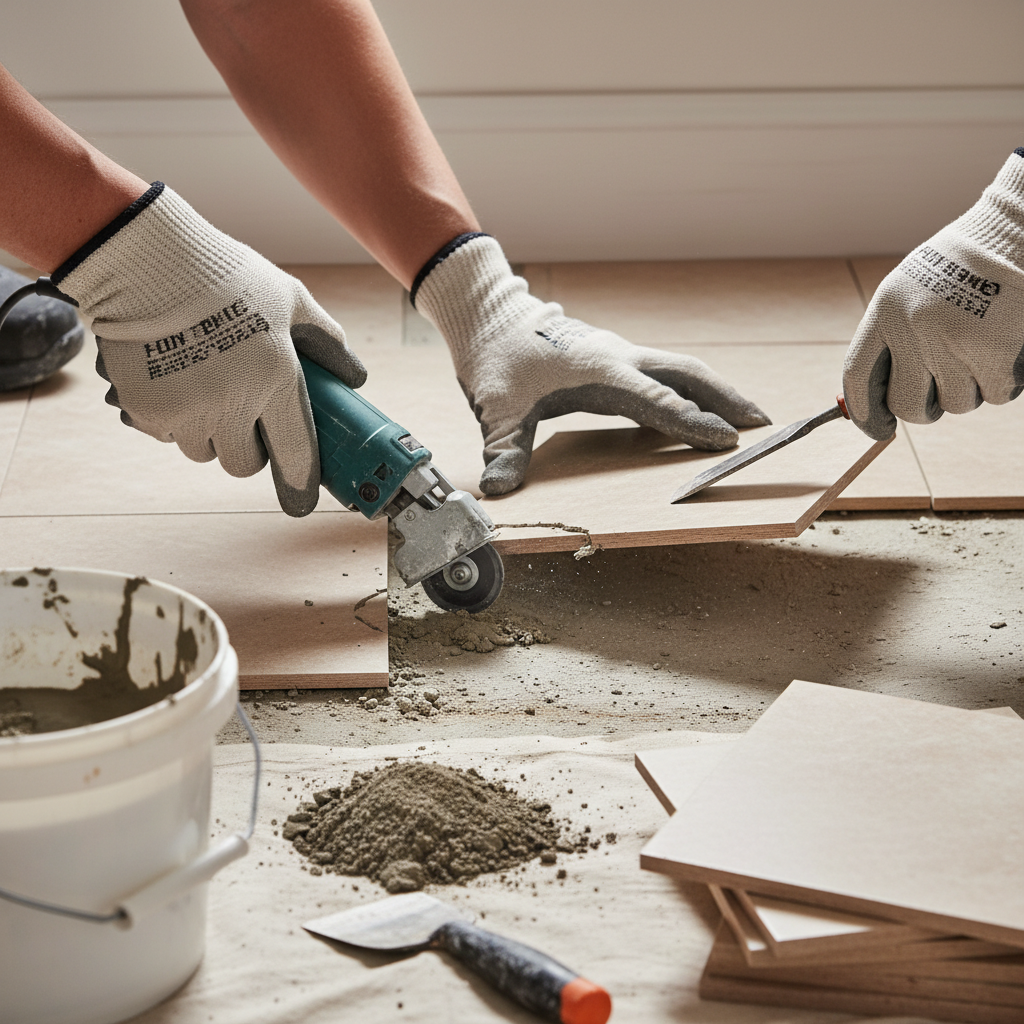
If a tile is already loose, carefully remove it to inspect the thin-set coverage on the back of the tile and on the subfloor.
Step 6
Assess the overall 'bounciness' or deflection of the floor to check for potential subfloor issues.

DIY vs Professional Costs
| Repair Type | DIY Cost | Professional Cost | Time Required |
|---|---|---|---|
Cutting Relief Joints & Caulking | $20-$40 | $250-$450 | 2-3 hours |
Replacing a Few Cracked/Loose Tiles | $50-$150 | $300-$600 | 4-6 hours |
Major Section Repair / Full Re-Tile | N/A | $1,500 - $8,000+ | 2 days - 1 week+ |
When to Call a Professional Tile
- When tenting affects a large area (more than just one or two tiles).
- If multiple tiles are cracked, as the pressure is severe.
- If the floor feels bouncy, spongy, or unstable, indicating a potential subfloor or structural issue.
- When you cannot find matching tiles for a repair and need an expert to source them or offer solutions.
- If you suspect any kind of water damage or moisture is the root cause.
- When you've read the DIY instructions and realize the dust, noise, and complexity are more than you want to handle.
Prevention Tips
- Ensure your installer leaves a 1/4-inch expansion gap around all perimeters and fixed objects.
- Fill expansion gaps with flexible, color-matched caulk, NEVER with hard grout.
- Insist on proper thin-set application with full trowel coverage, not 'spot bonding'.
- Use a high-quality thin-set mortar rated for your specific tile and subfloor type.
- Make sure the subfloor is structurally sound, flat, and free of excessive bounce or 'deflection'.
- Allow the tile installation to cure completely according to the manufacturer's directions before allowing heavy traffic or grouting.
Frequently Asked Questions
Related Guides
Tile Tenting or Bulging: Troubleshooting & Fixes (From a Guy Who's Seen It All)
Are your floor tiles popping up? A 25-year vet explains why tiles tent and bulge, how to fix small problems, and when to call a pro before it gets worse.
Hiring a Tile Guy: How to Not Get Ripped Off (Troubleshooting & Fixes)
A veteran tech's guide on hiring a great tile installer. Learn the red flags, what questions to ask, and how to avoid a disastrous, expensive tile job.
Mold in Shower Grout (Troubleshooting & Fixes)
A veteran tile tech's guide to killing mold in your shower grout for good. Learn how to identify, clean, and prevent that nasty black stuff from coming back.
Cracked Floor Tile (Troubleshooting & Fixes)
Got a cracked floor tile? Here's the no-BS guide from a 25-year tech on how to fix it yourself with epoxy or when you absolutely need to call a pro.
Cleaning Your Patio Tiles and Slabs (Troubleshooting & Fixes)
A veteran tech's guide to cleaning outdoor patio tiles. Learn how to remove moss, algae, and tough stains yourself and when it's time to call in a pro.
Tackling Old Grout Removal (Troubleshooting & Fixes)
A veteran tile tech's guide to removing old, cracked, or moldy grout. Learn the right tools, troubleshooting steps, and when to call a pro.
Need Professional Help?
Find top-rated tile experts in your area